Category: Tutorials

Hybrid How-To | Making Flair Buttons

Hi, everyone! It’s Kate here, and I’m so stoked to present another edition of our Hybrid How-To series here on The Digital Press blog! Today, I’ll be sharing my process for making hybrid flair — a quick and easy trick I’ve been using for a long time now.

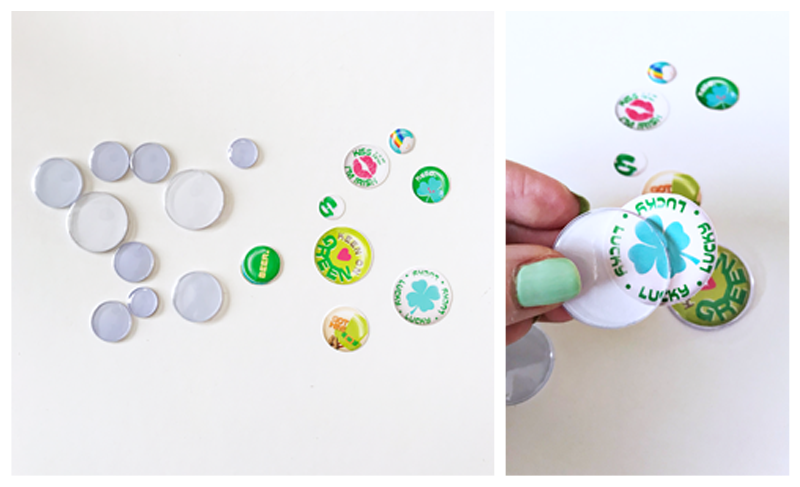
I love digital flair so much, but it doesn’t always transfer very well to the hybrid world. A couple of years ago, I started using googly eyes to give the printed digital flair some dimension and I LOVED the result. The best part of hybrid flair? You can make it any size you want (because googly eyes come in every size imaginable!)… and additionally, they’re flatter than real flair buttons, which makes it much easier to store your pages.

Supplies Needed:

  • Digital flair images of your choice (I used Get Lucky by creashens)
  • Photo editing software, like Photoshop (PS) or Photoshop Elements (PSE). Cutting machine software also works for this project; you just need to be able to re-size.
  • Photo paper or cardstock; photo paper makes it more vibrant.
  • Googly eyes
  • Straight blade or X-ACTO knife.
  • Scissors or cutting machine

Instructions:

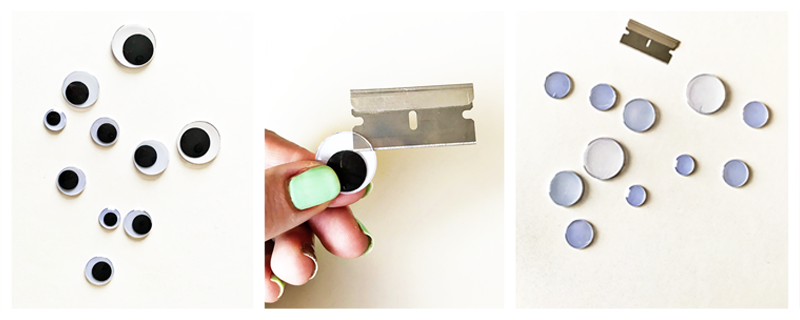
1. The first step is to cut a slit along the edge of the googly eyes. I used the corner of a straight blade to punch through where the clear plastic meets the backing. Then I held the blade still while moving the eye around it in a circle, until I had cut about half-way around the plastic. Basically, you just need a slit big enough to pop the black part out and pop the printed flair in…

2. Next, measure the googly eyes and size your flair in your photo-editing software program accordingly. Then, print and cut your flair.

3. Now, just pop the flair into the plastic. You can secure the slit with a little bit of hot glue if you want to. I used to do this, but I’ve found over the years that it’s not really necessary because there’s always a little lip all the way around that holds the paper in place.

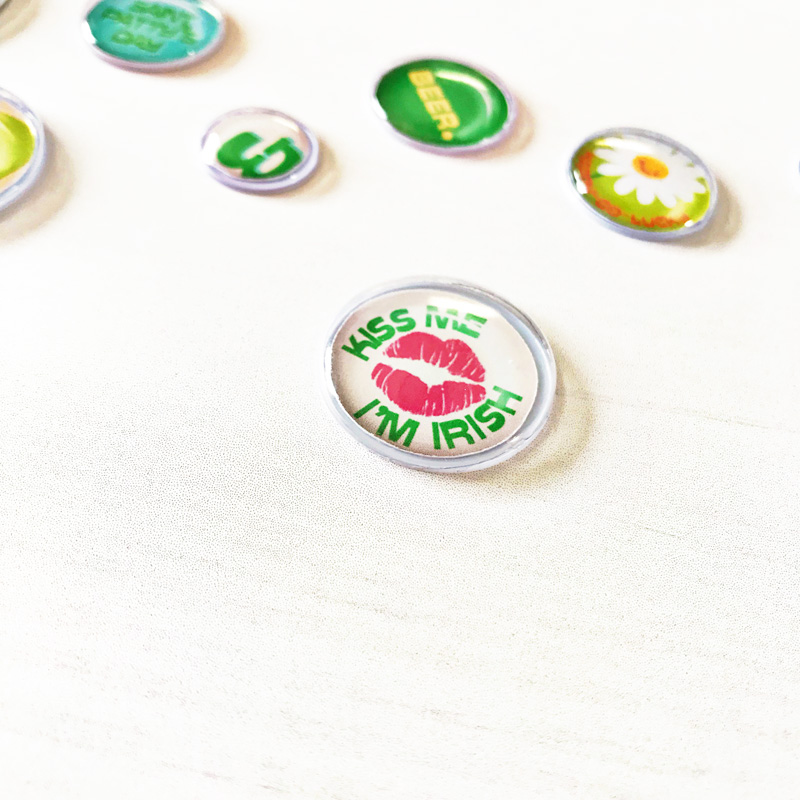
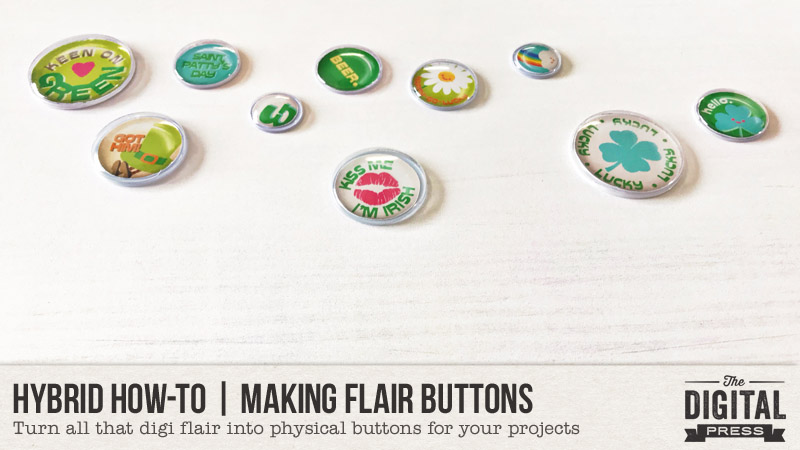
Here’s a close-up look at my finished “googly-eye” flair buttons…

Easy-peasy hybrid flair with dimension!

And to think that my kids think I keep googly eyes around for their projects. Psh. No. I keep them around for my projects. 🙂

I hope you’ll give this project a try! And please share your projects with me — I’d love to see what you make with your new flair. If you’re participating in The Digital Press’s challenge system for March 2018, don’t forget to visit the CROSSWORD SECTION in TDP’s forum to get the details about this month’s Hybrid Challenge — because you can earn challenge points if you give this project a try (you can earn points toward discounts & FREEBIES)!


Kate About the Author  Kate is on the hybrid team here at The Digital Press. She lives on the Utah/Colorado border with her husband, 5 kids, 10 chickens, and a dog named Gracie. She’s a city-born girl who found she’s really a country girl at heart. She can be found outside, barefoot, and probably in her garden.

Tutorial Tuesday | Digital Mini Albums (Part 1)


If you have ever looked at the beautiful mini-albums that our hybrid creative team members make for gifts or holidays, and thought, “I want to do that!” …but then your brain kicks in and reminds you that you live in a teeny, tiny apartment with 5 other people and not enough room for a dining room table (No? That’s just me then? OK, well)…

…I would like to propose a solution: a fully digital mini album! It’s perfect for those of us who love the idea of creating a cute little mini-album, but who are lacking in space, tools, supplies, or even simply the “courage to tackle hybrid or paper scrapping”!

If you search for “mini album” here on The Digital Press blog, you will be rewarded with a bunch of articles that are all full of fantastic ideas and inspiration. Here are just a few examples of the gorgeous mini-albums I found…
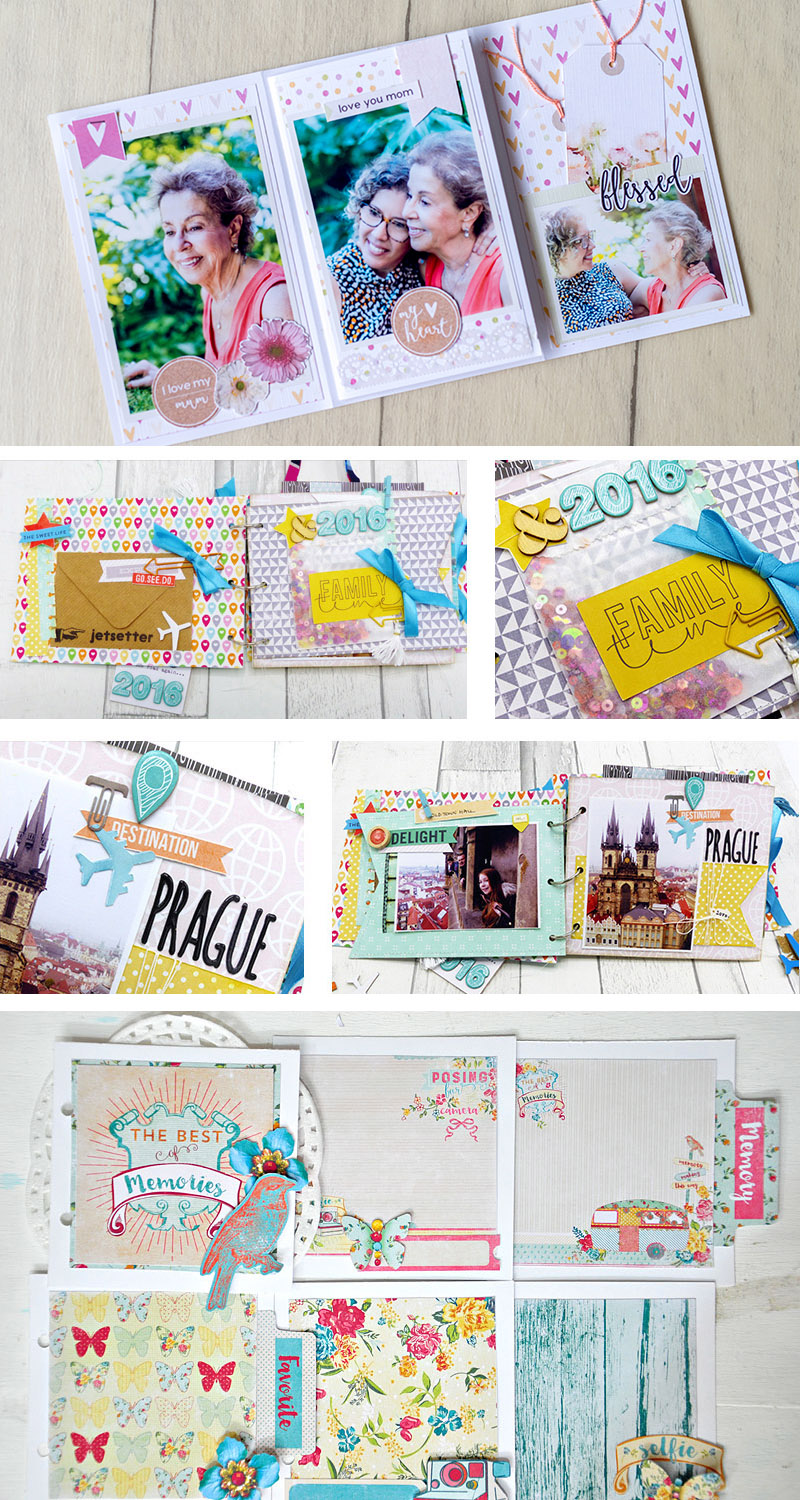
Mini-albums are handy for all sorts of things:

  • Creating a separate album for a family vacation
  • Creating a special gift for someone
  • Documenting a special holiday
  • Documenting a specific family tradition
  • Capturing a sports season or extra-curricular event
  • Documenting major life events such as adoption, graduation, birthday, wedding, birth, or death

You could create a mini album for just about anything you want to… but they are especially helpful when you want to highlight a certain event, or create a gift using your crazy awesome scrapbooking skills. 🙂

Technically, you could simply throw together a bunch of pages and call it a mini-album… but if you look at most of the examples in the link I posted, above, you’ll likely notice that mini-albums usually have a consistent flow. That sort of cohesion does not just come together on its own… but instead, it takes a little bit of thought and planning.

After thinking about my own album creation process, I broke it down into the following steps:

  1. Planning
  2. Organizing
  3. Filling & Finishing
  4. Printing

These are not hard and fast rules, mind you… but I have found that they help me to get through the process quicker and end up with a final product that I love!

Over the course of several tutorial posts here on the blog throughout the coming weeks, I will walk you through each of the above steps for creating a digital mini-album. Today, we are looking specifically at the first step — planning.


Step 1: Planning

I have found planning to be the most important step in the process of creating a mini-album. It sets the stage for everything that comes later, gives you a definite direction, and makes the actual production of the album go like clockwork. For me, this is key to actually completing the project — something which, I admit, I often struggle with otherwise.

Planning allows you to decide ahead of time what you want the finished album to look like, and ensure that there is consistency and cohesion throughout the pages.  I encourage you to pull out some paper, or make a document on your phone or computer, to jot down your planning notes.  That way you can look back at it later, or make adjustments if needed.

CHOOSE YOUR SUBJECT

Decide what your album is going to feature before you even start.

Back in the days when I paper scrapped on a regular basis, I always made mini-albums of our vacations. This was mostly because the kids (including the kid in me) loved to look back on those short moments in time that seemed so perfect. Other times I have made special “I LOVE YOU” books for a relative, or special teacher. And when we adopted our middle child I made a special album just for her that walked through the entire process.  She loves it and thumbs through it regularly.

Your subject matter can be anything you like. For myself, and for the purposes of this blog series, though… I am going to be making a very specific kind of mini-album. Last fall, my youngest sister lost her baby girl in a still birth. It was heart-wrenching and difficult, but she very much wanted to take pictures and remember everything she could about her little angel. So one sister took pictures, and over the last few months my youngest sister has curated the ones she wants and asked me to make them into a book: a mini-album that celebrates the short life of her youngest daughter. How could I say no?

CHOOSE A SIZE/ORIENTATION FOR YOUR ALBUM

Depending on your chosen topic, decide which type of album would be best.

You can print your pages at home, at a local print shop, or have them printed as a complete book using an online print service. There really are a multitude of choices here. One thing to note, though… a mini-album is just that — mini (in size) — so it should be smaller in size than a “Year in the Life”-type book, etc. (both in dimension, and in number of pages).

Things to consider when choosing your album size and style:

  1. How do you plan on printing it? If using a print shop, or online book print service, what are the requirements?
  2. What size restrictions do you have? For instance, do you have the ability to print “9 inches wide” (etc.)?
  3. What is the orientation of most of your photos? Are they mixed, or are they primarily landscape/portrait?
  4. Do you have a lot of journaling to include? The smaller the page size, the more difficult it may be to read lengthy journaling.
  5. Will you use digital templates to help you achieve a layout style you like?
  6. If this is a gift album, what are the storage capabilities of the recipient? (i.e. do they have room to store your gift?)
  7. What do you LIKE?

In my mind, templates are one of the biggest benefits to doing a digital album, and The Digital Press offers a wide variety of templates from which to choose. Templates that are geared specifically to album-making can be found HERE.

Here are just a few examples of album-based template packs that I have enjoyed working with in the past…
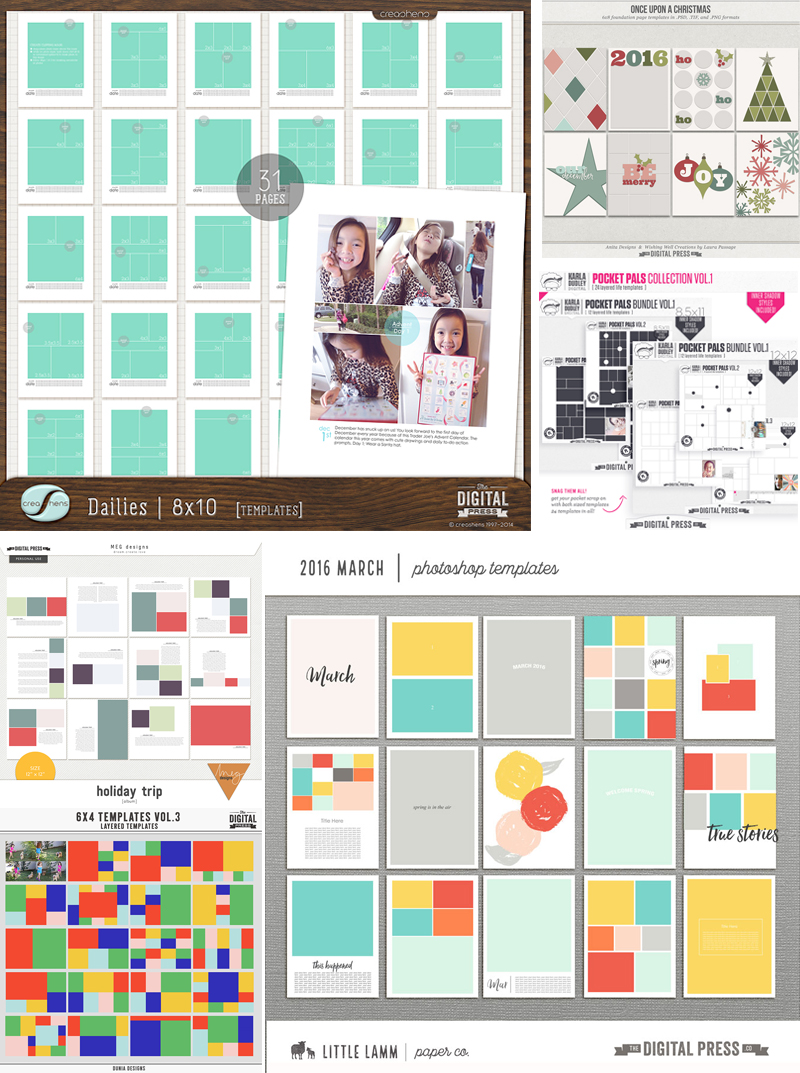
Working with an album template pack is especially helpful in constructing a mini-album because these template bundles usually contain a variety of templates in a similar style… and thus, they already work well together.

The use of templates does not have to completely dictate your page size, however. If you look on the blog HERE you can read a number of articles containing tips for transforming your templates to fit into different-sized pages.

For myself… I plan to print my pages separately at a local print shop and then put them in a SNAP album using plastic pocket pages. This will allow my sister to add additional items to the album as she sees fit. To do this, my pages will need to be sized at 6″ x 8″. I decided to use The Great Escape by Anita Designs to give my album pages some consistency — and also to allow me to quickly pull the pages together…
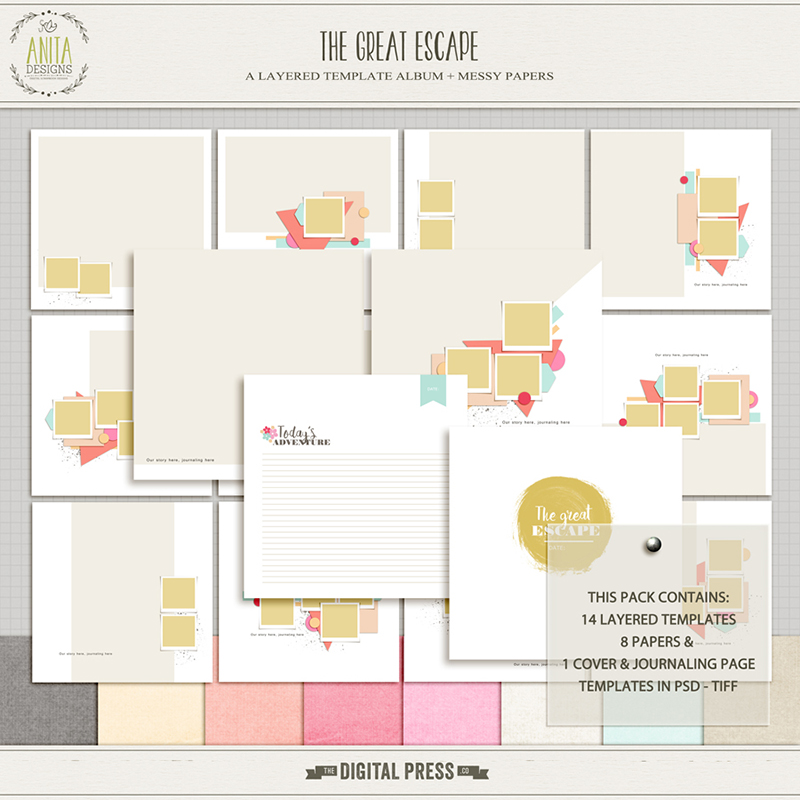
This set offers a lot of variety… from full photo pages, to full-page journaling spots. I will, however, need to re-format them a bit to work in the binder I chose for the printed album. I will show you how I did that in PART 2 of this tutorial series (the ORGANIZE portion of the series)!

DEFINE YOUR COLOR SCHEME

Color plays a huge role in our lives. It is a well-documented fact that certain colors are linked to specific emotions. While this is somewhat cultural, there are several universal connections as well. For instance, bright colorful patterns are usually connected to playfulness and energy, while blues and greys tend to have a more calming effect.

If you are unsure what color scheme works for you, you can always browse Pinterest or do a Google search to get ideas (for instance, you could search “Winter Colors” or “Ski Vacation Colors” to get ideas for a ski trip mini-album). The Digital Press blog also has some fun information about color, if you want to learn more.

Things to consider when choosing colors:

  1. What is my subject matter? An album about a trip to the beach will look nice with tropical colors (whereas an album about a funeral… not so much).
  2. Do my photos “need” a certain color? For instance, a mini-album documenting a sports team will need to use that team’s colors.
  3. What colors are in my photos? Or will I potentially use black and white photos?
  4. What emotion/feeling am I trying to convey?
  5. Do these colors look nice together? We don’t want clashing pages in an album.
  6. Is there a certain digital kit you really want to use? What color scheme does it employ?

For my album, I need a little bit of flexibility. My sister requested some girly colors, and the first part of the album will have some happy pregnancy photos… so a more upbeat feel to those pages will be great. But I also want to be able to create a more subdued & calm feel to the end of the book (not dark and brooding, even though the subject matter is sad… but rather, somber and thoughtful).

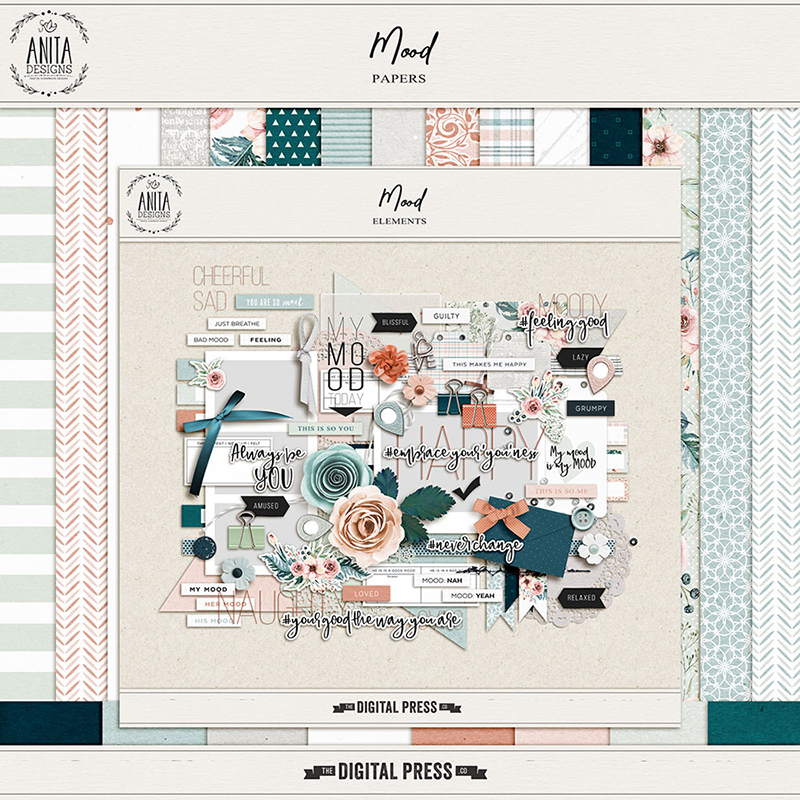
I realized that Anita’s template pack (the one I linked, above) came with some great colored solid papers, and I thought those colors would work pretty well for what I wanted to do. They play nicely together, but also offer the flexibility I need. Using those colors, I searched through the store and found this additional kit, Mood, also by Anita… which uses similar colors and some word art that will work well for this subject. I can use my color scheme to recolor items that need it, and I can always add more paper/elements from other kits if I decide there is something missing.
DETERMINE SPECIFIC ELEMENTS NEEDED

Thinking about the theme of your album… try to decide if there are specific elements you NEED or WANT to use. This does not mean that you have to plan out every embellishment you will use, but just that you decide on some thematic elements that you can use to connect your pages to the event you are documenting.

For example, if you are documenting a Disney Trip — you would want to include some Disney-inspired elements. Or perhaps you’d use some flip flop stickers and a birthday cake for a pool party-themed mini-album. Planning these things out, ahead of the actual construction of the book, will allow you to be proactive and have all your supplies handy when it is time to create.

You can also go ahead and decide which generic element types you might use. For instance, because my book centers around a baby girl — I will be including lots of flowers, ribbons, and buttons. All generic, but easily associated with baby girls. Notice that the kit I chose to work with, above, already has a lot of these types of elements. I can find additional elements, as well, if needed — but these will be my base for my album.

ASSESS ADDITIONAL PLANNING NEEDS

Feel free to brainstorm other areas that might need fleshing out a bit as well. I realized that my sister might want to add things… like cards she received, or her own handwritten thoughts, or even drawings from her older children. I decided to include a few “blank” pages for these types of additions.


As you can see, it really does not hurt to spend some time planning out your project — as it will actually save you time, later, when you begin working.

The areas listed above are the things I like to plan-out prior to building my mini-albums. Having concrete plans on these topics help me to have a strong idea of where I am going with my project… and those plans also allow me to concentrate more on the creation of the album when that time comes.

Now that we have begin to get everything all planned out… we are well on our way to creating our digital mini-album this spring! Keep a look out for PART 2 of this series — coming here to the blog really soon!


ErinErin is an artsy crafty kind of girl who is currently dabbling in far too many things, but is working hard to enjoy every moment of it, while avoiding the rain, which is difficult due to living in the land of many rains. She is slowly learning to use her smart phone to capture all the fun little bits of life that would otherwise go unremembered in the busy craziness that is raising a family!


Tutorial Tuesday | Get Yourself Into Your Photos

Hello everyone, and welcome to another edition of our Tutorial Tuesday series here on The Digital Press blog. Today we are going to talk about getting in our own photos!!  I know I know, most of us say there are a plethora of reasons NOT to get into the photo…. we haven’t fixed our hair, we don’t have on makeup, we think we have cellulite, we don’t like that outfit, etc., etc., etc., But I’m here to implore you to GET IN YOUR PHOTOS!  One day, when we aren’t around anymore, our families will beg for pictures of us.  They won’t care what we looked like I promise.  Those vacations that we take??  Is there much proof that we  went??  I swear my kids wouldn’t even know I existed when they look at some of my earlier photos.  I was too worried about my appearance after having 3 kids within 5 years, so I never allowed my family to take my photo.  Now I would love to have one of me holding a baby or being a part of the fun!  So, I’m hoping to not only encourage you to get in your pictures but tell you how to do it as well!!  Maybe if you find it easy to TAKE the photo, you will have the courage to be IN the photo 😊

So how do you take that photo?  Well, let’s start with the basics – how the actual procedure works!

Stabilize the Camera

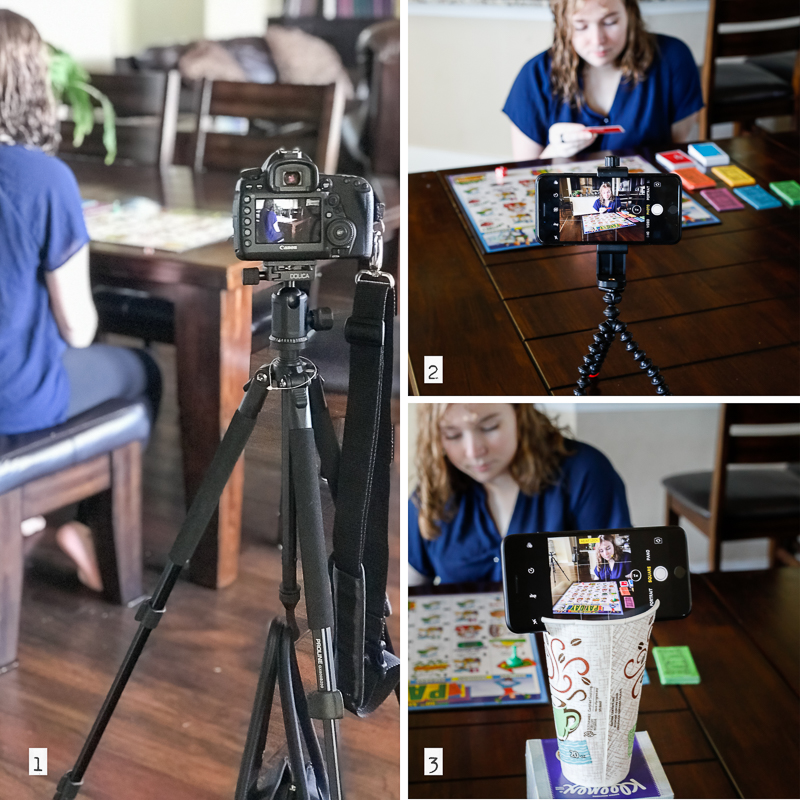
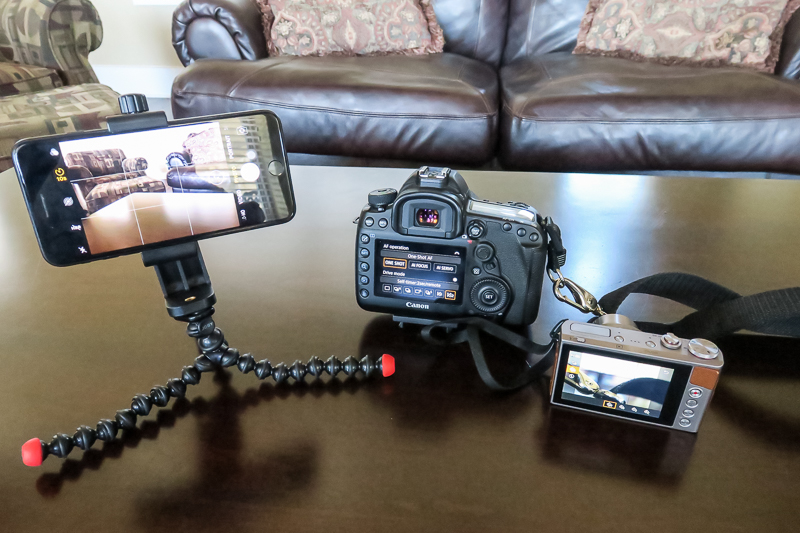
First, you’ll need your camera or phone to stay still while you are taking the photo – no jiggling allowed!  You can use a tripod or a solid, steady surface to prop them on. I’ve been known to place my camera or phone on tables, on books, between jars, and even wedged between rocks.  If you are using a tripod though, make sure it’s sturdy enough to support your camera.  Often, they will have a hook in the center, so you can hang something heavy on it.  I use my purse since it’s heavy enough it helps stabilize the camera.  I don’t want the dog to accidentally knock it over!  Below are some examples of how I have set up my camera and phone. In the first picture, notice my purse.  In the second one I’m using my phone which has a dedicated tripod.  It’s magnetic and flexible and is so easy to use it stays with me at all times!  Now if you don’t have a phone tripod, it’s easy to make one from a sturdy cup.  Google “DIY Phone Tripods” for even more options.

Focus

Next, you’ll need to set the focus.  If you are taking a photo of just yourself, you can use a child / toy / large inanimate object and place them where you want the focus to be.  Or, if you are taking photos with other people also in the frame, you can use them to set the focus.  With DSLRs and point-and-shoots, you need to press your camera’s shutter button half way for autofocus.  If you would rather use manual focus, feel free to do that instead. If you are using your phone, press and hold the screen where you want the focus to be until it locks in.  The main point is that you set your focus before taking the photo. If you’ll look in photo #3 above, you can see that I locked the focus on my daughter’s face.

And a quick tip, if you are using a DSLR and are viewing the scene with your viewfinder (not in Live View), after you set your focus don’t forget to put your eyecover over the viewfinder so that light isn’t leaked in when you take your eye away.  This will help you to avoid unwanted darkening of the photo.  And if you can’t find your eyecover, you can use gaffers tape – just make sure you take it off as long term use can leave a sticky residue.

Taking the Photo

Now decide HOW you are going to take the photo.  You have several options and you don’t have to spend a lot of money to use them.  There are numerous choices such as self-timers, remotes, interval timers, and timer remotes!  For instance, most cameras and cell phones have self-timers. You just decide how many seconds of delay you want to give yourself, press the button, and move quickly into the photo.  I choose the greatest amount of time available (10 seconds on my phone) so I have time to settle before the shutter releases. Below you can see some examples of what the self-timer looks like on a phone and some different Canon cameras.  Check your manuals to see where your self-timer is!

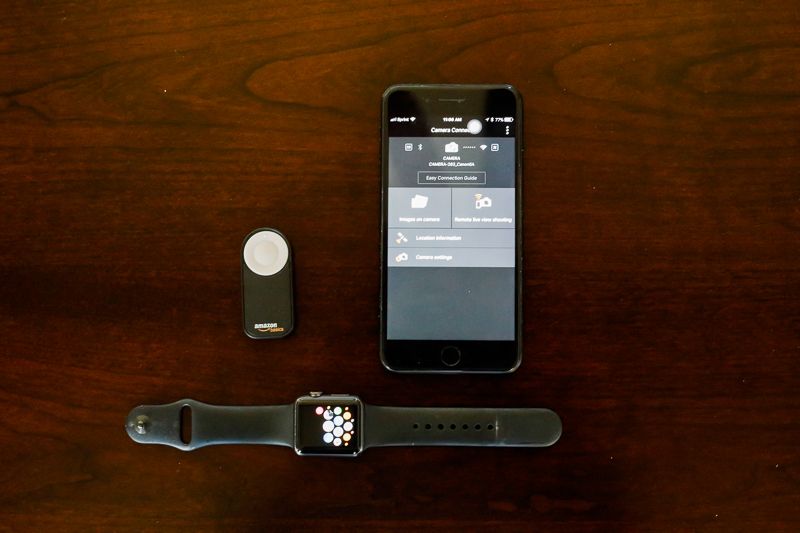
If you don’t like the “run quickly without tripping” scenario, you can use a remote.  Remotes are quite inexpensive and can be purchased for most DSLRs.  Just Google “(insert your camera here) Remote”, and you can find them at most camera shops and Amazon!  They are easy to use since you can position yourself accordingly and then surreptitiously press the remote to activate your camera.  No frantically getting into place 😊  If you use this method, try to set your camera on the 2 second delay so you have a chance to hide that remote.  If you don’t have that option, position your hand so it’s not in the photo.  Don’t forget, many DSLRs have the capability of using a phone app as a remote tool!  I use my Cannon Connect App with mine.  I set my camera to take the photo after a 2 second delay, then I get into position and use my phone to trigger the camera just as I use my hand held remote.  The disadvantage to this is much like the remote, you have to hide it, but since my app lets me set the focus remotely, it’s worth it!  Also, if you happen to have an Apple Watch, it too acts as a remote for your iPhone camera. There are so many ways to remotely trigger your camera and below are some few examples.  You can see a basic remote from Amazon, my Canon Connect app, and my Apple Watch.

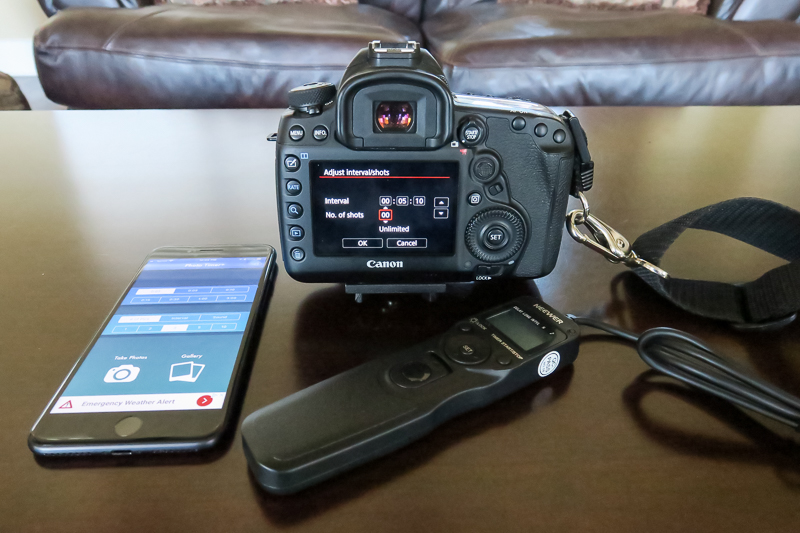
You don’t have to use a remote though.  Another way to take the photo is to use your camera’s interval timer mode.  You’ll need to check your manual on how to set it up, but if you have this option, USE IT!  It’s by far the easiest way to take multiple pictures at a set interval so you have plenty of opportunity to get the photo you are looking for.  It’s not just for DSLRs either.  If you are using your phone, there are a multitude of apps that do this as well! For my iPhone, I use Photo Timer+.  It’s free and easy to use.  I usually select 5 or 10 photos with a 3 second delay between them, and I turn the countdown sound on if we are posing.  This is one of many, so just do a search for interval timer apps for the phone. And for you Android users? Check your phones since many have interval timers built right in.  Additionally, you can purchase an interval timer remote if your camera doesn’t already have one.  Amazon has them relatively inexpensively and they are easy to set up and use.  In general, I have to say this is my preferred method.  I love interval timers because I can set the camera to do its thing and then just be in the moment with my family. On Christmas mornings, birthday parties, reunions, etc., I turn my interval timer on to take unlimited photos every few minutes.  Then I place my camera into a corner on a tripod and walk away.  Not every photo turns out wonderful as you can imagine, but I get enough good ones that I’m happy.  Below is the app on my phone, my DSLR camera set up, and a interval timer remote too.

We’ve talked a lot about different ways to have your phone or camera do the work, but don’t forget the simplest method of all, allowing someone else to take your photo.  This can include your kids too.  It’s quite fun handing your phone or camera to them and seeing their joy when they are photographing you!

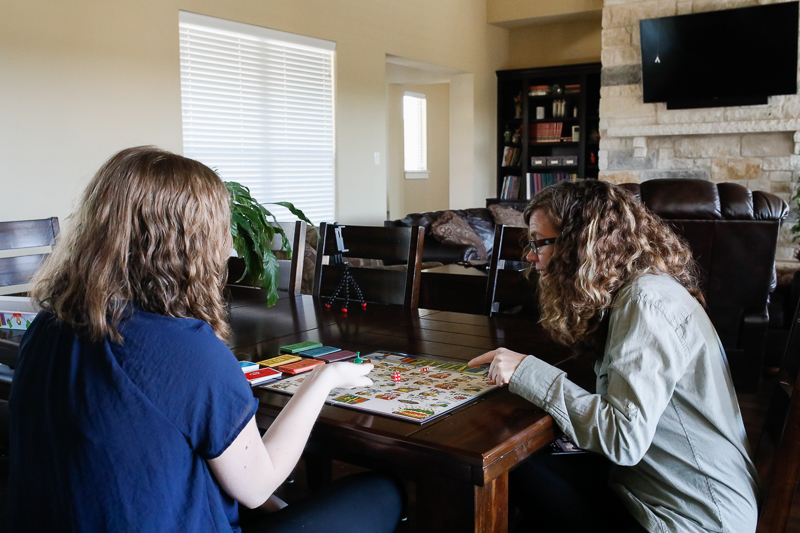
And just to show you that it can be done, here are two photos that I set up with the intention of being in them myself.  It’s hard but my kids will thank me some day!

See how easy this is?  Yes, not every photo will be to your liking, but the point is YOU ARE IN THEM!  Truly, that’s what matters most.  I promise you that YOU are the most critical person, not your friends and family.  So, do yourself and your family a favor, and jump in those photos – messy hair and all. 😊


Robin

About the author  Robin is a member of the creative team here at The Digital Press. A wife of 25 years and a mom of 4 crazy children (3 in college and 1 still at home), she says that her life occurs mostly in the car as she transports said crazy kids to their many, many homeschool activities. When not driving, Robin loves to make her family cringe by pulling out her camera again (and again, and again…).

Hybrid How-To | Easter Treats

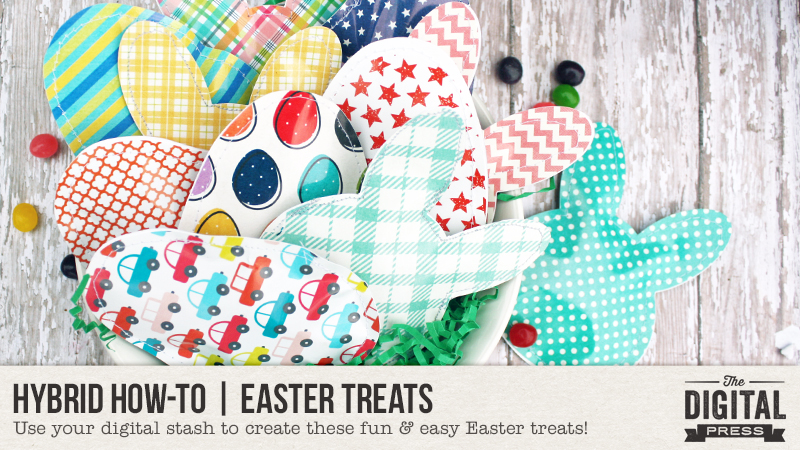
Hello everyone! It’s Tanya here, and I’m excited to share another edition of Hybrid How-To with you here on The Digital Press blog! With Easter just around the corner, I thought I’d show you how to use your digital papers and or elements to create some really fun Easter treats.

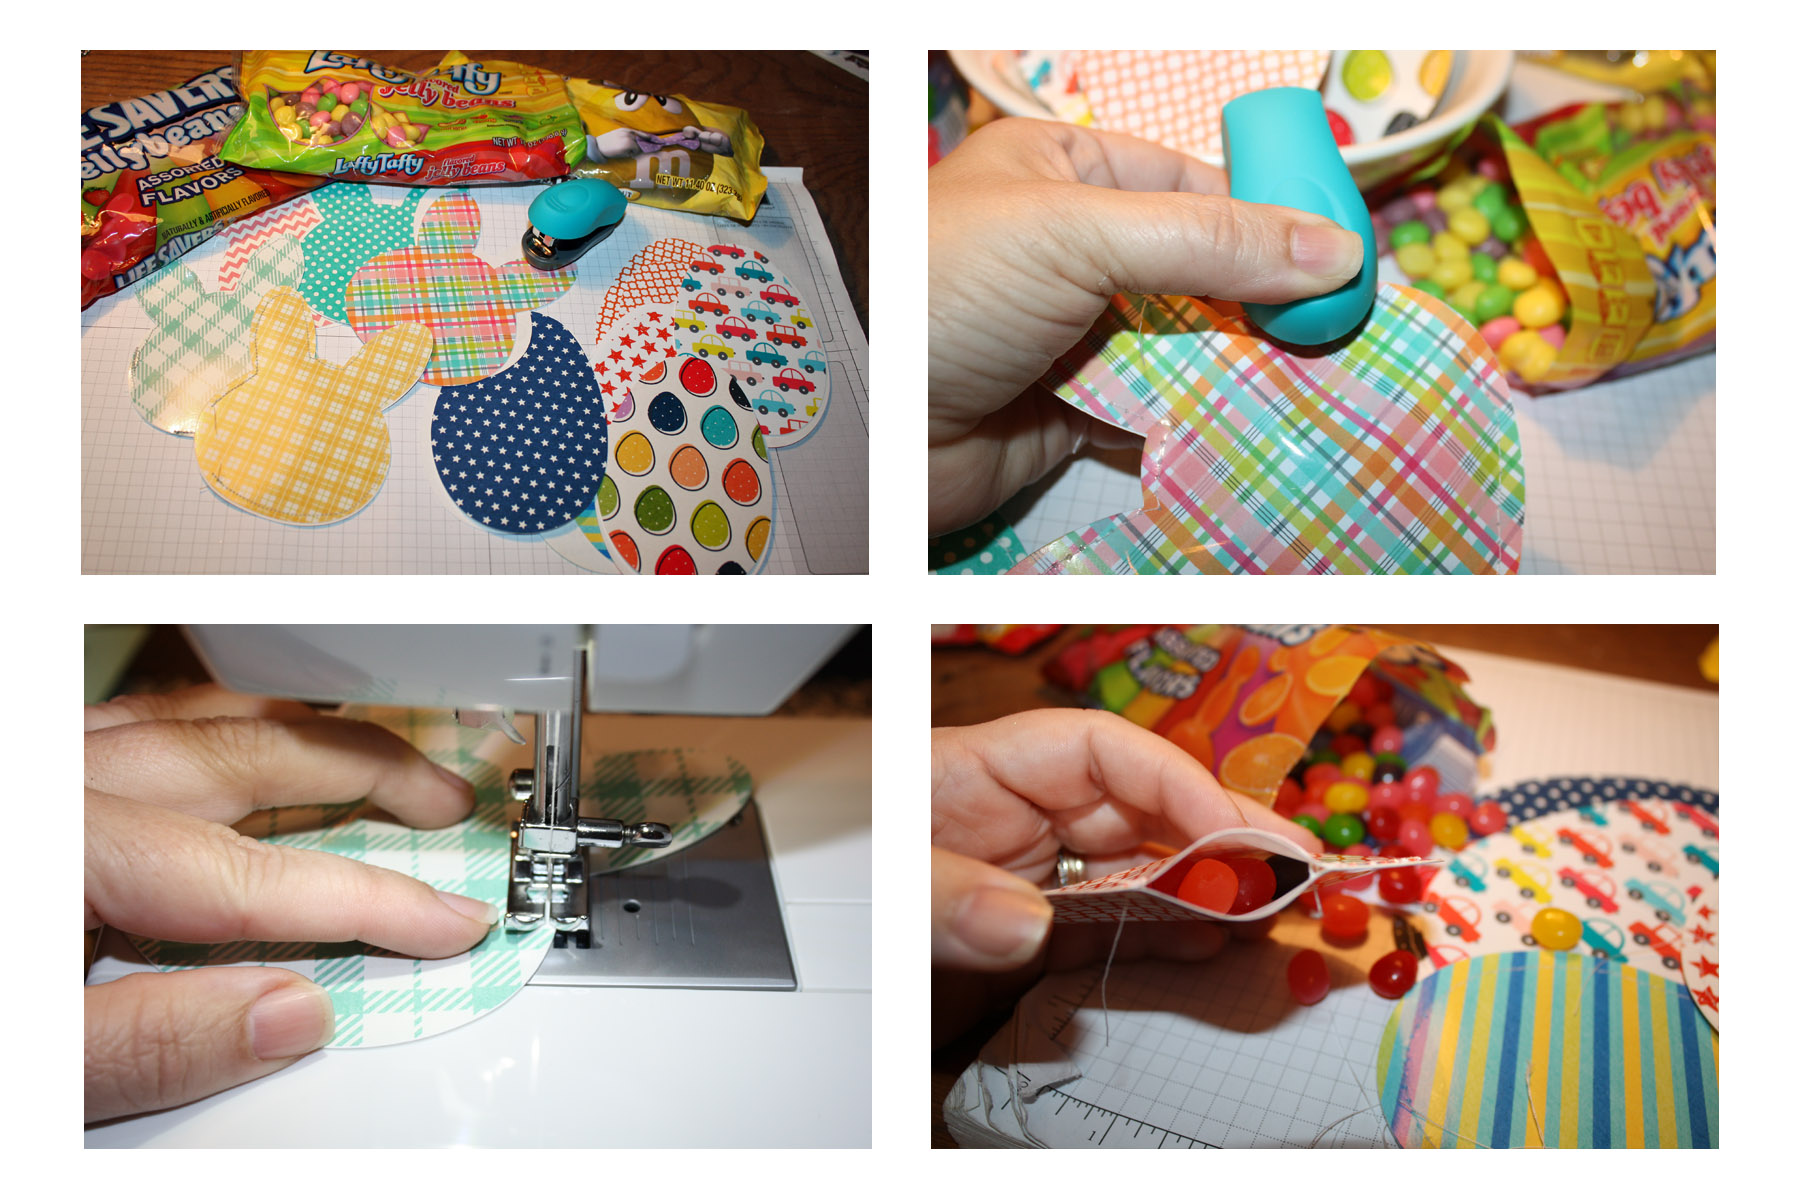
This is a great project because you can truly use just about any of your favorite digital products to create these treats. I used soft papers for the girls’ Easter bunny and brighter colors for the boys’ Easter egg.

SUPPLIES NEEDED:

  1. Your favorite digital scrapbooking products
  2. White photo paper
  3. Printer (or, you can also have it printed at any copy shop)
  4. Jelly beans, M&M’s, or any other small candies
  5. Scissors
  6. Stapler or sewing machine

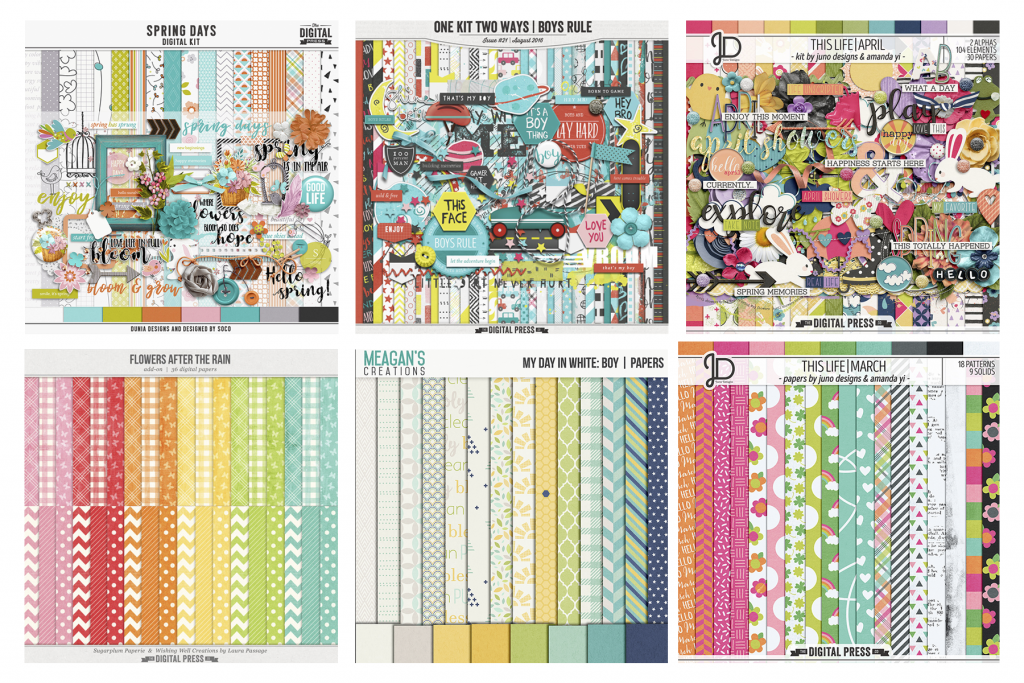
Here is a quick look at the kits I used for my treats…

[ (1) Spring Days (2) One Kit Two Ways | Boys Rule (3) This Life | April (4) Flowers After The Rain (5) My Day In White | Boy (6) This Life|March ]

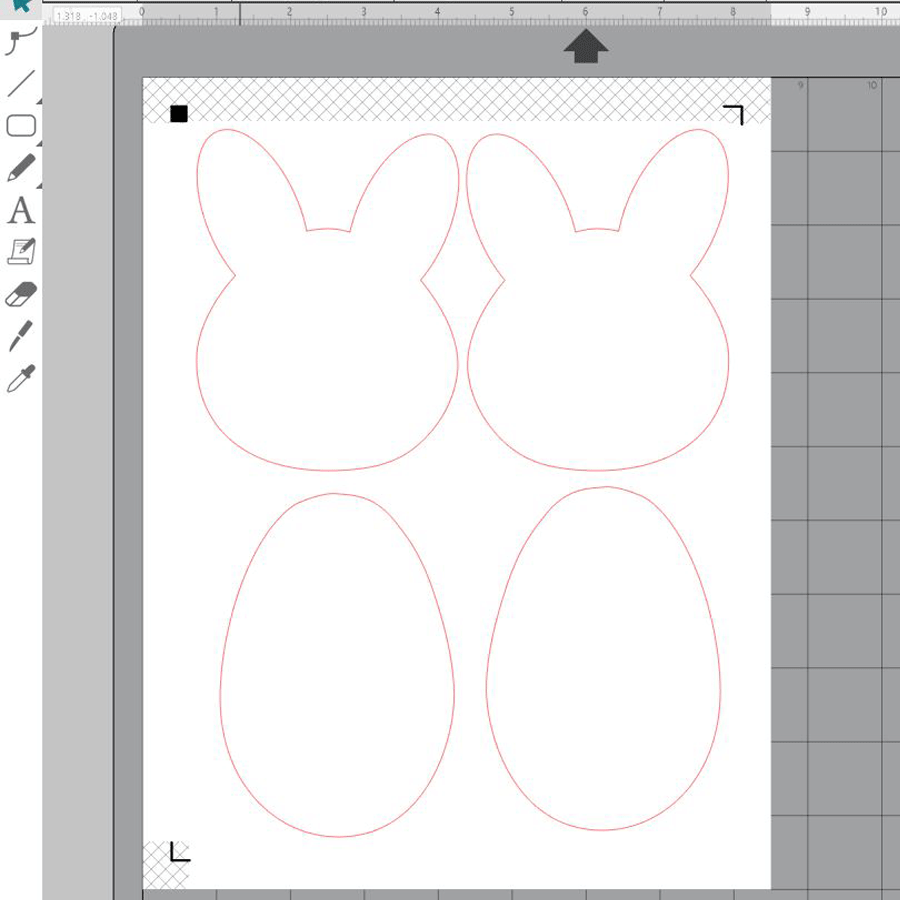
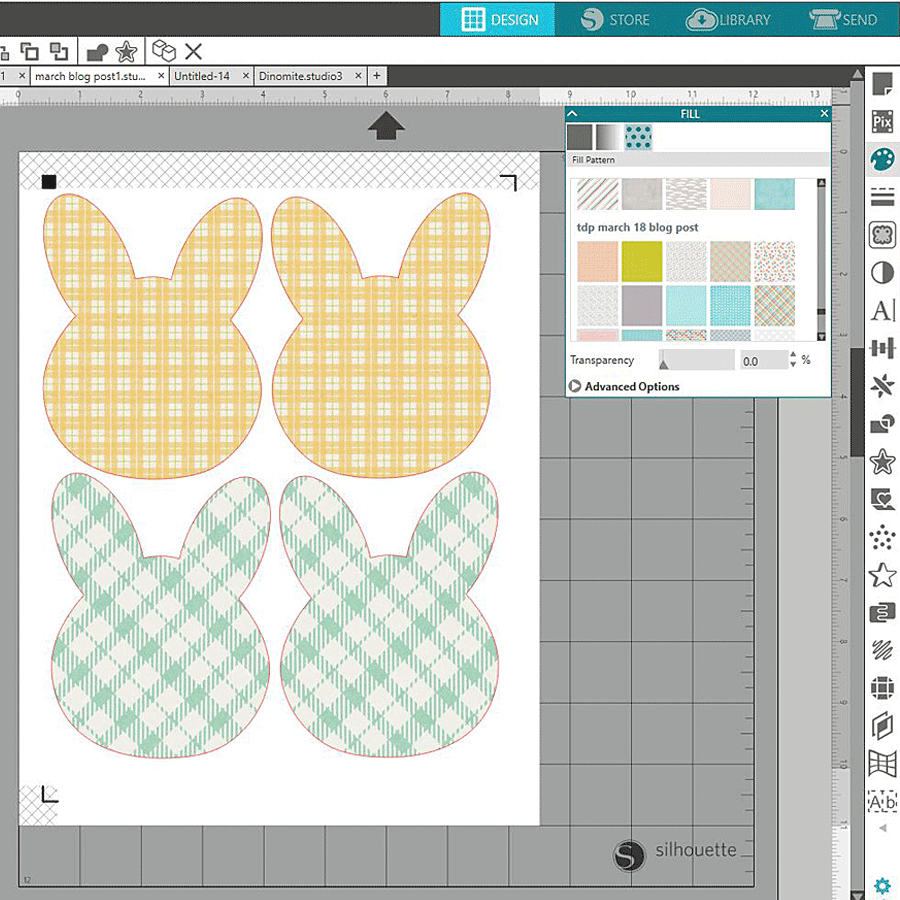
For this project, I used my Silhouette Studio Business Edition software. You can use any photo editing software, however. The first step is to draw out your Easter bunny head and your Easter Egg. To do this I used the draw tools to the right of the work space. You can also find similar patterns by googling “outline Easter egg shape” or “outline Easter bunny head”…

Open the paint palette on the right side of the page, and then choose the little box with the polka dots to open your patterned papers. To fill the pattern, click on the bunny or egg image and then click on the paper you want…

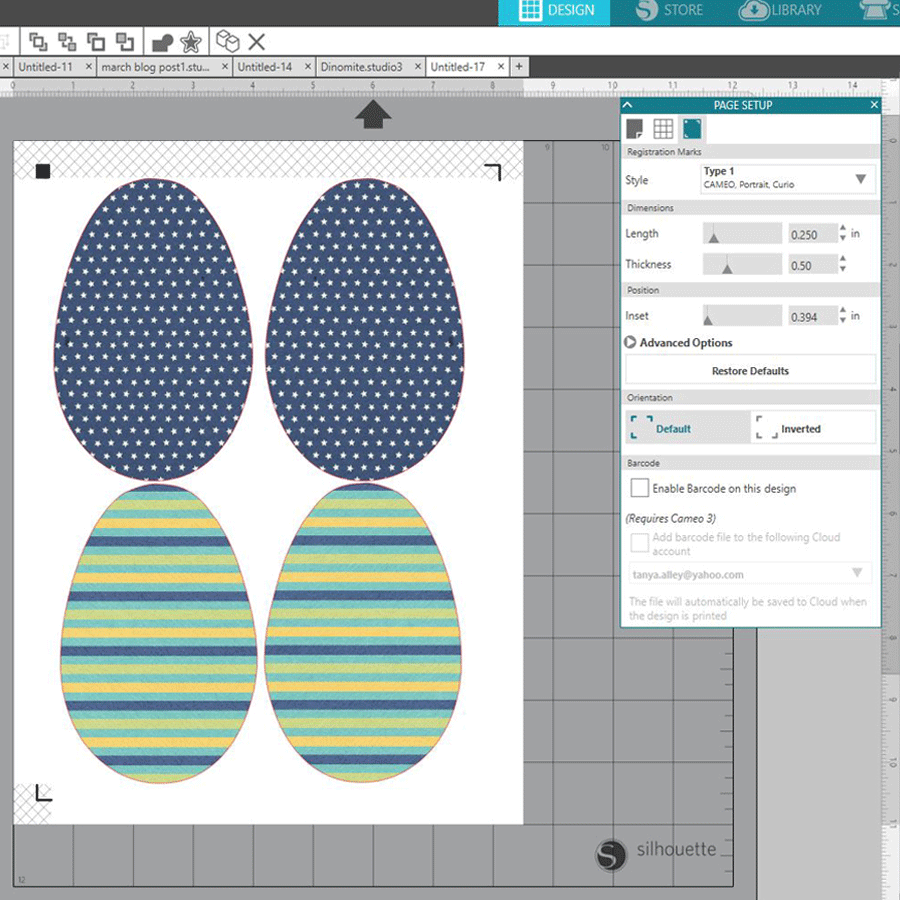
Page Setup  —  I usually do this step first thing; it’s just habit now. But if you haven’t already turned on your registration marks (if you are choosing to cut with your Silhouette machine), you will need to do that now. Open the Page Setup menu and choose the third icon (see screenshot, below). Next, choose the machine you are using and then slide the Inset all the way to the left. This gives you the most work space for cutting as possible…

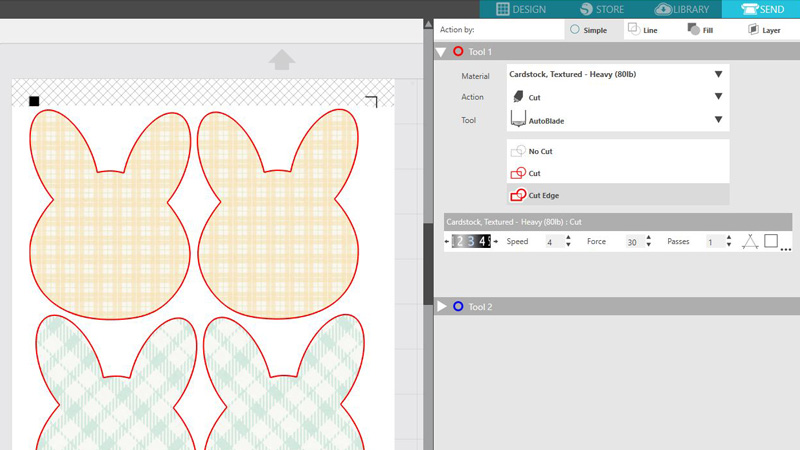
If you choose to send the pages through your printer, you will want to make sure that your cut lines are turned on. To do this go into the SEND menu, and if it doesn’t show up with red cut lines on, you will need to highlight everything and choose the cut edge option (this will turn on the cut lines)….

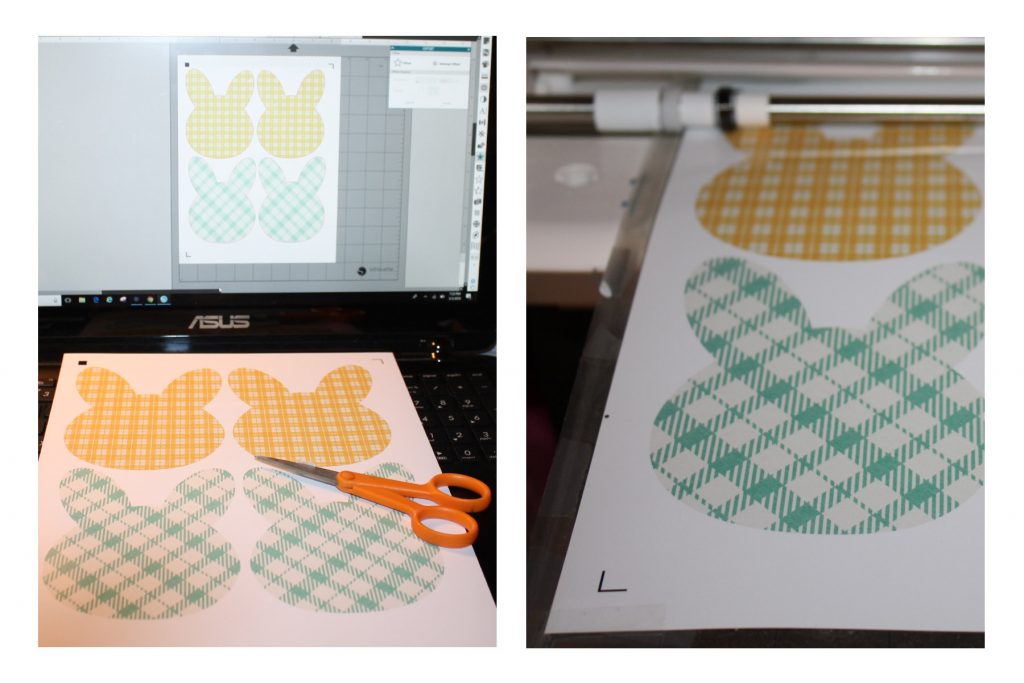
You are now ready to move on to the next step, which is to print it out. Once you print it, you can either use a pair of scissors and hand cut it… or… use your cutting machine to cut them out. Honestly, it is probably just as fast for a simple project like this to just cut them out by hand… 😉

Next, you will take two of the same-shaped pieces and put them back to back. Make sure that the printed sides are facing outward. You can either staple them all the way around… or… sew them together. Either way, make sure to leave a small space to fill the pouches with your candy of choice.

For myself, I love the stitched look and have a sewing machine just for hybrid projects. This was my first time using it… and about halfway through closing the little opening for the candy, it stopped working. UGH! …it’s always something, isn’t it?! 😉 I guess this means I will have to watch the “How-To” disk the sewing maching came with.

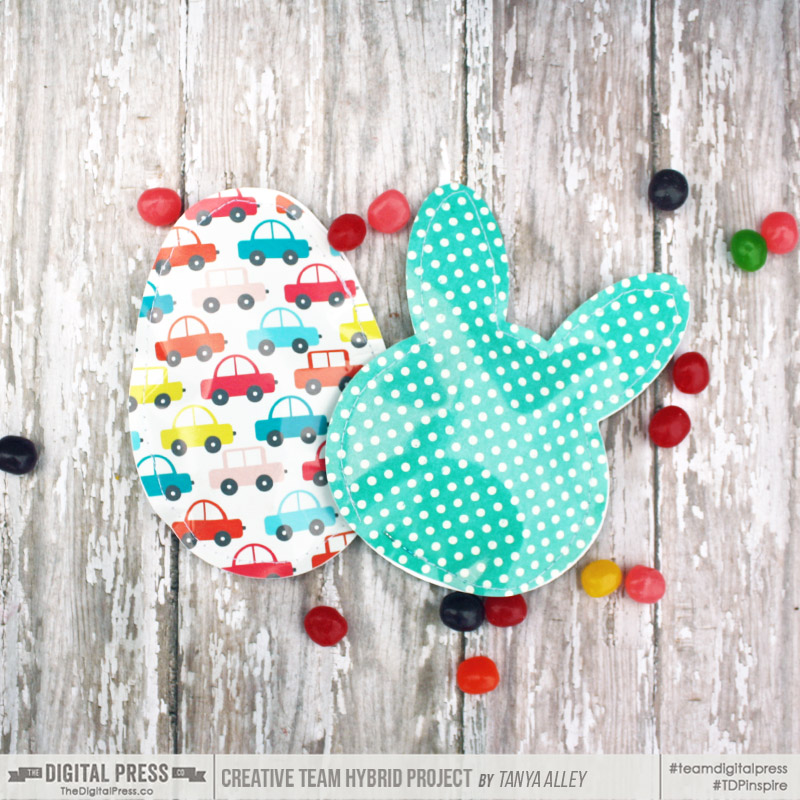
Here’s a look at one finished egg and one finished bunny. Aren’t these just the cutest things? You can make them for your co-workers, your child’s Easter parties, etc.

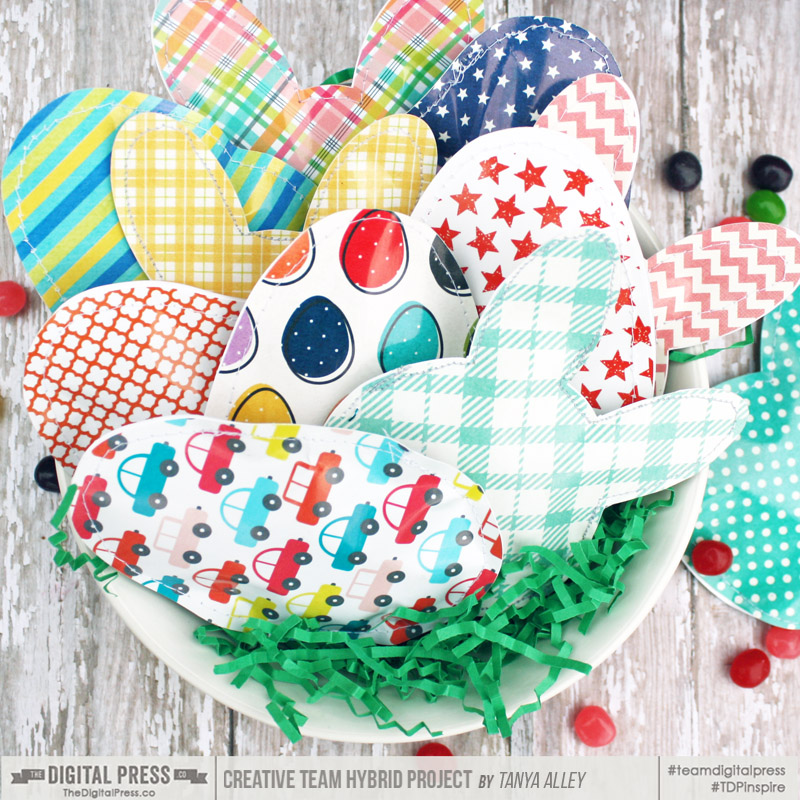
You could even make a bunch and display them together (as shown here) and use them as party favors, etc…

I hope that you have enjoyed this edition of Hybrid How-To, and that you will give this easy project a try (and/or come up with a shape of your own for these Easter treats!).

If you’re participating in The Digital Press’s challenge system for March 2018, don’t forget to visit the CROSSWORD SECTION in TDP’s forum to get the details about this month’s Hybrid Challenge — because you can earn challenge points if you give this project a try (you can earn points toward discounts & FREEBIES)! I hope that you will join in!


Tanya

About the Author  Tanya is a part of the hybrid team here at The Digital Press. She has been hybrid crafting for at least 15 years now, and loves creating and sharing those creations with others. Her all-time favorite tool is her Silhouette Cameo. She has been married for 29 years to her high school sweetheart, Richard and has two sons: Chris, 26 and Chance, 22. She also enjoys crocheting, photography and woodworking.

Tutorial Tuesday | Creating a Stamped Title

Creating a Stamped Title

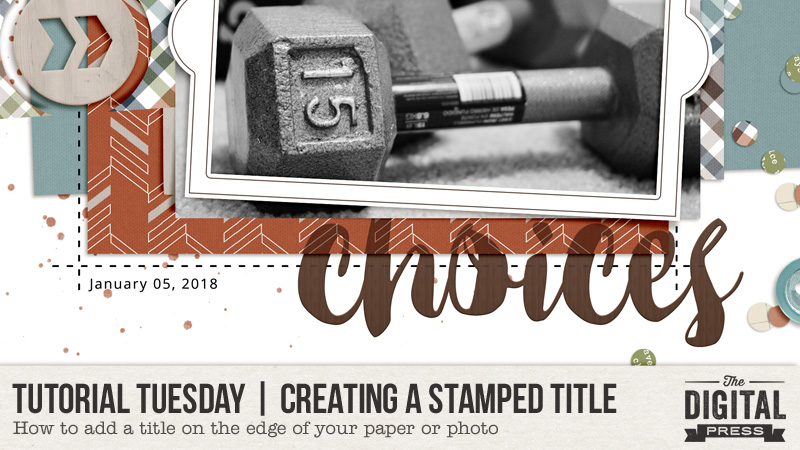
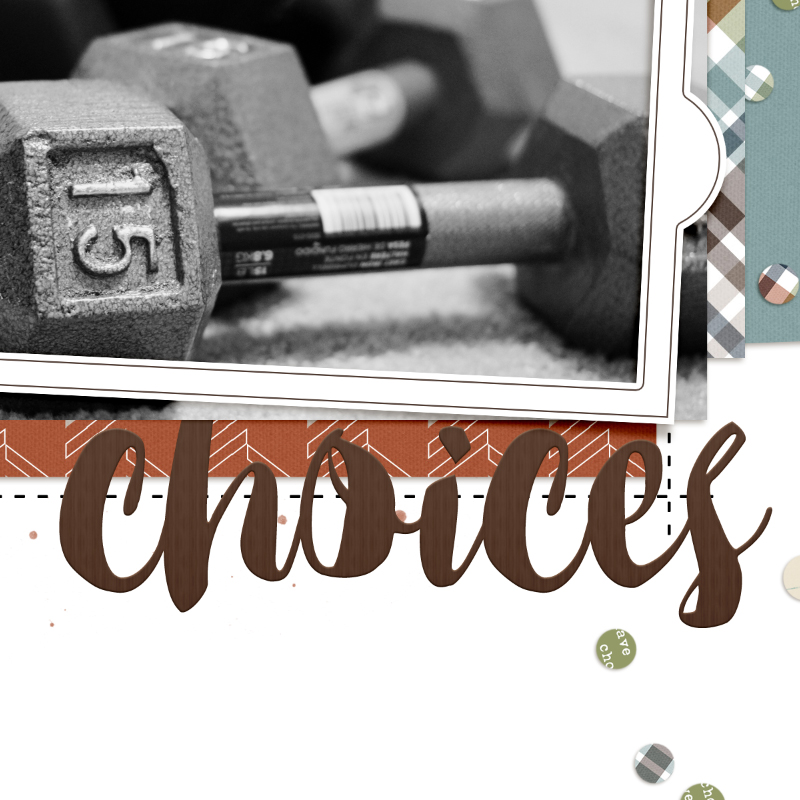
I’m a big believer in trying to make my more traditionally-styled digital scrapbook pages, well, traditional! Sure, there are a ton of things you can do in the digital realm that simply aren’t possible with supplies that you’d buy at a craft store, but I’m always looking for ways to create the illusion of something being “real.” I wanted to share with you an easy way to re-create the look of a stamped or painted title on your page that’s layered among papers, photos, or other flat elements.

Let’s stop for a minute and think about this: If you had a stack of papers or photos spread about on a table and you grabbed a wood block stamp, inked it up, and stamped away, what would the words look like? Some might be a little transparent, with patterns or images peeking through. Maybe the edges are fuzzy. If your stamps go over the edge of two or more papers or pictures, does everything line up exactly? Yes, folks, these are the kinds of things I think about when I’m creating my digital layouts and trying to get the finished product to look as realistic as possible.

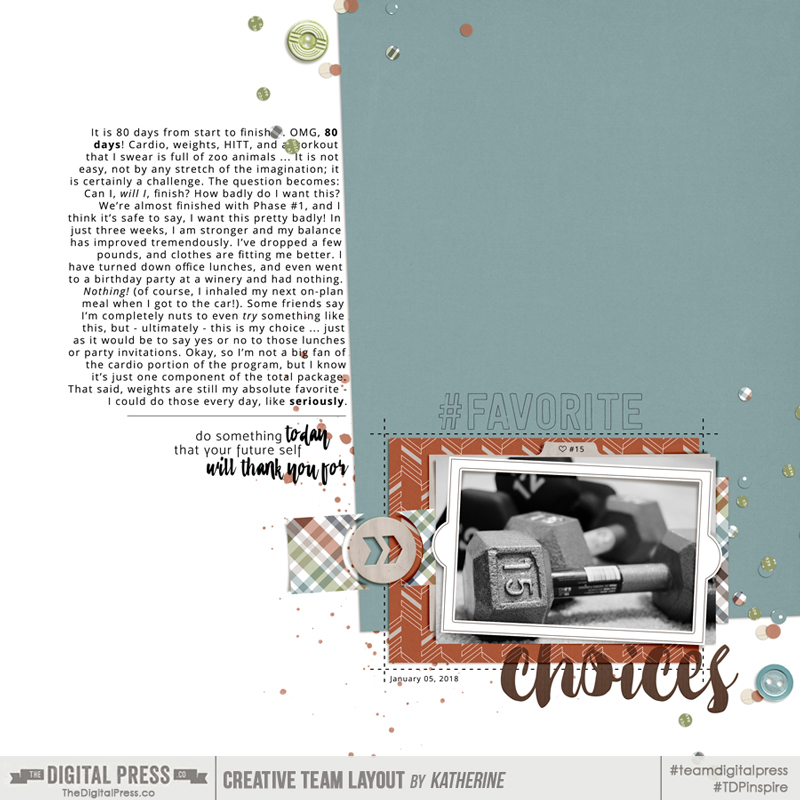
As I placed this title on my page, I found that I wanted it sitting on the patterned paper and spilling over to the background. Realistically speaking, if this were truly stamped, I would see some of the pattern on the orange/brown paper bleeding through, and I’d see the bottom edge of the paper, too. As things stand right now, that’s not the case. Here’s how I changed that.

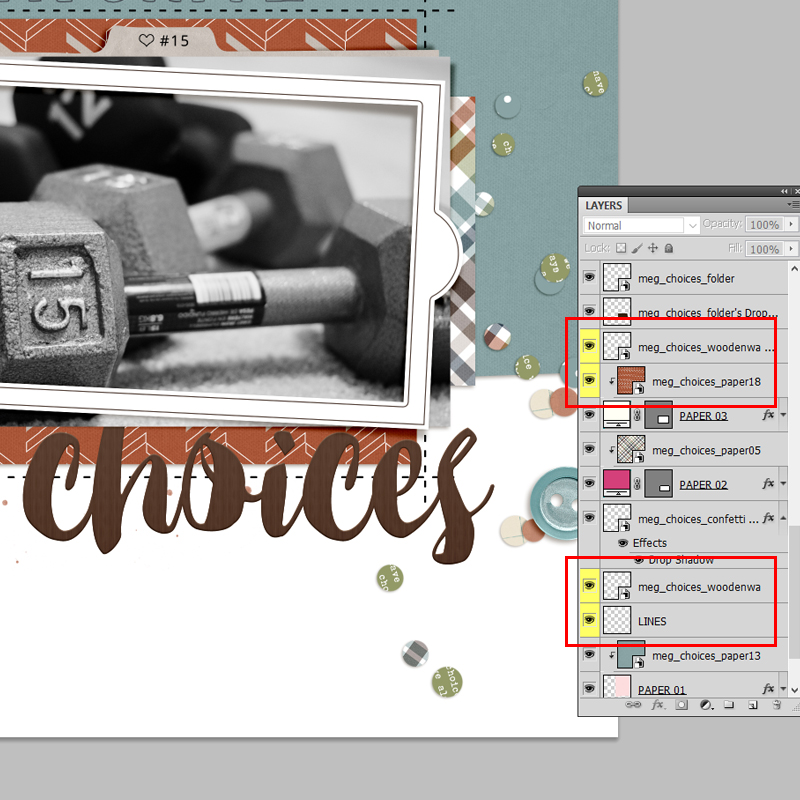
Step 1: Create a duplicate layer of the title, wordart or alpha.

Step 2: Place one copy of the title immediately above the paper on which the title sits; place the other copy underneath.

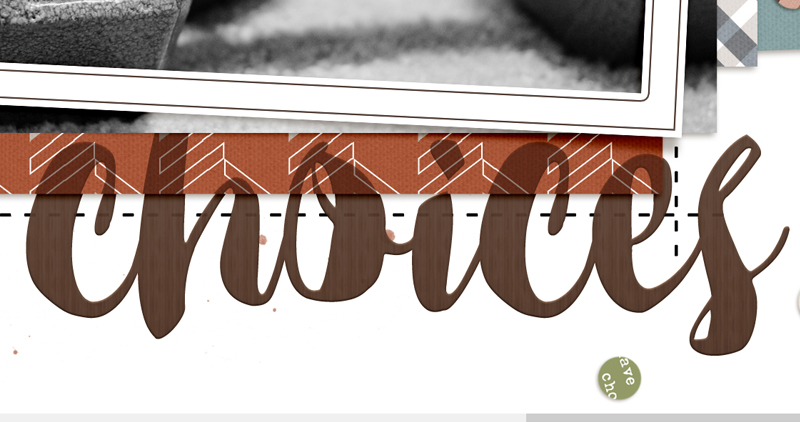
In my example, I have a copy of the word “Choice” right on top of my patterned paper, and another copy above the lines layer.

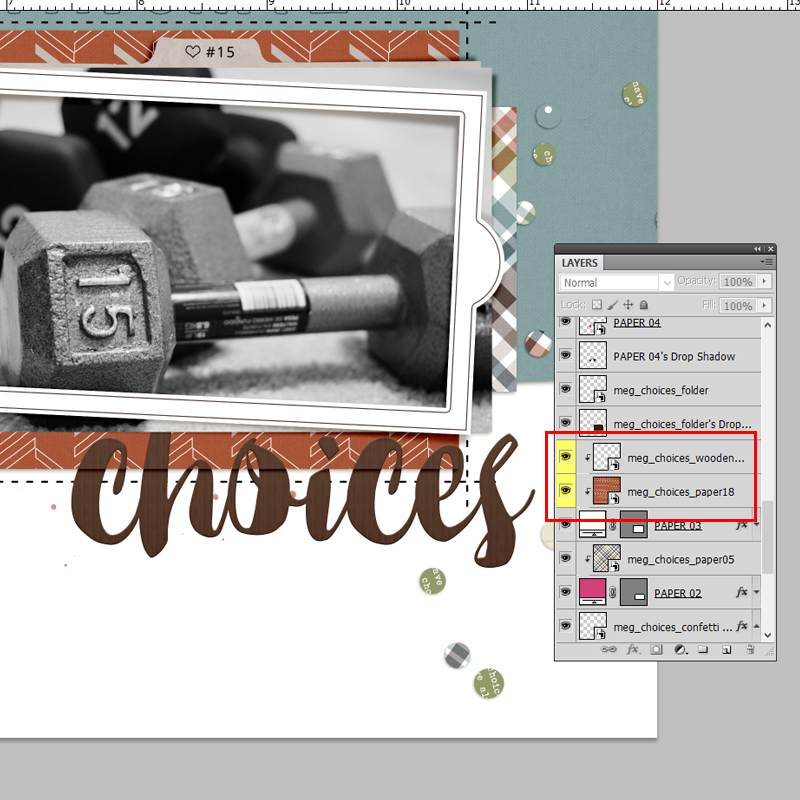
Step 3: Clip the title to the patterned paper. This will allow the bottom edge of the paper to be visible and reveal any shadowing you might have.

You could leave things just the way they are and be done. Personally, I still tweak things a bit more, and here’s why: Remember what a truly stamped image might look like if you were using ink and paper? I would still see some of the pattern on the paper coming through. The same goes for the dashed lines on the background paper. Read on

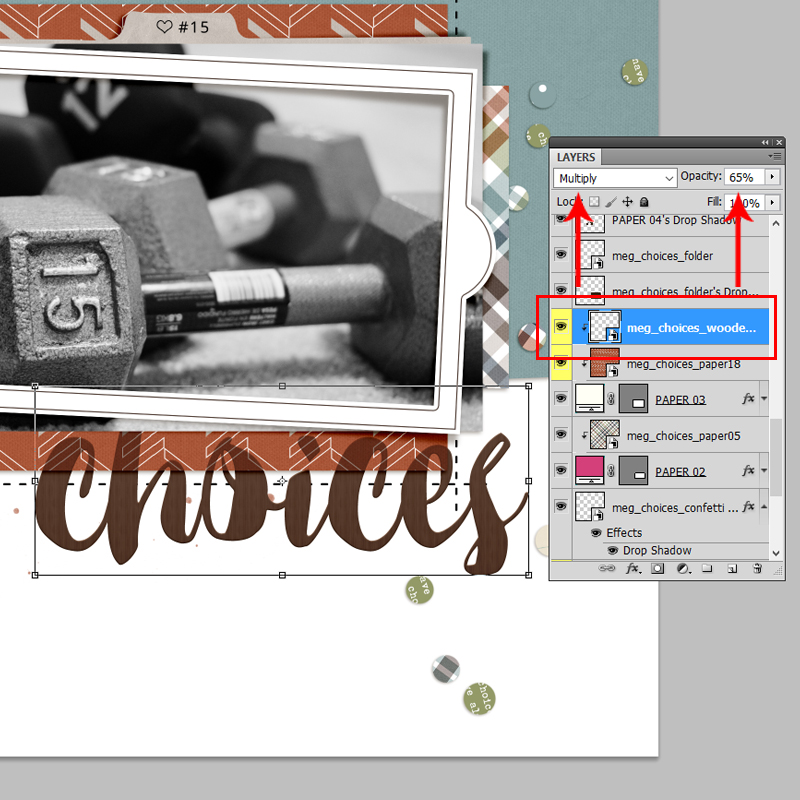
Step 4: Lower the opacity of the title layer that is clipped to the patterned paper, and play with blending modes to allow the pattern the bleed through.

I like to use Multiply or Linear Burn, depending on the color of the paper. This step is really a little bit of trial and error, so just play and see what you come up with. I ended up with a blend mode of Multiply, and Opacity of 65%. I also lowered the opacity on the bottom copy of the title (the one that’s sitting on top of the dashed lines), just a little, to allow the lines to peek through ever so slightly. These formatting options are in my Layers Palette (I’m using CS6), but you could also use the toolbar menus if you’re more comfortable with that, or if your desktop is configured differently. From the toolbar, I would select Layer > Layer Style > Blending Options to access these choices.

Once again, you can stop here, if you like … or not.

Step 5: Select one of the two title layers (either one is fine), and nudge just that layer a little to one side. The amount of movement really is very small; it’s just enough to add to the illusion that the stamping is on multiple layers.

TIP: Although not necessary, one last thing that I like to do is select the title layers, both of them, and link them together.
This way, if I need to move or resize the title, both layers change in unison.

Credits: Choices by MEG Designs

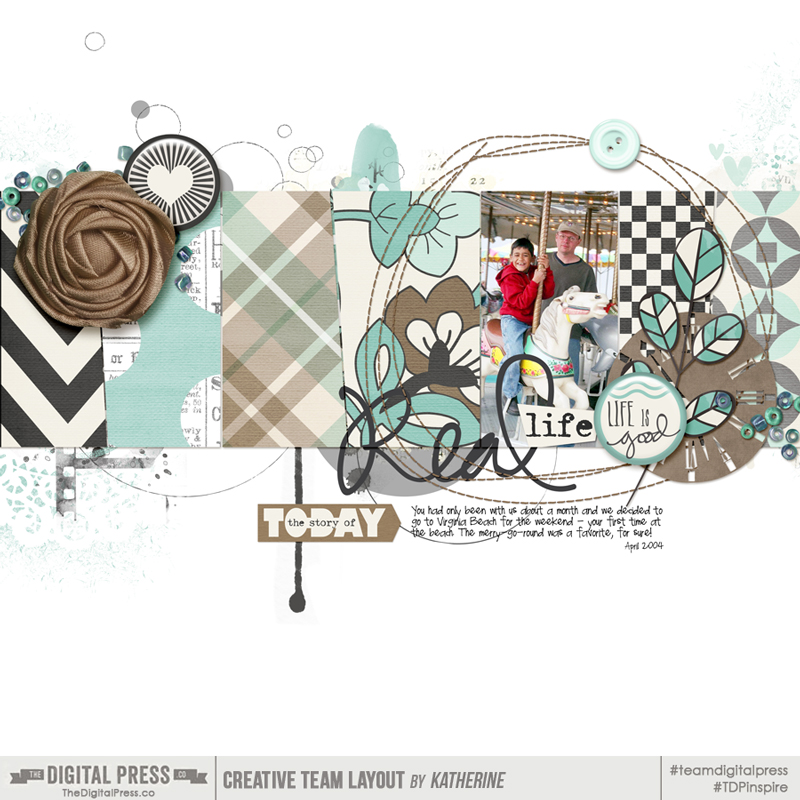
Credits: Real Life by Calista’s Stuff

As you can see in the second example that I’m sharing here, your title could spill over onto multiple photos and papers. Even if it seems complicated, the steps to creating the look of a stamped or painted title remain the same:

  1. Duplicate.
  2. Position.
  3. Clip.
  4. Blend and Opacity.
  5. Nudge.

I hope you’ll give this a go!


About the Author Kat Hansen is a creative team member here at The Digital Press. A Director of Human Resources by day, she loves the opportunity to spend a few hours each evening being creative. Vacation memories feature pretty heavily in Kat’s scrapbooking pages, as well as her health and fitness journey. Kat has quite the sense of humor (she “blames” her father for this), which she incorporates into her journaling and memory-keeping.

Tutorial Tuesday | Protecting Privacy

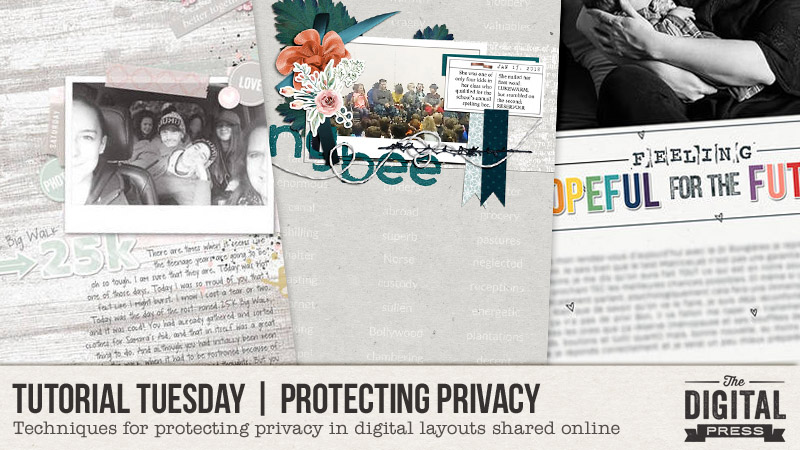
Hello, and welcome to another edition of our Tutorial Tuesday series here on The Digital Press blog! Today, I’m here to share some tips and techniques for protecting your privacy when you share your digital layouts online (both in galleries and on social media sites like Instagram and Facebook, etc.).

So many of us go to great lengths to protect our privacy — shredding anything with our names, addresses, or credit card numbers… or using screen names instead of real names, etc. — but not everyone goes to those same lengths to protect their own privacy in public scrapbook galleries or on social media (or maybe even realizes that personal information is being shared for anyone to see).  I know this is a very sensitive subject, and there are a multitude of opinions out there, but this tutorial focuses on techniques for protecting privacy — yours, your family’s, and also that of people you don’t know who may have inadvertently ended up in your photos or as part of your story — whenever you publicly post your digital layouts online.

First up, a couple of words on privacy, and what you ethically can and probably should not do. You can post any of your own information, details or photos – up to and including as much personal detail that you want. I’d say you can make this decision for your own immediate family too. You probably should not post identifying information or pictures of other people, and if you decide you are going to post information or photos about other people, you can easily avoid a potentially sticky situation by checking with them first. There are many reasons why people don’t want their name or face posted online without their permission, and accommodating those requests is not only courteous, but in keeping with the posted rules of many online galleries, including the gallery here at TDP.

Let’s start with about journaling.  I suppose the easiest way to protect privacy is just to leave out the salient details – exclude names, dates, places and any other identifying details.  But this kind of defeats the purpose if you scrapbook for memory keeping and you want those details recorded permanently. One option is to save and print your layout with the complete journaling, but post a modified version to the public galleries. In this scenario, there are many different ways to proceed.  First, assign aliases or nicknames to people or places in your journaling.  Second, use your original journaling, but obscure the pertinent details. There are several different techniques for hiding words or otherwise camouflaging your journaling that we’ll go over here:

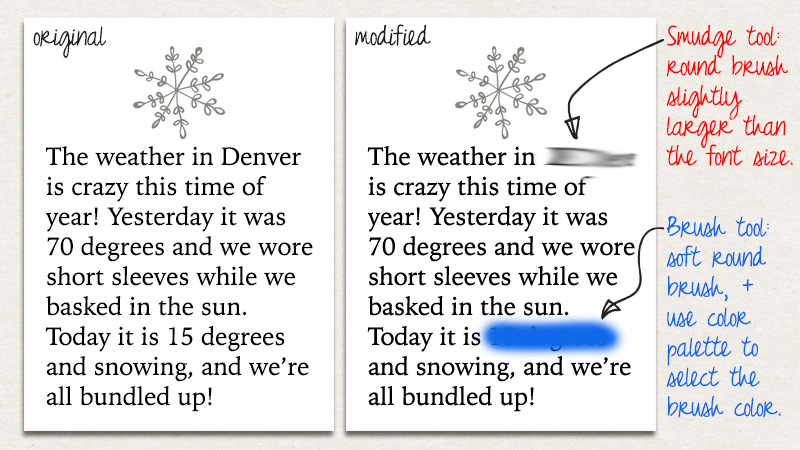
  • use the Smudge tool to smear individual words (most commonly names and places);
  • use the Brush tool to “line out” words (those redacted military documents come to mind);
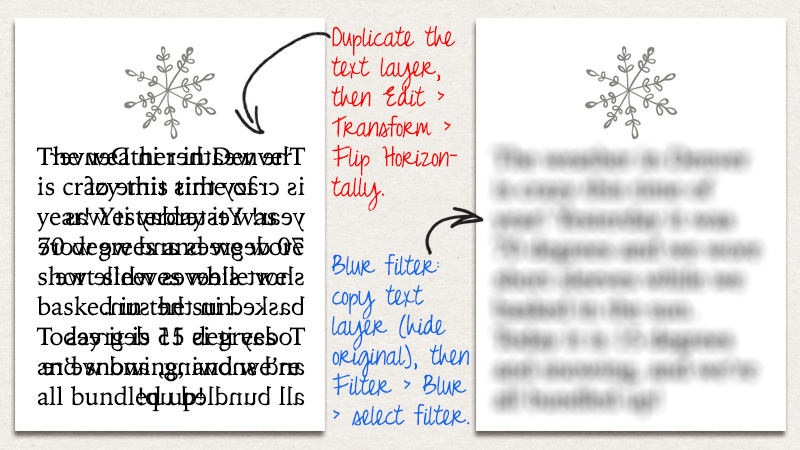
  • copy your text layer, then either flip it horizontally or apply a blurring filter.

Let’s take a closer look at each of these. First up, the Smudge and Brush tools. The Smudge tool icon looks like a finger pointing toward the lower left corner. Select that tool then choose a round brush and change the brush size to something slightly larger than your font size. I prefer to modify my journaling before flattening my layout into a single layer, so at this point I rasterize my text and work on that layer. You can run that smudging brush back and forth over the words you want to obscure using the mouse, or you can click on one end of the word, push the shift key, then click on the other end of the word to get a perfectly straight line between those two points you clicked. In the image below, I applied the smudge brush twice to the word Denver (in the journaling on the right). This technique is the most commonly applied privacy protection technique I’ve come across in the TDP gallery.

20180227_image1

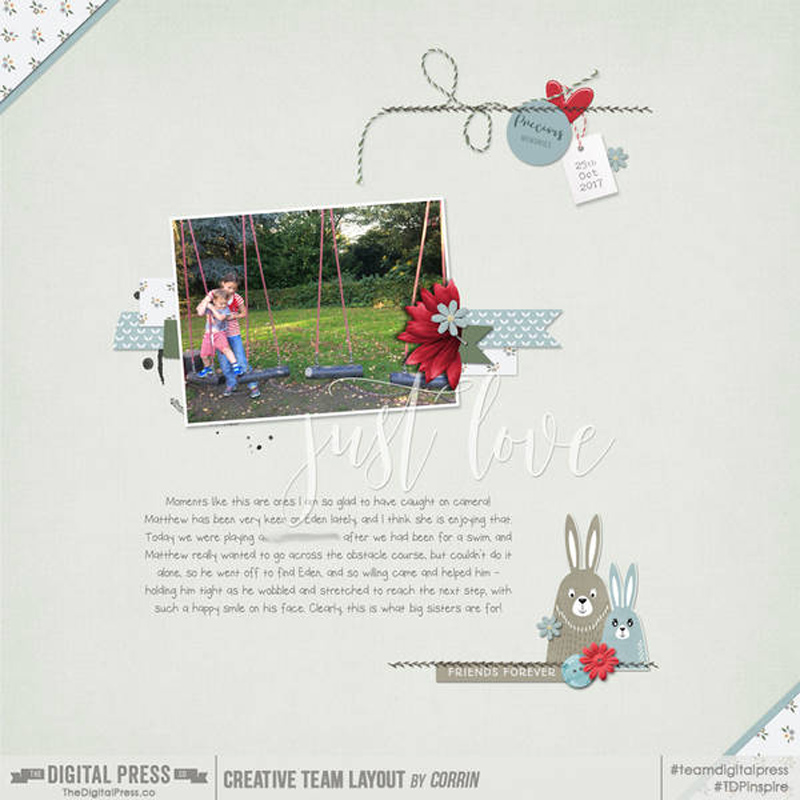
The smudge technique is probably the most commonly used one for removing pertinent details from journaling. In the example below, TDP CT member Corrin smudged out a place name in the middle of her journaling.

The Brush tool, which has an icon that looks like a paint brush, can be used to line out or redact words, or, if you’ve got a uniform background color, “erase” selected words from your journaling. Your text layer does not need to be rasterized to apply this technique. Select a color darker than your text to make the redaction obvious (like the blue in the example above), or a color that matches your background layer to make it look as though the selected words have been erased. (Note that this same technique can be used to highlight words in your journaling; just put the brush layer under the text rather than on top of it.) Both the smudge and brush techniques are useful when you only want to obscure a handful of words.  These techniques can get time-consuming for removing more than a few words though, and there are easier techniques to apply to entire journaling blocks.

The third technique, useful for obscuring large blocks of journaling, includes copying and modifying your journaling layer. In the image below, I show two different techniques that can be applied to entire text layers – the horizontal flip and the blurring filter. To use the text-flip method, simply duplicate your journaling layer, then, with that new copied layer selected, click Edit from the top menu bar, then Transform, and Flip Horizontally. Don’t delete the original layer. This creates an effect like the one shown on the left side of the image below. This technique works well for scripty fonts, or fairly consistent and wide leading (spacing between the letters). You can see in the example below that some words are still legible, which may or may not be the desired effect.

20180227_image2

The final technique to obscure journaling is to blur all the text sufficiently that it cannot be read. To use this technique, first duplicate the text layer and rasterize it. Delete or hide the original text layer. Select the rasterized text layer, then select Filter from the top menu bar, then Blur, and choose from one of the myriad different blur techniques. The example below shows a 10-px Field Blur, but the Gaussian blur also works well and is a favorite of several members of the TDP CT. The blur filter is useful when you want all the journaling obscured, but still want to include it for placement on your final page.

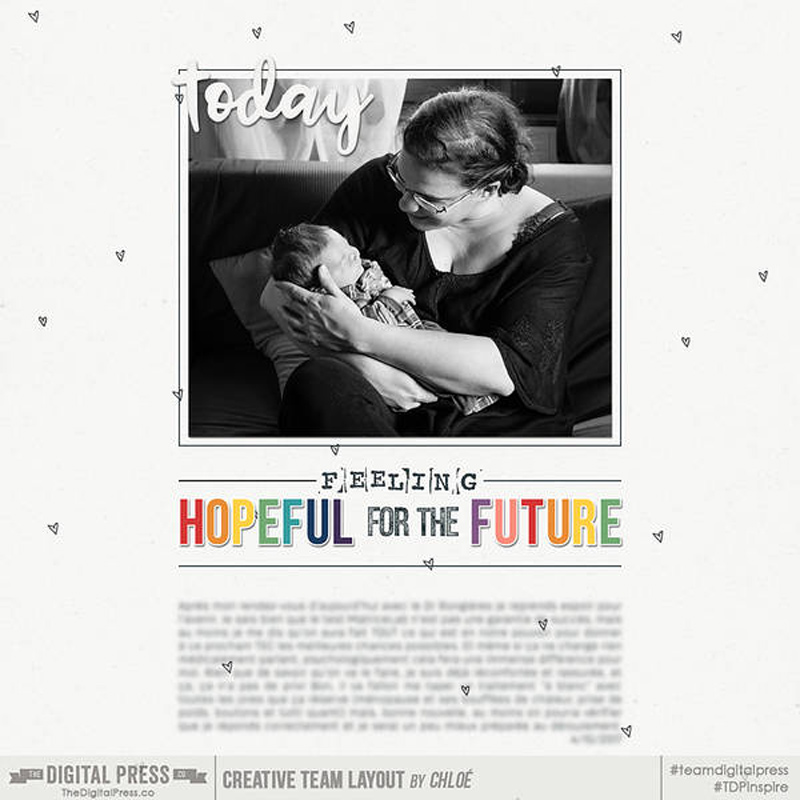
TDP CT member Chloe applied a blur filter to her entire journaling layer in this example:

Other, non-destructive techniques for obscuring journaling include using a small font size (I prefer 10-pt font on my printed 12×12 layouts, but that often makes my journaling hard to read on screen), journaling in a color that is very close to the background paper color, or reducing the opacity of the journaling layer, and covering all or just crucial parts of your journaling with digital elements or photos. The possibilities seem nearly endless, but at the end of the day, protecting personal information, identifying details or routines is the name of the game here.

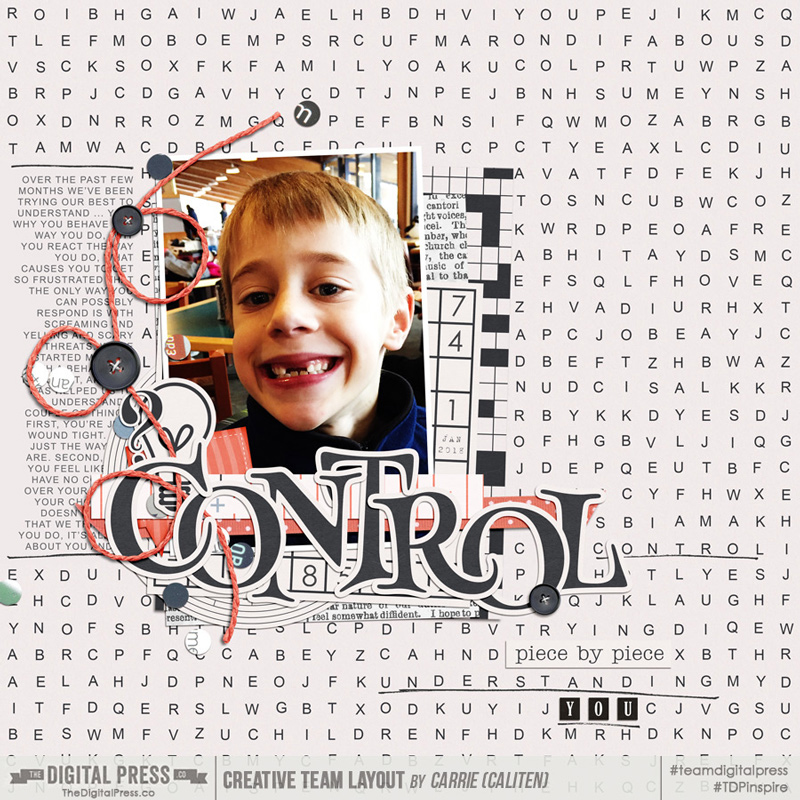
In this example, I used strategically placed elements (a button and some confetti) to cover up parts of the journaling that I didn’t want exposed.

caliten_control

Now let’s talk about photos. Protecting privacy in images may be something you’re more familiar with, but may not think to apply to the photos on your layout. From my experience, some people are more diligent about not showing their face online than they are about sharing personal information. For our purposes here though, we’ll include faces and any other unique identifying details, such as tattoos, license plates or car registration details, parking or access decals on vehicle windshields, and school or other establishment logos. There are times when it’s easy to just strategically crop your photo(s), or cover part of the image with an embellishment, journaling card or cluster, but also times when that just won’t work. Let’s focus on those latter cases. The techniques for obscuring these details in photos are similar to those discussed above for journaling: smudging, brushing, or applying a blurring filter.

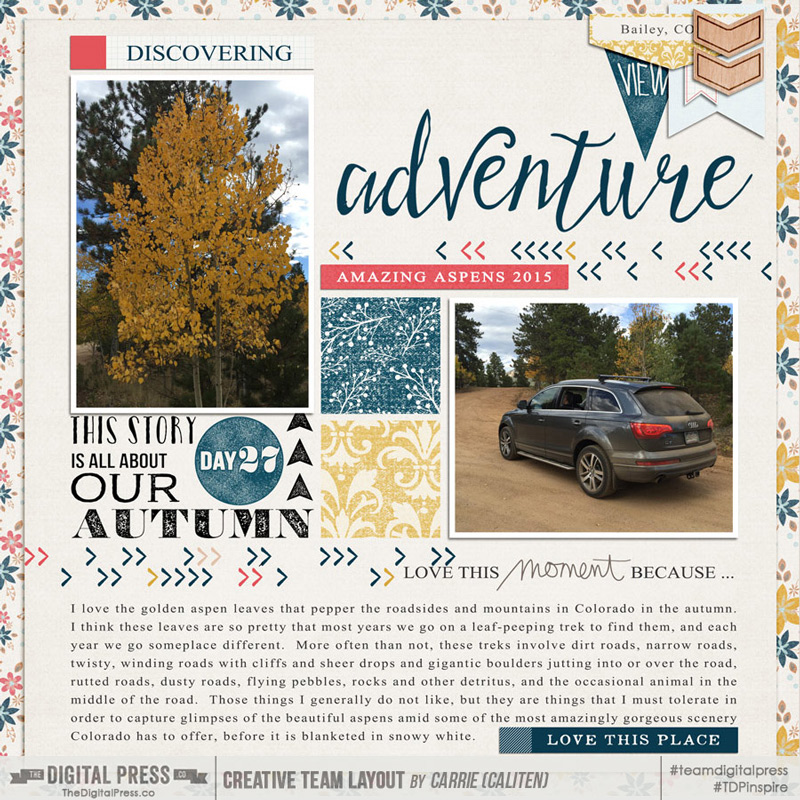
To apply smudging to a photo, simply use the Smudge tool as you would for journaling, and go over the detail you want obscured. (With a small brush, this technique also works reasonably well for removing unsightly forehead wrinkles!) To use the brush technique, create a new layer, then select and apply a small brush area over the detail that you want hidden. I applied this technique in this layout of mine below to obscure the numbers and letters on the car’s license plate.

tdp_ad_goingplaces_caliten_aspens2015

Probably the most common technique for masking faces that I’ve noticed in the TDP gallery is using a blur filter on a small shaped mask layer.  To do this, create a new layer, then make a small oval to cover the face.  Ensure that the layer is similar color to the background (this technique is far less noticeable when applied to black and white images), rasterize it and apply a blurring filter (Filter > Blur > ….). If you have the time or inclination, you could also do a photo extraction (wherein you make a copy of your photo, and mask out all but the part that you want to have in focus), and then blur the background using a blur filter.

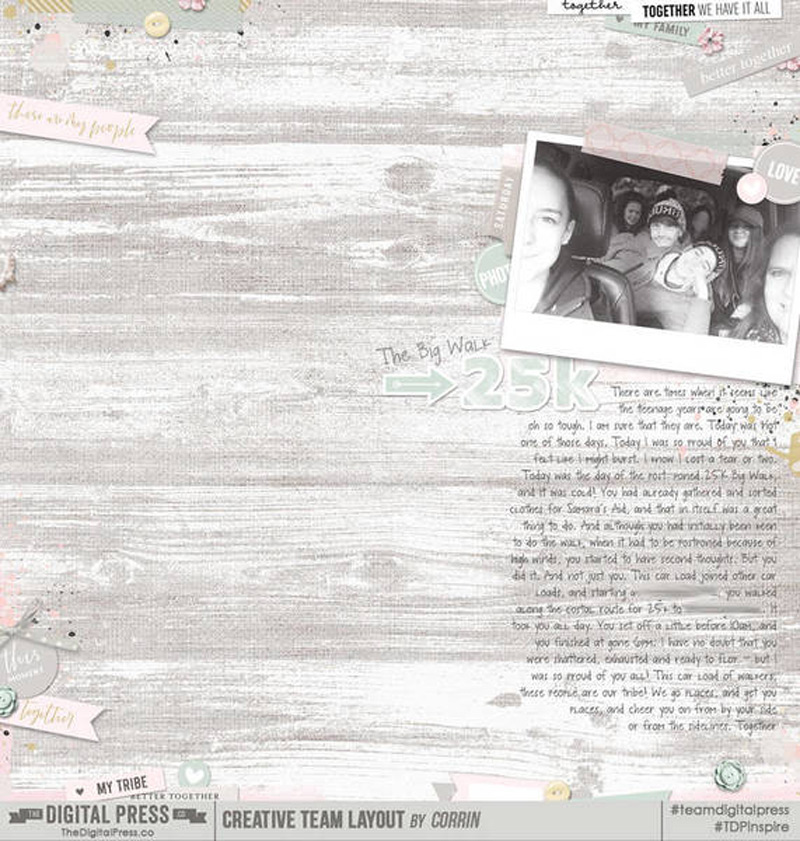
In this example, TDP CT member Corrin very subtly blurred one of the faces in the photo on her layout, below. Using a black and white photo really helped to draw attention away from that one blurred face.

corrin_25kB

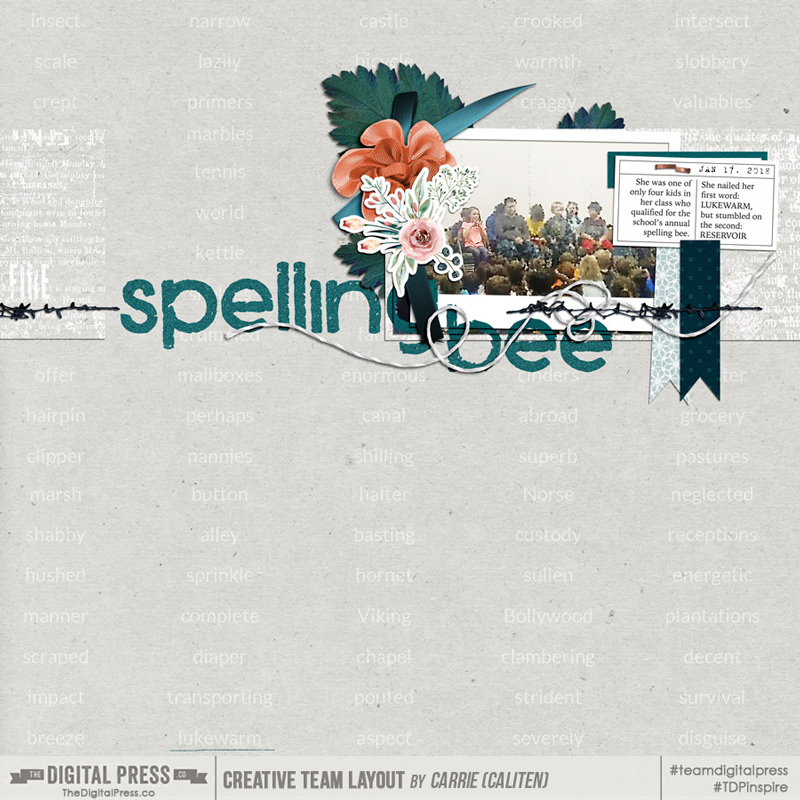
And lastly, in the layout below I used a picture grabbed from my kids’ elementary school web page.  It was a grainy photo to start with which really helped the blurring mask to blend in. After placing the photo where I wanted it on my layout, I duplicated the photo layer. On top of the top photo layer, I created a new layer with an oval mask that only included the little girl in the orange shirt (she’s mine, and has given permission for me to show her unblurred in the photo), and moved it below the top photo layer.  I sharpened the photo, applied a color filter, and clipped it to the oval mask layer.  Then, on the original (bottom) photo layer, I added the same color filter then applied a standard Photoshop blur filter.  This particular one was Pixelate > Crystallize.

tdp_ad_mood_caliten_spellingBee

Protecting privacy in public galleries is a personal choice. Here we covered a handful of techniques for obscuring pertinent information in your journaling and faces or other identifying information in your photos. If this is something you do regularly, or something you’re now considering doing, I hope that you now have a new technique or two to try.


caliten About the Author  Carrie is a creative team member here at The Digital Press. She and her family enjoy spending time outdoors, year-round, near their home in Colorado. In addition to scrapbooking and the occasional hybrid home decor project, Carrie also reads voraciously, accumulates fabric, makes soap, brews beer, grows hops, and tries to keep indoor plants alive.