Category: Tutorials

Tuck it in! Hide your Photo Corners under Paper

It’s Tutorial Tuesday and I’m happy to bring you something, that I just figured out to do myself (insert big smile here). Tucking in the photos into the paper. It’s like you make a cut into the paper and insert your photo’s corner. Only without real scissors, paper or  photos of course.
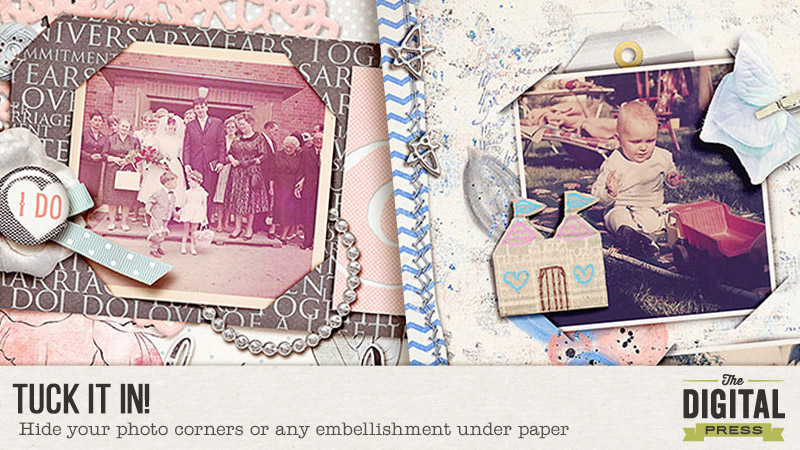
 

My first layout with this technique took me a while. I tried and failed many times. Ctrl-z was my best friend. I found it super complicated but now that I recreated it for you, it’s not too fiddly. I made it into tiny steps and hopefully easy to follow. I also tried to make it PSE friendly. For all the other software girls… you can do this too! I just don’t know how (insert giggle here)! I’m sure you will be able to recreate this with your software.

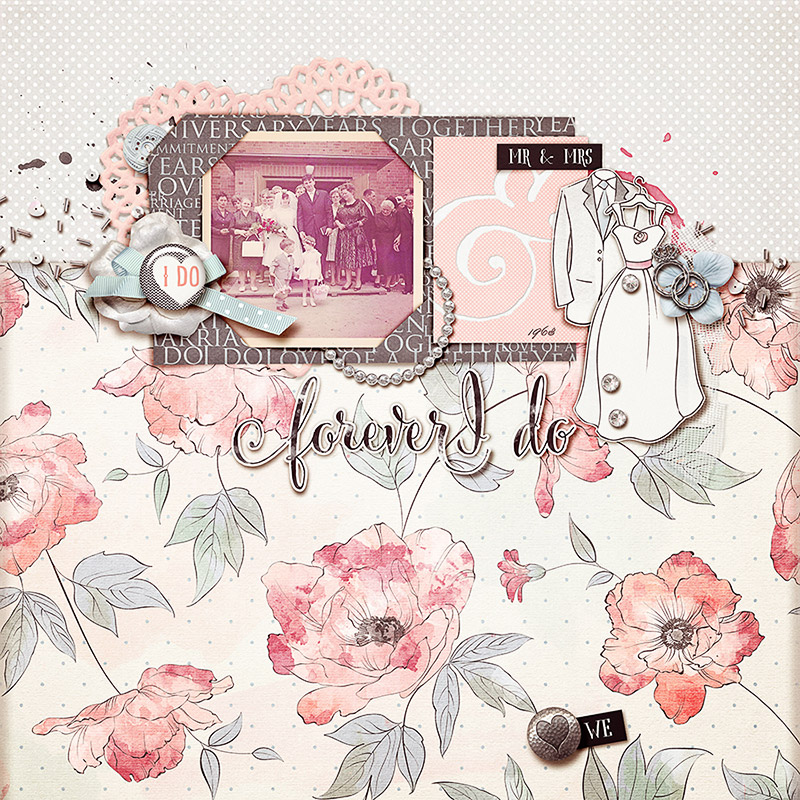
So here is my first layout with this technique:
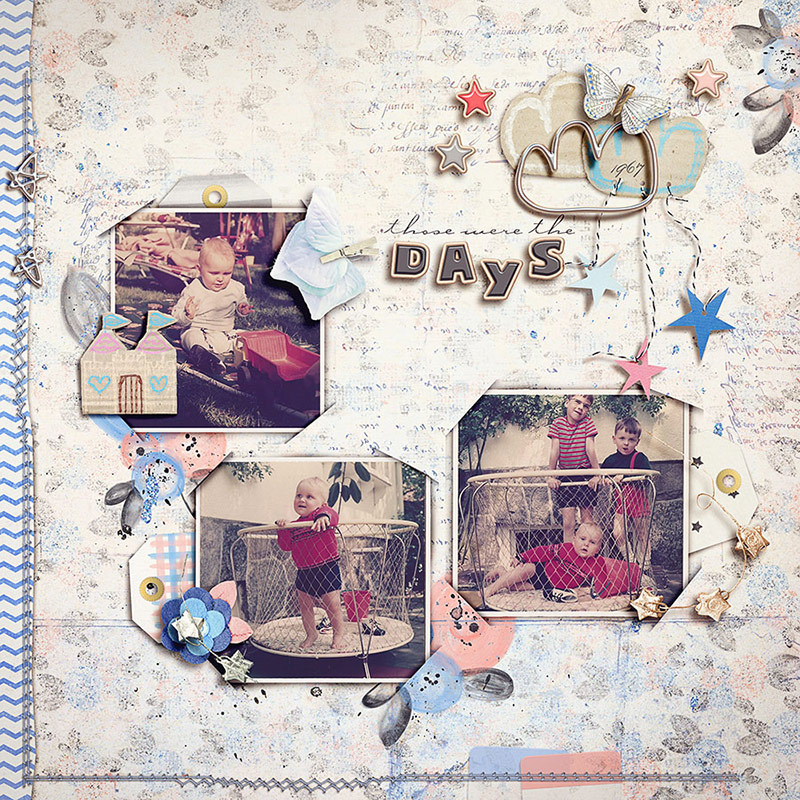
 

My first try on the technique. Image is linked to my gallery, if you want to know what I used.


Want to have a try? Here we go:

  1. Choose a photo or a frame that you want to use. When you use a frame, put a clipping mask for the photo under the frame for later use. Link the frame and the mask together.
  2. Increase the size of your canvas to 130% (Image → Canvas Size → choose „percent“ from the dropdown menu and 130% on width and height). You should now see the checkered background around your photo. If this is not the case, go one step back (ctrl/cmd+z) and double click on the layer name in the layers panel, click „ok“ and repeat the canvas resize. For better visibility of shadows put a paper layer under the photo. The paper will not be part of the tucked in corners later.
  3. Create a shadow for your photo (on a separate layer)
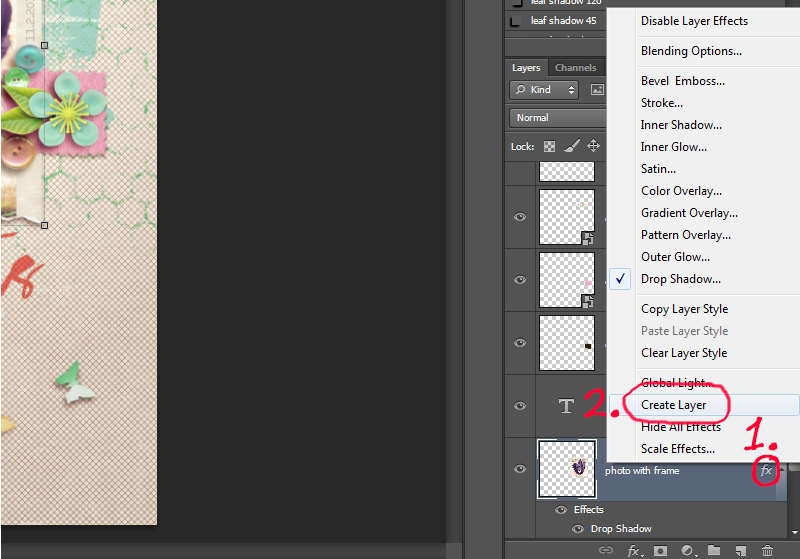
    For PS users: create a drop shadow for the photo and put it on a separate layer (right click on the fx icon of the layer → create layer)
    For PSE users: ctrl/cmd+click on the layer icon to get the marching ants around the photo → Select → Modify → Feather → 10px. Create a new layer beneath the photo and fill the selection with a dark gray, brown or simply black. Deselect the selection with ctrl/cmd+d. Nudge the shadow to the side where you need it. In my example I left it pretty much where it was. For a deeper shadow simply copy the shadow layer (ctrl/cmd+j) and maybe decrease opacity of the upper shadow layer when needed. Link the photo, frame, clipping mask and shadow together.
    It should now look something like this:
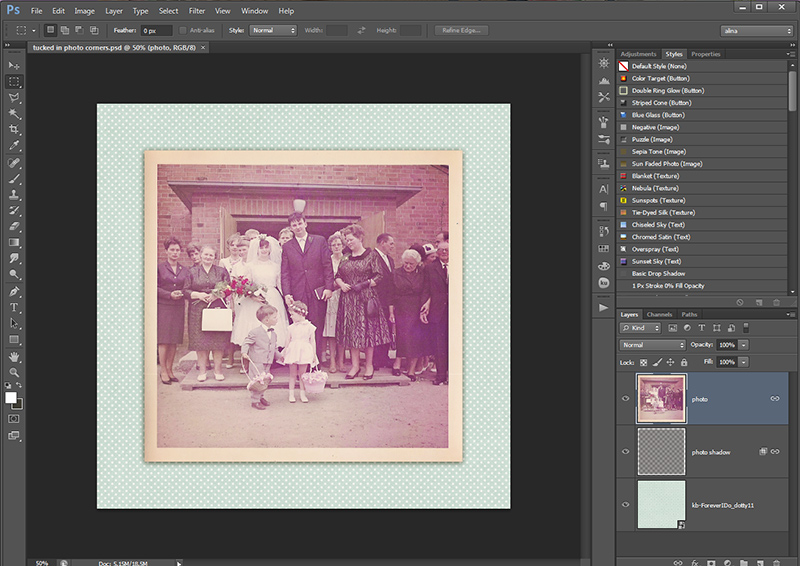
 

A cherished photo of my parents’ wedding in 1963.


  1. Create a new layer above the photo and draw a triangle. You can use any method you like. I always use the polygonal lasso tool and fill the selection with a color. The triangle will later be invisible. Make the triangle so, that you cover one corner of the photo like a photocorner would (see picture). Make it so big, that you can’t see the shadow of the photo but not too big that it gets to the edge of the canvas.
  2. Create a shadow for the triangle (see also 3.)
    For PS users: create a drop shadow and put it on a separate layer
    For PSE users: Create a new layer beneath the triangle, ctrl/cmd+click on the triangle layer icon, feather the selection with 10px, fill the layer beneath the triangle with a dark color, deselect.
  3. Nudge your shadow slightly to the middle of the photo. Link triangle and shadow together.
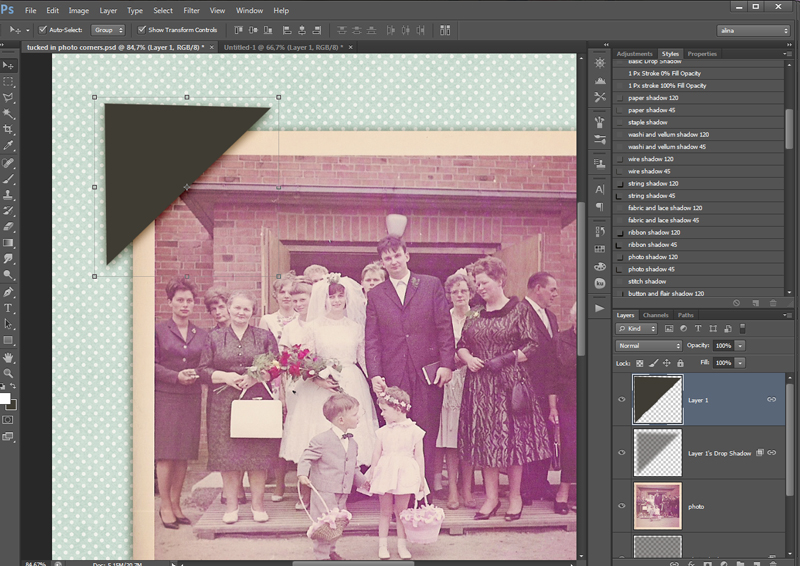
 

The triangle already shadowed.


  1. Ctrl/cmd+click on the triangle layer icon to make a selection. Turn off visibility of the triangle.
  2. Delete the selection of the triangle on every layer (except for the paper and the triangle layer itself). Deselect the triangle (ctrl/cmd+d).
  3. Now you will still have some shadow of the triangle left where it doesn’t belong. Use your eraser with a brush size that is about half as wide as your triangle at 30% hardness 100% opacity and carefully erase the shadows that are parallel to the edges of the photo and a little of the ends of the „cuts“, so that the illusion of the cut ends is given (see photo).
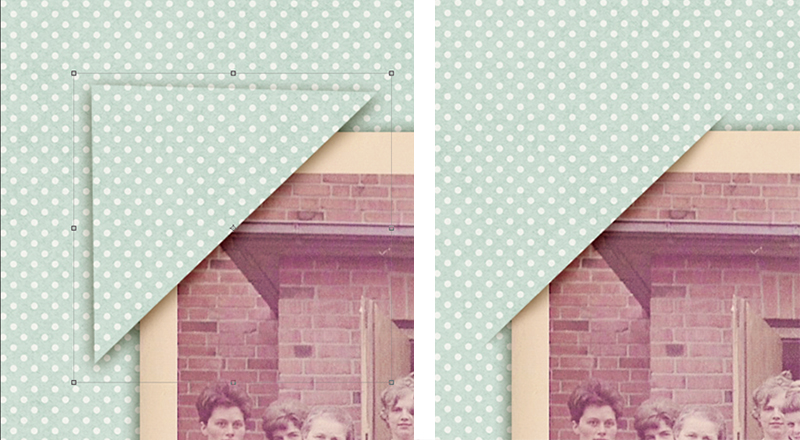
 

Left you see what it looks like after you deleted the triangle selection from all layers and turned the visibility of the triangle off. Right you see the same after I erased the unwanted parts of the shadow.


  1. Now it should look like one corner is tucked into the paper. If you want this on every corner of the photo you just have to copy the triangle and the shadow, turn it around and place it over the next corner, ctrl/cmd+click on the triangle layer icon and delete the triangle from the photo and the photo shadow (and the frame and photo mat if you have them).
  2. Save your ps or pse file for later use as a tucked in template.
  3. For use in your layout just drag the photo (with its shadow) and the corner shadows on your layout and link them together. You can now move everything around to your liking.
 

The technique in full size view. The image is linked to my gallery.


Tipps and Tricks:

  • For your next tucked in photo just use your cut corner template.
  • Always remember to first shadow your photo on a separate layer.
  • Use your single corners for any size/edge relation of photo.
  • You could also do this directly on your layout. I only wanted to show you the technique as simplyfied as I could.
  • Instead of deleting the triangle from the layers, you can of course also apply a layer mask to the items and fill the mask with black after the selection of the triangle to make this technique non-destructive to the photo or frame.
  • You can also make horizontal or diagonal cuts with this technique to tuck in a whole edge of your item
  • Not only photos can be tucked in. Paper shapes, envelopes, flowers…

Enough said, you can do it! If any questions appear, feel free to ask in the comments! Have fun!

 

AlinaAbout the Author: Alina enjoys sitting in front of her large computer screens too much. Apart from that she loves walking her dog and watching sunsets while being amazed of life in general. She is married to her best friend. Tries to manage the needs of her two cats and her dog and badly fails when they all want their cuddle time at once. Everything else is scrapping, taking photos and currently crafting. Having said that, she needs a bigger craft room.



Listen to your Inner Artist

blog_header


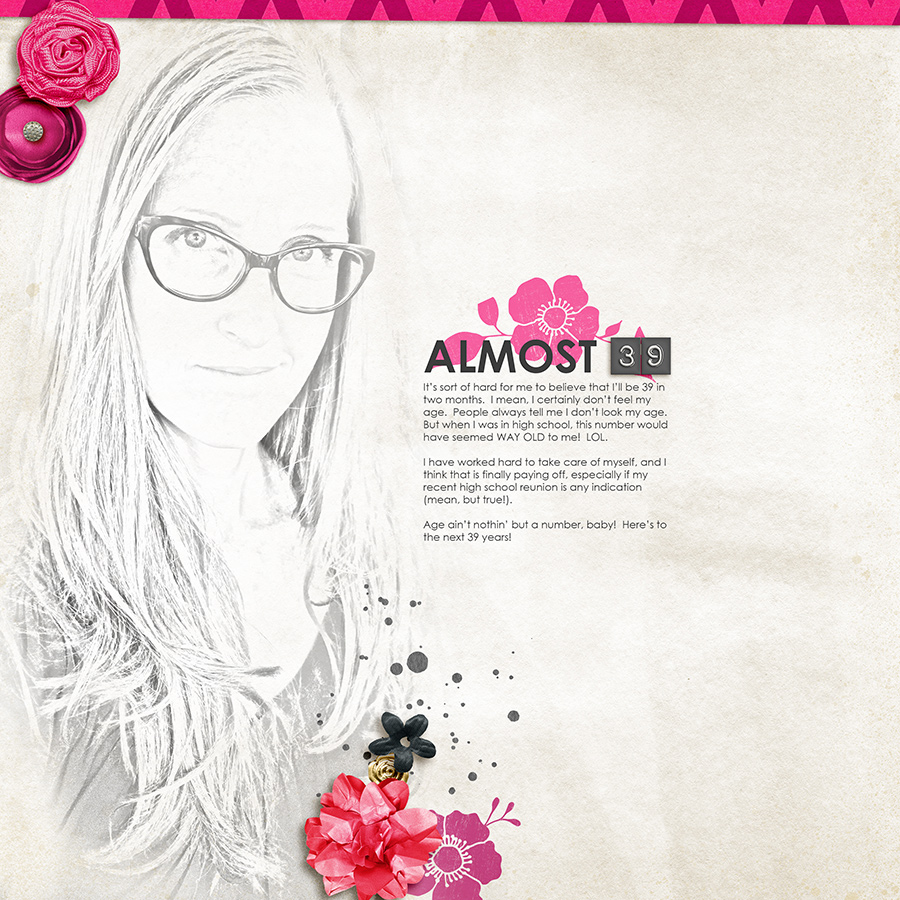
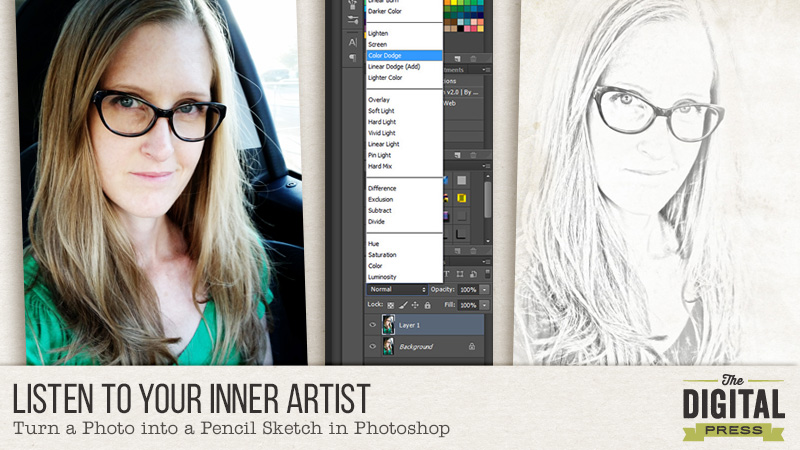
It is good to occasionally step out of your comfort zone and do something different on your layouts, right? Today, I’m going to show you how you can easily turn a photo into a pencil sketch in Photoshop and an idea on how to use the finished sketch on a layout.

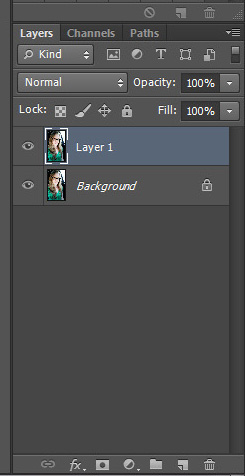
First, open the photo you want to work with – mine is my favorite selfie (it was a fantastic hair day!). Then, duplicate the photo into a new layer. I like to use Ctrl-J (cmd-J on a Mac).

2

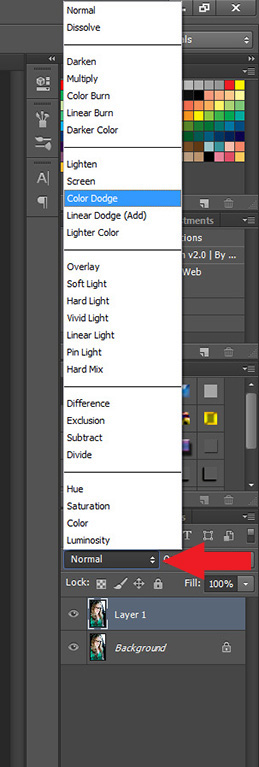
Change the blending mode for the duplicated layer to Color Dodge.

Blending Mode

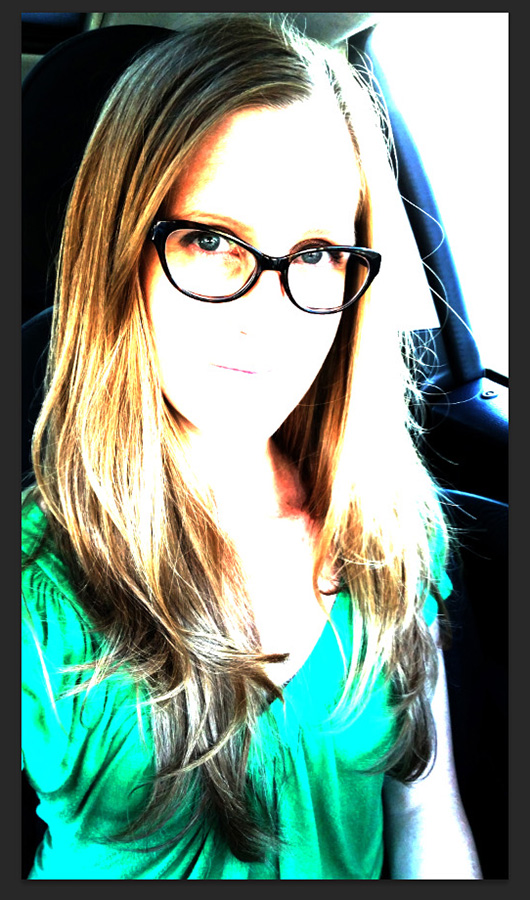
Your photo will look a bit washed out, like this:

4

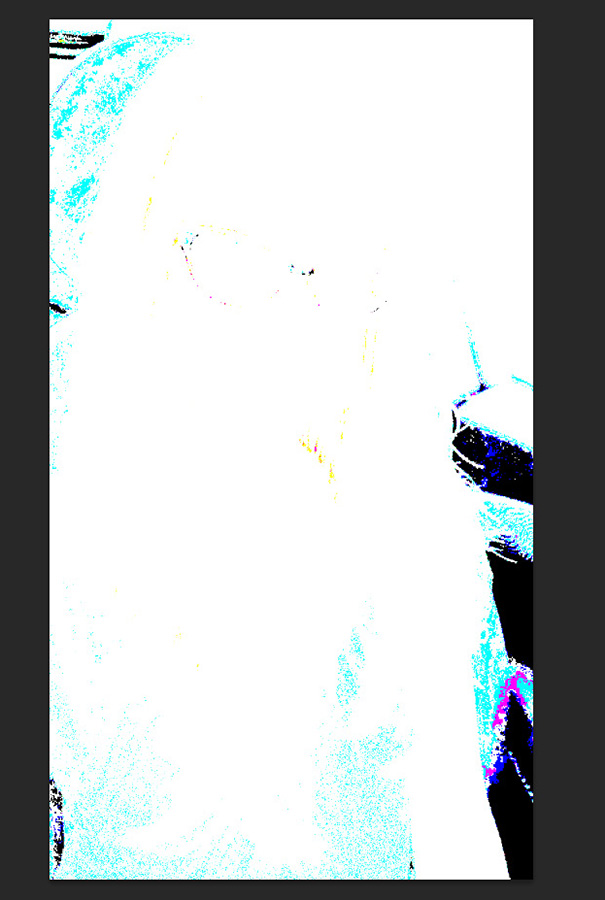
With the duplicated layer still selected in the Layers panel, we want to invert the image (Ctrl/cmd-I). Your photo will now look really strange.

5

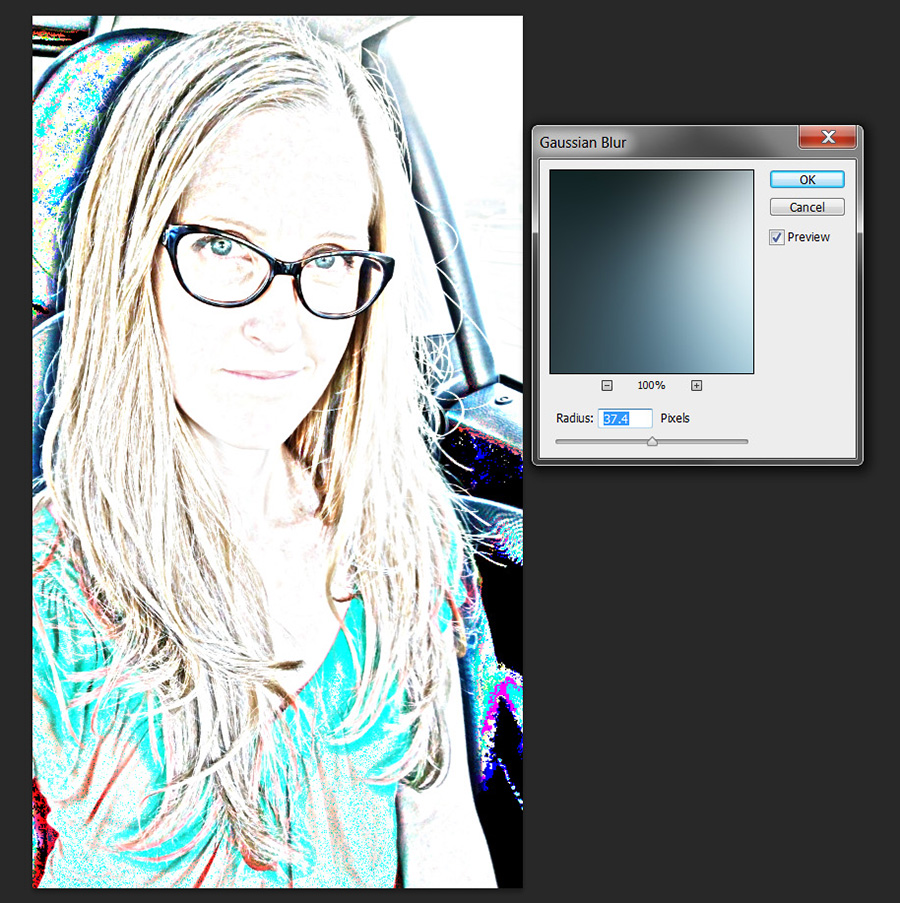
We are now going to blur the layer, which produces the pencil lines. Using Gaussian Blur (from the top menu choose Filter, Blur, then Gaussian Blur). Play with the blur settings a bit until the fake pencil lines on your photo look the way you want. I used a setting of 37.4, but your results may vary widely.

6

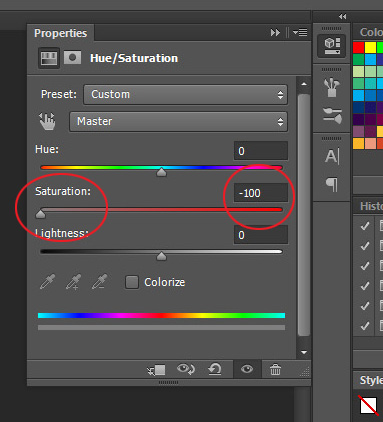
Now, we need to convert the layer to black and white. In the layers panel, choose the half-filled/half empty circle icon at the bottom (Create new fill or adjustment layer) and choose Hue/Saturation. In the panel, turn the saturation down to -100.

7

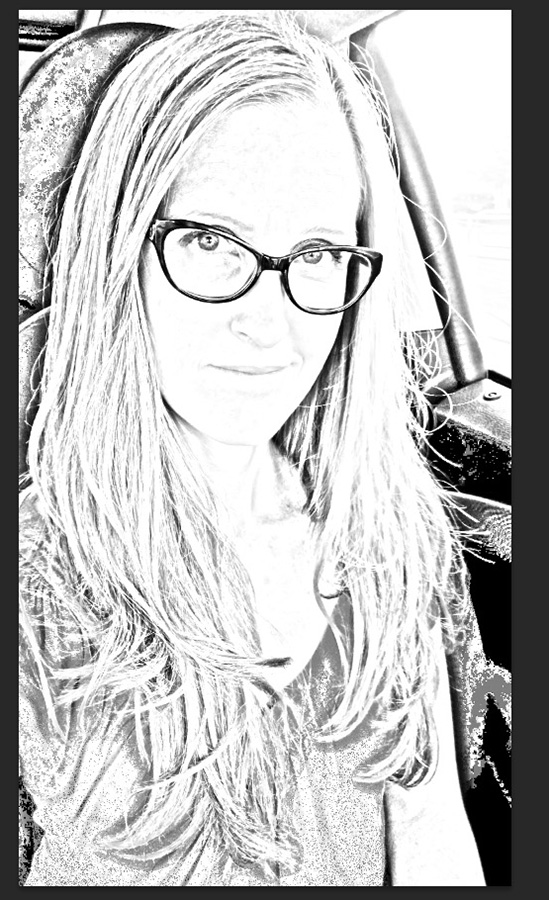
Your photo will now look similar to this:

8

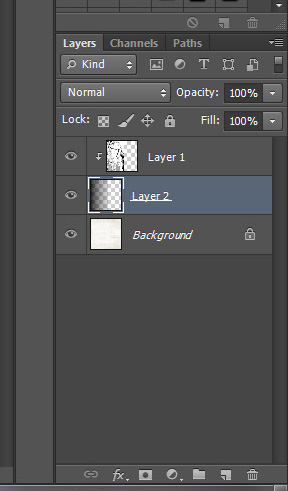
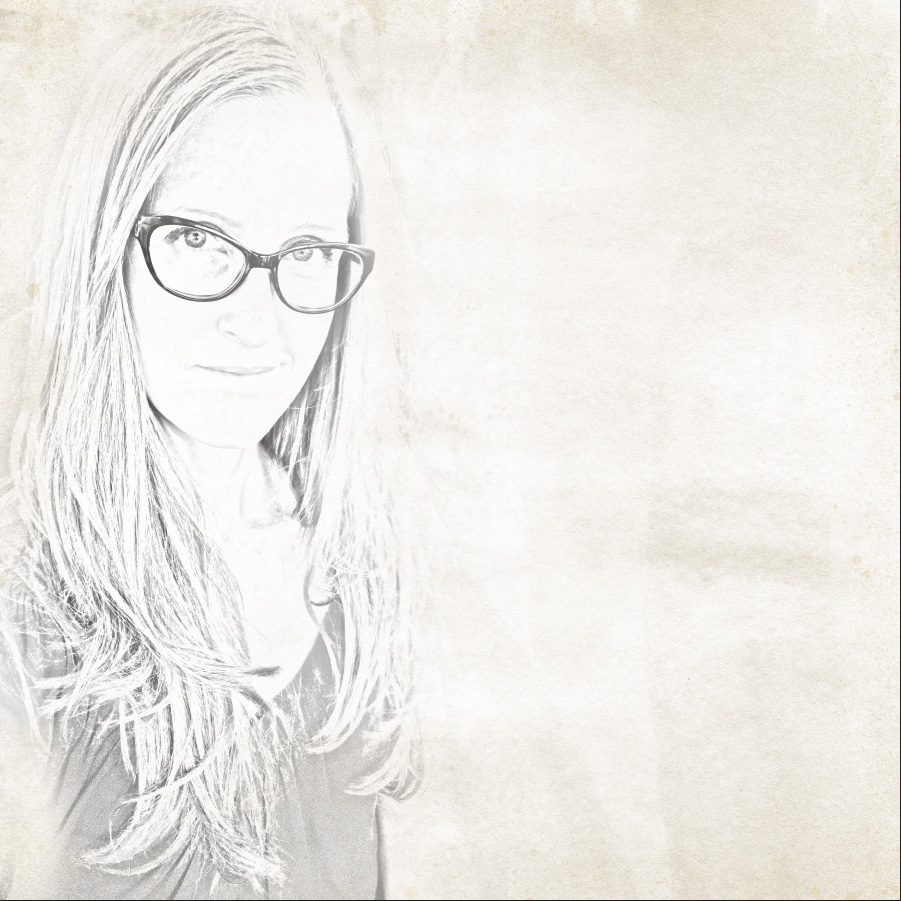
I think this might look good as a drawn-in background on a layout. I flattened the image and copied it over to my background paper (lighter-colored and plain backgrounds seem to work best).  I used a gradient fill as a clipping mask behind my photo, and then the eraser tool (brush mode, 5% flow) to blend the edges on the clipped layer to get the photo to blend into the background seamlessly. I use a low flow on the eraser brush because it’s harder to mess it up when you are only erasing 5% for each brush pass.  😉

9

10

My photo, blended into the background, looks like this:

11

I added some journaling and embellishments, and I’m done!

Almost 39

Credits:
A Day in the Life:  Solids
by Sugarplum Paperie
A Day in the Life:  Essentials by Sugarplum Paperie
Hello, I Love You by The Digital Press Designers

Kacy About the Author:  Kacy is an Environmental Engineer living in Arizona with a elderly, cranky, pudgy, but insanely cute calico kitty.  She enjoys scrapbooking, crocheting, dancing awkwardly to electronic dance music, Grumpy Cat, Scottish accents, drag queens, cupcakes, bacon,  Stephen King books, smirking, very crude inside jokes, and men in kilts.

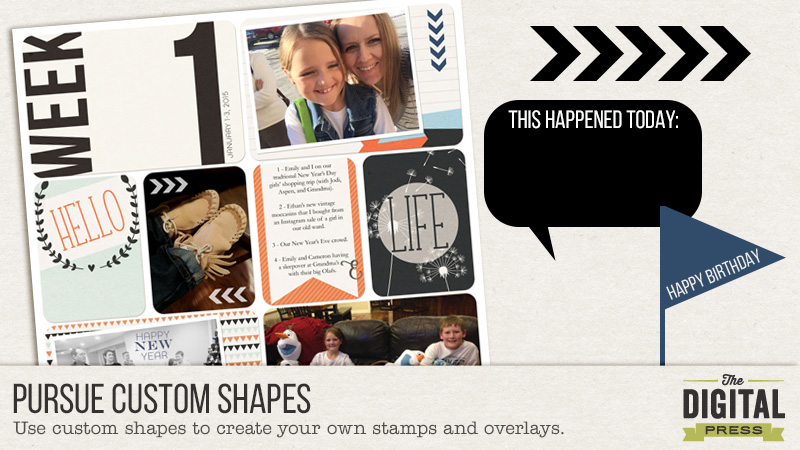
Pursue Custom Shapes

11

I love to use brushes/stamps on my photos, just to give them that little bit of extra. I love it when these are included in kits, but even when they’re not, it’s super easy to create your own using fun fonts and the custom shapes tool.

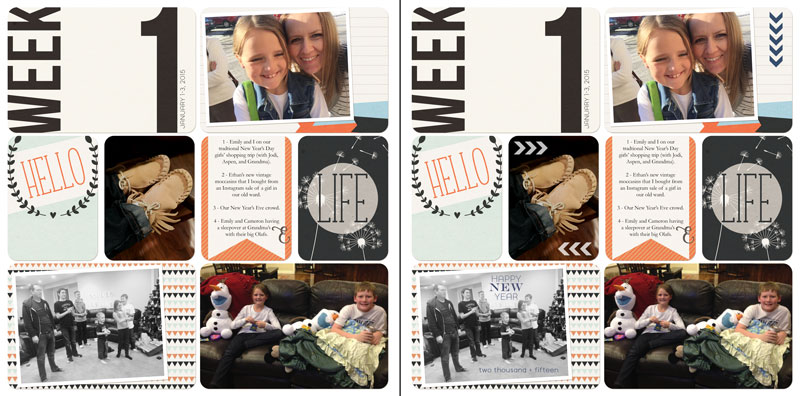
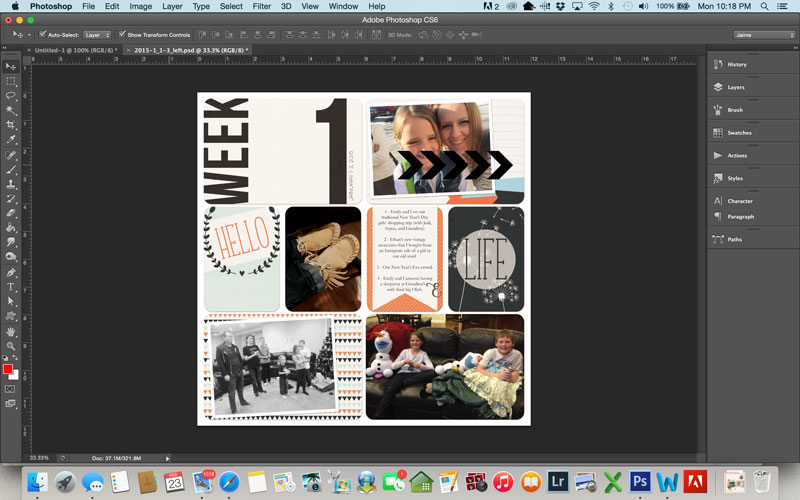
Take a look at the two pages below. They are the same page, but the first one doesn’t have the little extras I created using shapes and fonts. On the second page, I added a little, chevron arrow pattern (repeated a few times) and some custom text.

Cards from Project Weekly and The Simple Life by Amanda Yi Designs

Here’s a quick tutorial on how to use custom shapes to make your own stamps to use on your own photos.

  1. Create a blank document. I usually use a 4×6 or 3×4 document, since those are typically the size of the “pockets” I use for my scrapbooking.
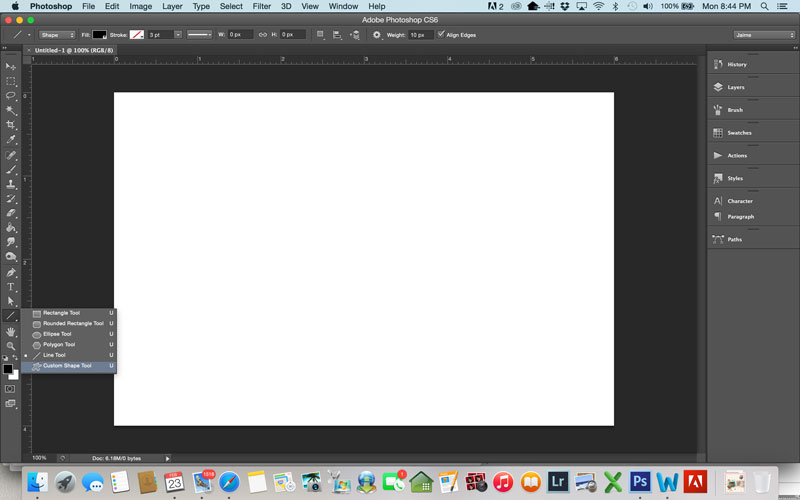
  2. Over on the tool bar, click on the corner of the shapes tool to bring out the flyout menu, and click on the one that says “custom shapes tool.”

1

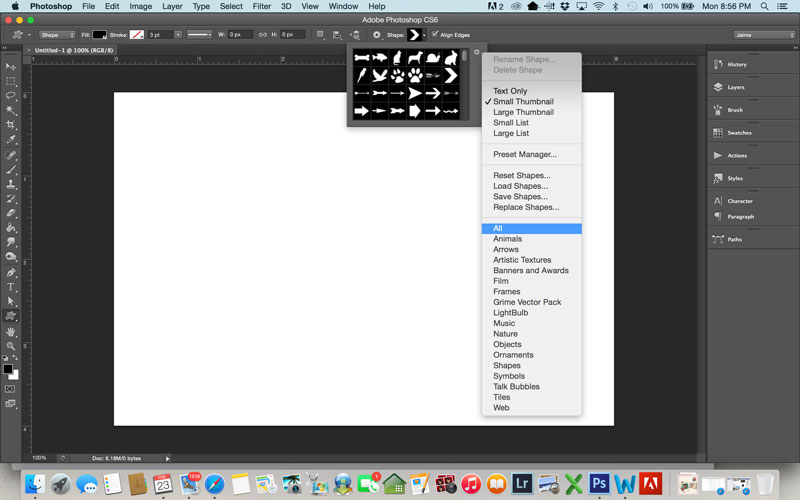
  1. The shape options will show up on your top toolbar. If all the shapes aren’t showing up, you can click on the little tool icon to bring up this menu. I like all of my shapes to be showing, so I select “ALL”.

2

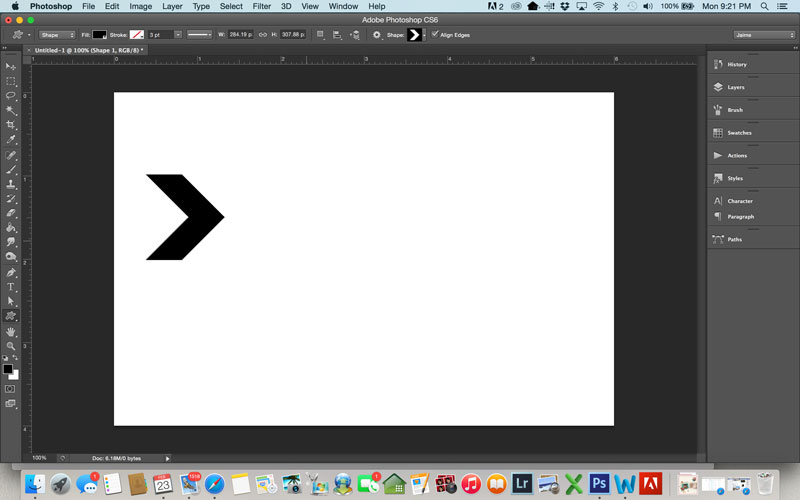
  1. For the page above, I chose to use this cute, little chevron-shaped arrow. Click and drag on your page to draw the shape. If you hold down shift at the same time, it will keep the same proportions (which matters for some shapes and doesn’t for others).

3

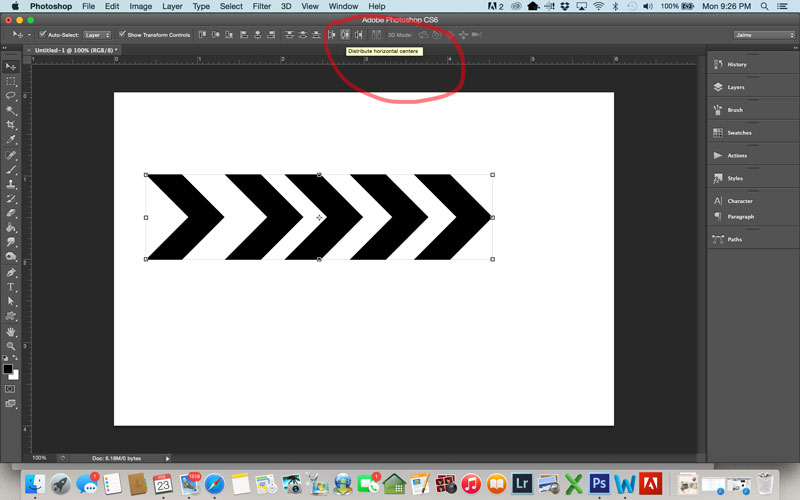
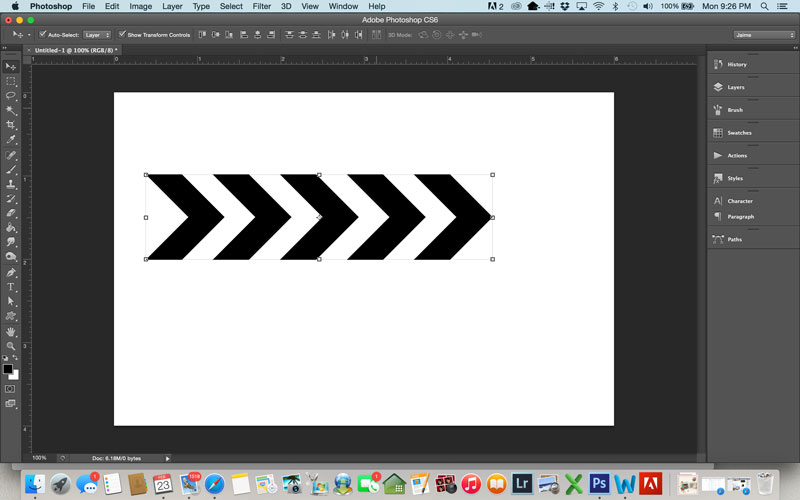
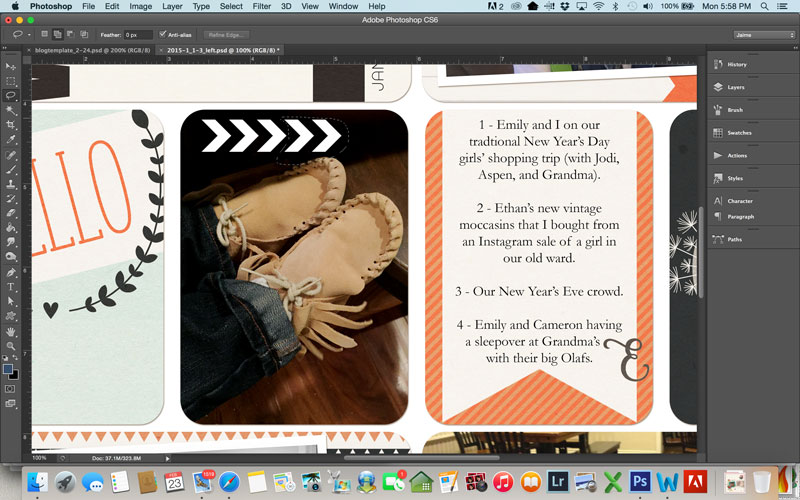
  1. For this one, I duplicated the arrow so I had five copies of it. Here’s one of my favorite tricks. Select all 5 arrows, and make sure your move tool is selected. Then, push the icon at the top that says “distribute horizontal centers” when you hover over it. It makes your arrows evenly spaced!

4

5

  1. At this point, I like to merge the shapes together. To do this, select all the arrows, right-click, and select “Merge Layers”. I also like to rasterize the shape (right-click and select “Rasterize Layer”). Now, you can drag the arrows over to your layout and use them however you want.

6

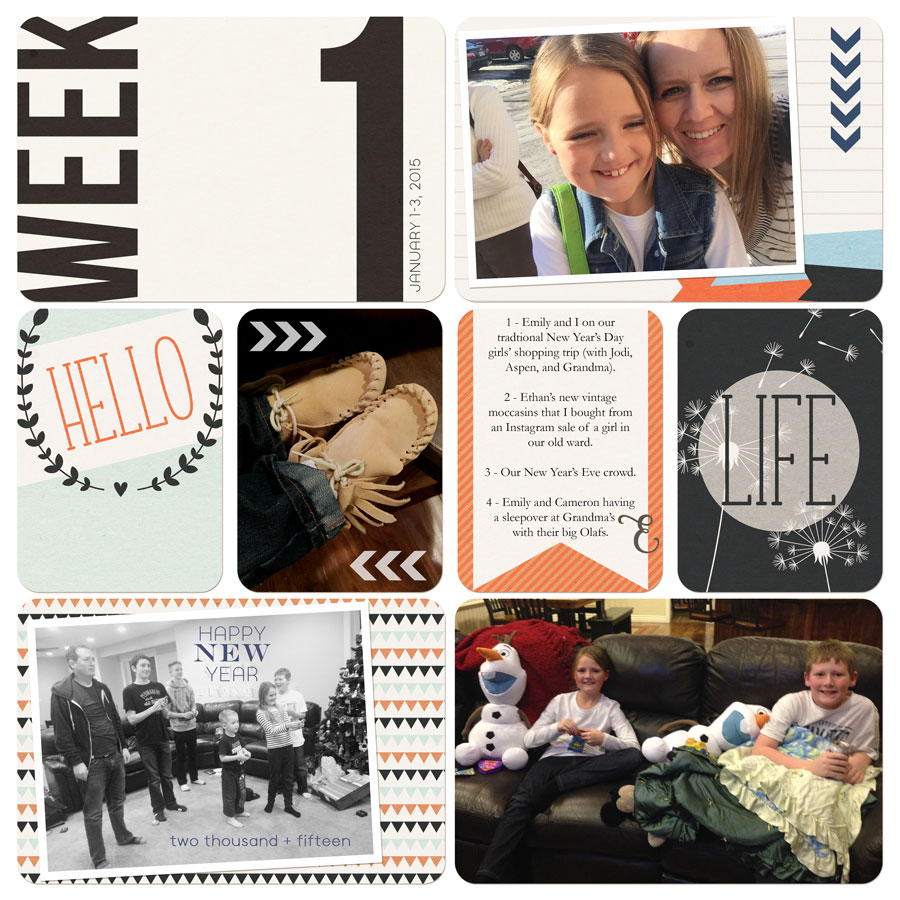
  1. For the top right pocket on this page, I rotated the arrows, made them smaller, and changed them to a blue color that matched my layout. I felt like I needed something next to the picture on the card, so I put the arrows there. I duplicated the arrows for the moccasin pic, but I decided that five arrows was too many, so I used the lasso tool to select two of the arrows, and deleted them. I also changed them to white for that pic and lowered the opacity to about 75%.

7

  1. The final step I took for this page was to add text to the bottom left pic. I had converted that photo to black and white, and I felt like it needed a little more. I just added some text boxes directly on top of the picture. Sometimes I will lower the opacity, or change the blending mode, but for this one I just changed the text to the same color as the top arrows. I liked it, so I left it that way.

Here is the final layout:

Cards from Project Weekly and The Simply Life by Amanda Yi Designs
Cards from Project Weekly and The Simple Life by Amanda Yi Design

There are so many fun shapes to play around with, so the next time you think your photo or page needs a little something extra, check them out! Here are a few more of my favorites:

8

JaimeAbout the Author: Jaime is a member of the creative team here at The Digital Press. She is a stay-at-home mom to 4 boys and 1 girl. When she’s not chauffeuring, volunteering at school, or helping with play costumes, she likes to digitally record her family’s memories, improve her photography skills, and read (there’s always a stack of books on her nightstand).

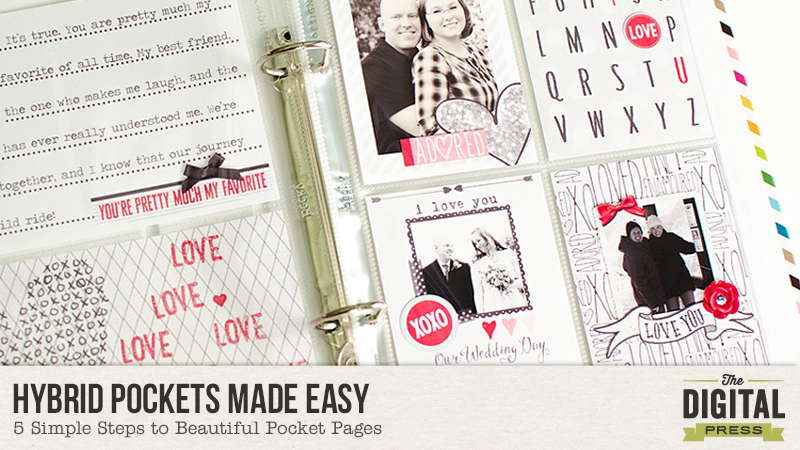
Hybrid Pockets Made Easy

Hybrid Pockets Made Easy

I never loved traditional paper scrapbooking. Mostly for all the same reasons you usually hear about why someone fell in love with digital; no mess, not spending an arm & a leg on supplies or tools, and the speed at which you can finish layouts! After several years of creating strictly digital pages I realized I had nothing to show for it. I had only printed a handful of layouts. I also found that I was only recording the big moments such as birthdays, holidays, and happy events. The snapshots, out-takes, and less than happy moments weren’t included and that was a big problem for me because I wasn’t being authentic in my memory keeping. I knew I had to make a change.

After taking a moment to assess where I was and where I wanted to be I decided that the best thing for me was to start printing at home. I also decided to jump on the pocket scrapbooking bandwagon because it felt like a great fit that would allow me to include pictures that I might not want to devote a whole 12×12 layout to, but were still important parts of my family’s daily real life.

When I set out to create my first hybrid pocket page I spent way too much time trying to get going. I really wasn’t sure where to start, but after a bit of trial & error over the course of several attempts I finally found a workflow that made hybrid easy for me. Today I’m sharing my process for making quick, but beautiful, hybrid pocket pages.

Step 1: Start With Your Layout

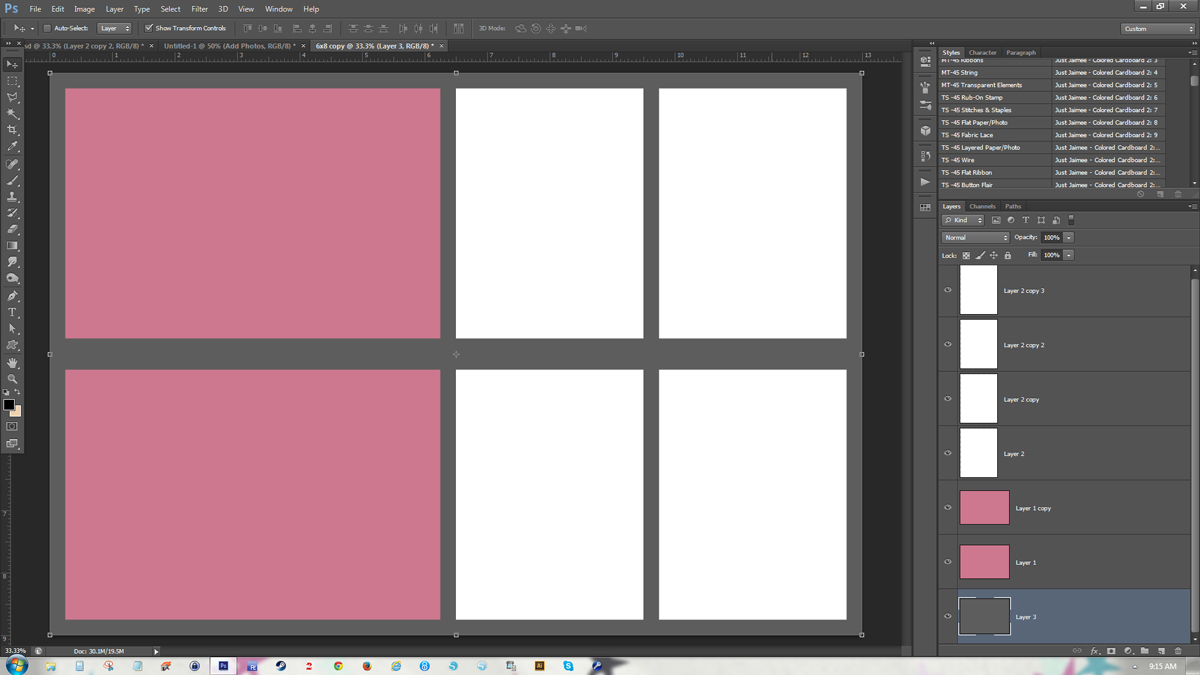
I find it’s easiest to create a template which matches the pocket page layout you’ll be using. For my example layout I’m creating for my 6×8” album and the pages are two 4×6” spots on the left and four 3×4” spots on the right. Create the appropriately sized boxes and arrange them in the correct places. These will be your clipping masks for creating your cards.

Hybrid Pockets Made Easy

Step 2: Add pre-made cards or papers & embellish

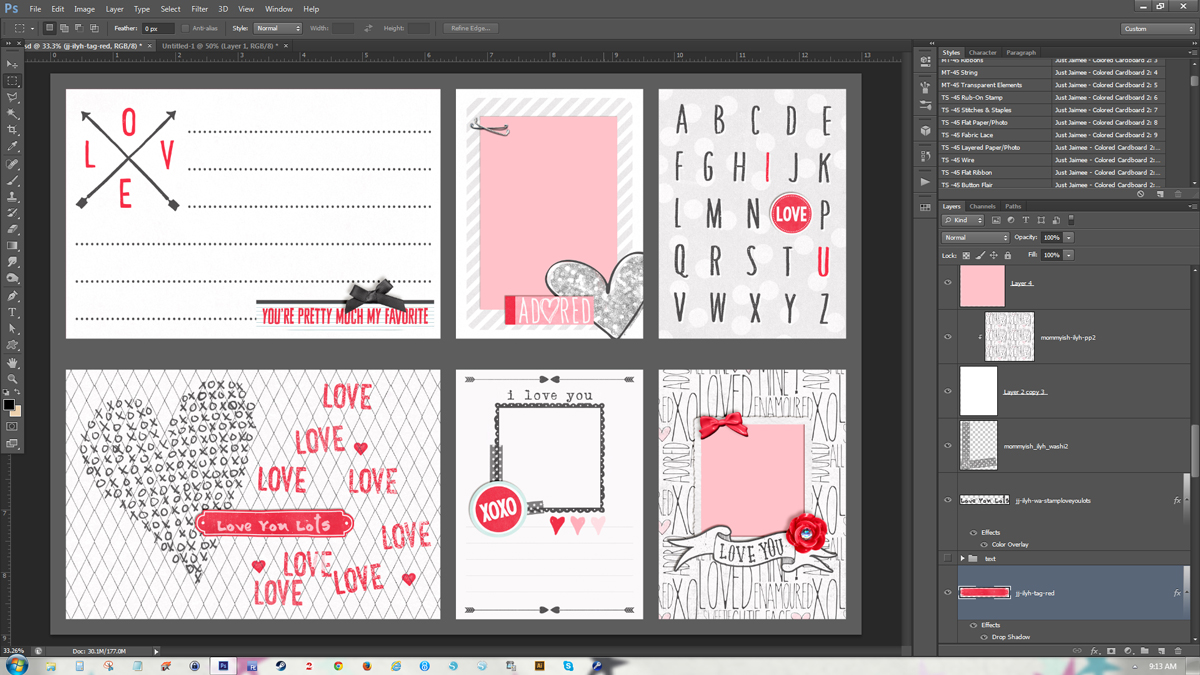
I like to treat each card as a mini layout. I look through the cards that come with the digital kit I’m using and drag them onto my layout. Sometimes I’ll also fill a space with a patterned paper. Then I look for frames in the kit that will work with the pictures I’m using. Once I’ve laid out where I’ll be putting my pictures I work on embellishing each card with some of the kit’s elements.

Hybrid Pockets Made Easy

Step 3: Add Photos and Text

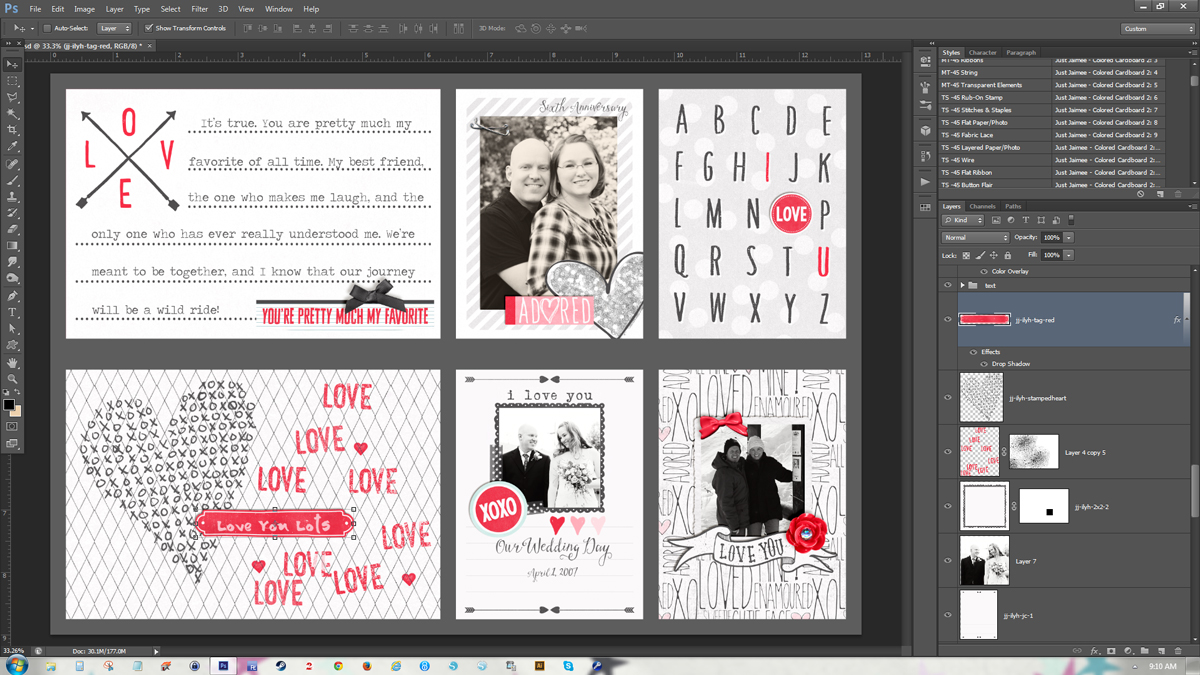
Now I edit & add my pictures to the cards. Finish things off with some text and I’m almost ready to print.

Hybrid Pockets Made Easy

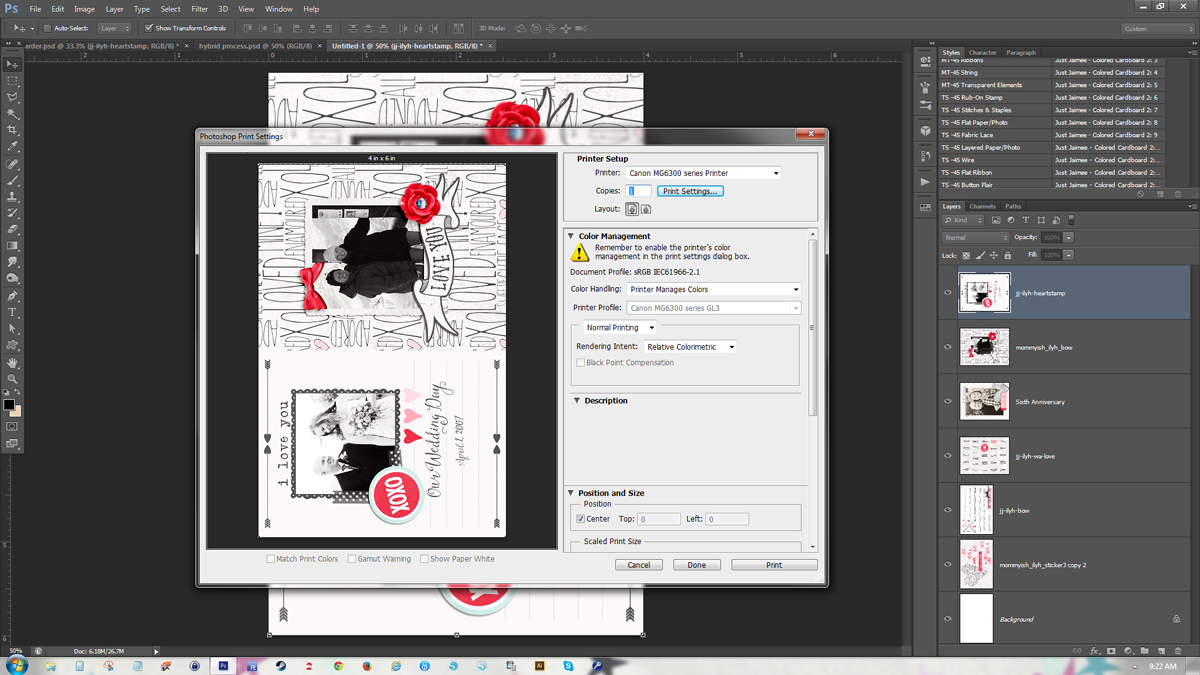
Step 4: Merge & Print

Once all the individual cards are ready it’s time to merge the layers. I hold down CTRL while clicking on each layer that I used for one of my cards. When they are all selected I hit CTRL+E to merge the selected layers. After I’ve merged all the cards I then create a new document sized to the print dimensions. I almost always print on 4×6” photo paper because it let’s me get away with the least amount of cutting. At this point I select & drag each card into my new document. The 3×4” cards fit 2 to a page nicely. Set your printer settings and print. I go down the layers list hiding the cards as I print them.

Tip: You only need to do the printer settings on the first print job. After that you can choose File>Print One Copy to bypass the print dialogue box!

Hybrid Pockets Made Easy

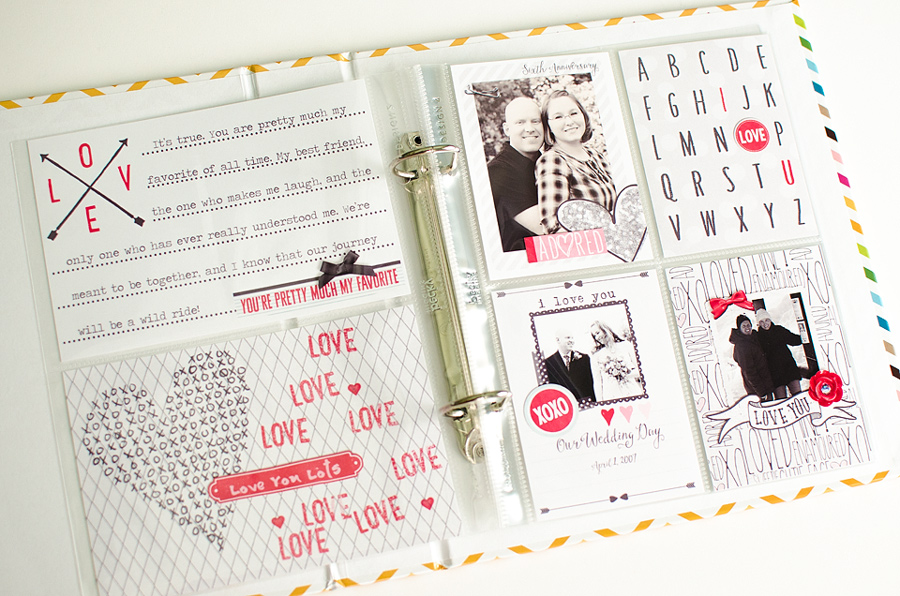
Step 5: Cut & Put Cards in Pockets

Cut your 2-Up 3×4” cards in half and pop it all into your pockets. All done!

Hybrid Pockets Made Easy
Real Life in Pockets | I Love You Harder by Mommyish and Just Jaimee


Hybrid style scrapbooking can be overwhelming at the start, but the instant gratification of having something tangible in your hands right away makes it well worth the effort in my book! I hope I’ve inspired you to give hybrid and/or pocket scrapbooking a try. I’d love to help you overcome any hurdles to hybrid that you’re facing. Leave a comment if you have a question or comment!


Amber About the Author: Amber Funk enjoys a vast assortment of interests such as scrapbooking, photography, getting crafty with her Silhouette Cameo, reading, and playing video games. She is a Wife and Mother of 2 living in Northern California and blogs her crafty adventures at http://perfectly-fabulous.com/

Pursue The Perfect Shadow – The Zen of Shadowing

Pursue The Perfect Shadow

I think that most of us seasoned scrappers went through phases with shadowing on a page. I remember my first pages, where I simply skipped the shadowing. I maybe just didn’t know that there was a shadowing feature and most probably I was ignorant that shadows would make a difference. After a while I found the shadows feature but just didn’t know how to use it properly and in review these pages don’t look much less awkward than my first attempts. After a while of shadow dabbling I found shadow styles and gosh, they made my scrapping life so much easier and rewarding. In this tutorial I will show you one technique to go even further and bring you closer to your Zen of Shadowing.


As much as anything in art, shadowing styles are a matter of taste. I personally like my shadows to be noticeable and giving depth to the page. I love it when I achieve a close-to-paper look. It’s still a hit and miss and I’m working, tweaking, changing my ways constantly to try something new and „better“ in this realm.


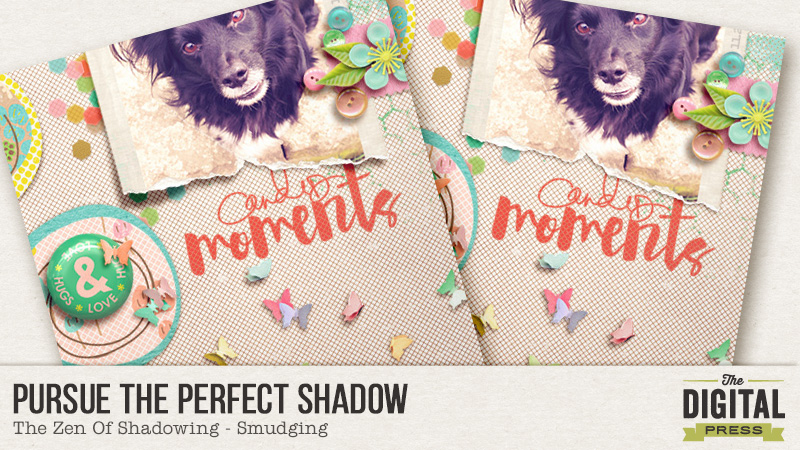
Pursue The Perfect Shadow or The Zen Of Shadowing - Smudging
Every item’s shadow on this layout has been smudged. Look at the paper’s edges, the photos and the tassels.


My latest obsession is „smudging“ the shadow. To do this, you have to be able to put your software-generated shadow on it’s own layer. I do this in photoshop cs6 by 1. right-clicking on the fx icon of the layer and 2. clicking „create layers“. If you can’t do that, you can always separate the shadow manually. Look up google for „Putting a Drop Shadow on Separate Layer„ for your graphic software.


Pursue The Perfect Shadow - The Zen Of Shadowing - Smudging
How to put your shadow on a separate layer in PS CS6

Before you can separate a shadow, you surely have to apply one. It’s up to you how you do that. I use shadow styles all the time and sometimes tweak them before separating, sometimes I do it afterwards.

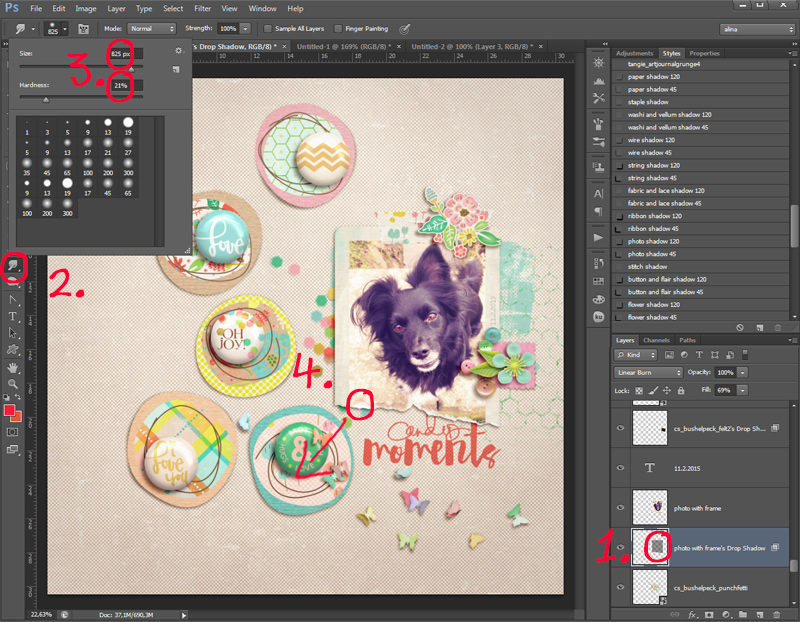
So with your shadow separated, you 1. click on the new shadow layer 2. click on the smugde tool, which is housed with the blur and sharpen tool. 3. Select a big round brush with about 20% hardness. The size of the brush depends on the size of the item your shadow belongs to. I usually go with a 825 px brush for the most items and adjust for very big or small items. 4. Look closely which part of the shadow you want to smudge. Put the middle of your brush to that part and pull a tiny bit into the direction where the light falls (away from the virtual light source).

Pursue The Perfect Shadow - The Zen Of Shadowing - Smudging
How to smugde a shadow

All the settings are just a suggestion and you may want to play around with this feature to get acquainted and make it your friend. The tool is not always easy to handle and especially when your software is going slow anyway, you may have some terrible fun waiting for your machine to calculate your move.

On a more detailed note (I love details!) some things I consider when working with shadows:

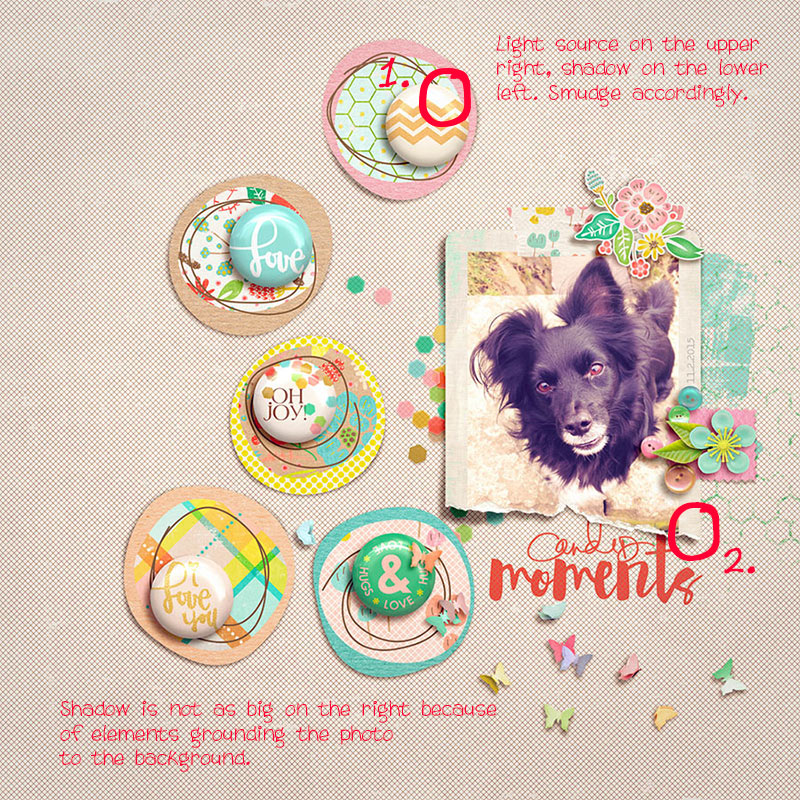
1. What is your global light doing? When the virtual lightsource is on the upper right corner, it usually makes no sense to stretch the shadow into that direction. Follow the path away from the light to stretch your shadow and create depth by applying the shadow how it would fall in a natural setting. If in doubt, go to a window, place a paper somewhere, crunch the paper a little and see how the shadow is falling when you turn the paper. It’s a great exercise for any visual artist.

2. Are there elements grounding your item? I personally don’t like it (blame it on my mild scrap ocd) when my shadow is spread where it naturally wouldn’t be spread. I smudge the shadow more to the inside of the item in these cases. Also the parts that are close to the grounding elements can’t be as far away from the background in my imagination.

3. Is the shadow strong or weak enough? As stated above, I like my shadows stronger, so most of the time I adjust the fill up to achieve a deeper tone. For more distance between item and background I might lighten the fill a little.

4. Smudge several times on one item if you want. As you see in the layout, I smudged the shadow of the photo several times. It still goes with the direction of the light, though. This makes the photo pop out of the spread even more.

Pursue The Perfect Shadow - The Zen Of Shadowing - Smudging
Details for smudging.

Let’s try this! It’s easier than it looks and it can make a huge difference on your page!

Happy smudging!

PS: I use ctrl z all the time when smudging (or using any other feature…)


AlinaAbout the Author: Alina enjoys sitting in front of her large computer screens too much. Apart from that she loves walking her dog and watching sunsets while being amazed of life in general. She is married to her best friend. Tries to manage the needs of her two cats and her dog and badly fails when they all want their cuddle time at once. Everything else is scrapping, taking photos and currently crafting. Having said that, she needs a bigger craft room.


Are You Ready to Scrap? Using Lightroom Collections to Plan Your Layouts

Are Your Ready to Scrap? Using Lightroom Collections to Play Your Layouts

How many times have you sat down to get some scrapping done and spent the whole time hunting for the photos that you want to use? It’s so frustrating to have to look through folders to find the photos from a certain event or that match a particular kit. I decided that I wanted to spend more time scrapping and less time hunting for photos, so I found a way to use Lightroom to organize my photos waiting to be scrapped.

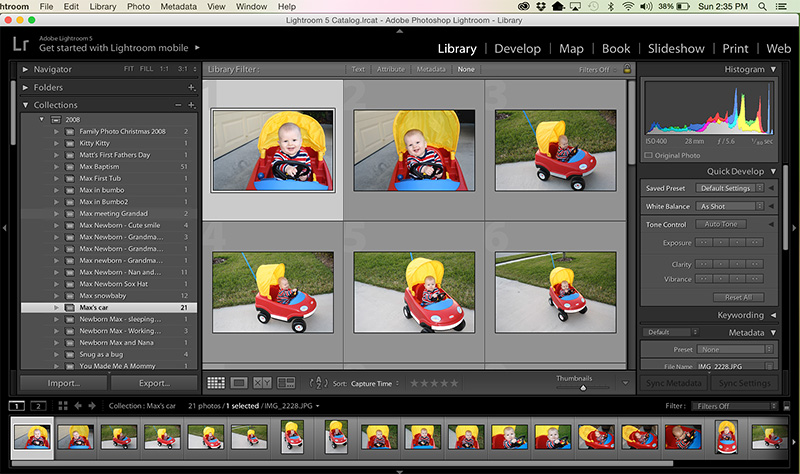
Collections is a feature in Lightroom that allows you to put photos together without actually moving where they are on your hard drive. I love using Collections to plan for my scrapbook layouts. I’m going to share my photo import workflow today to show you how I stay organized. By keeping up with these steps each time I import photos, I have photos ready to go whenever I’m ready to scrap.

Are You Ready to Scrap? Using Lightroom Collections to plan your layouts

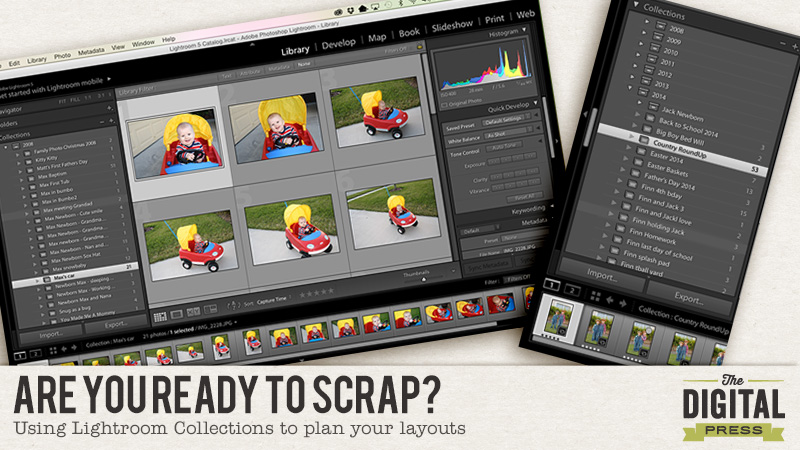
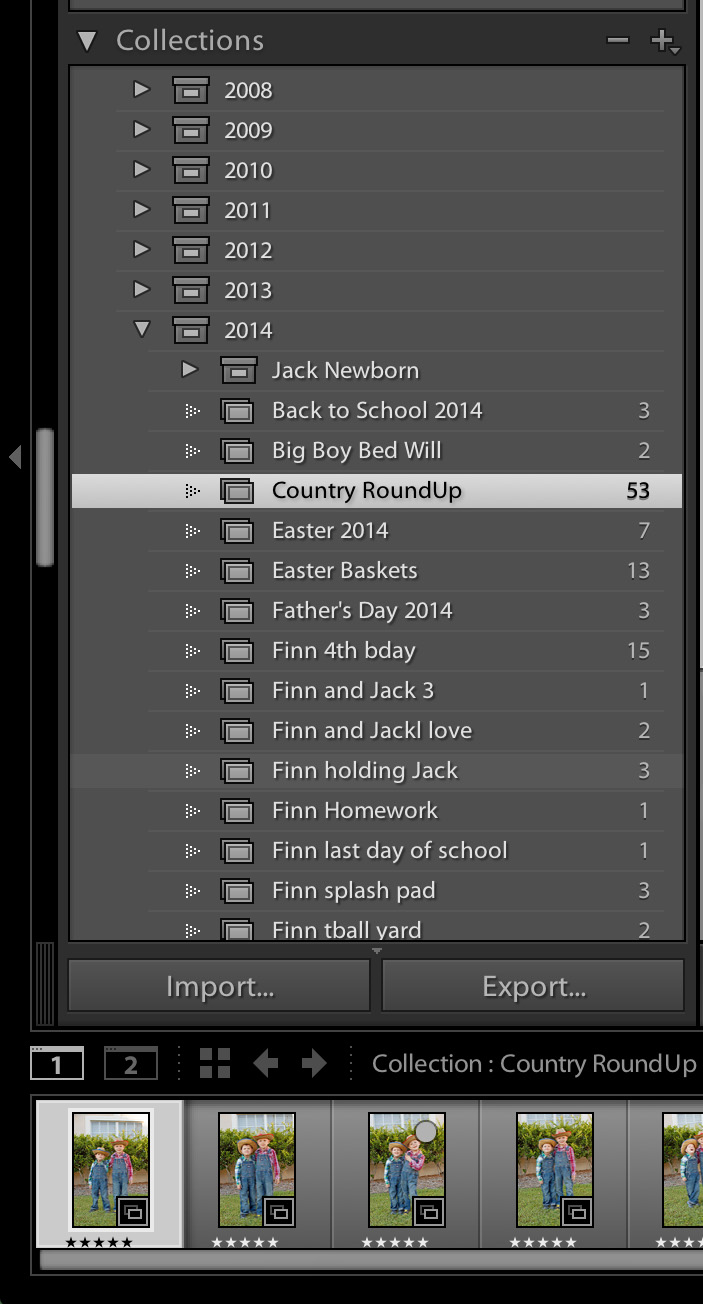
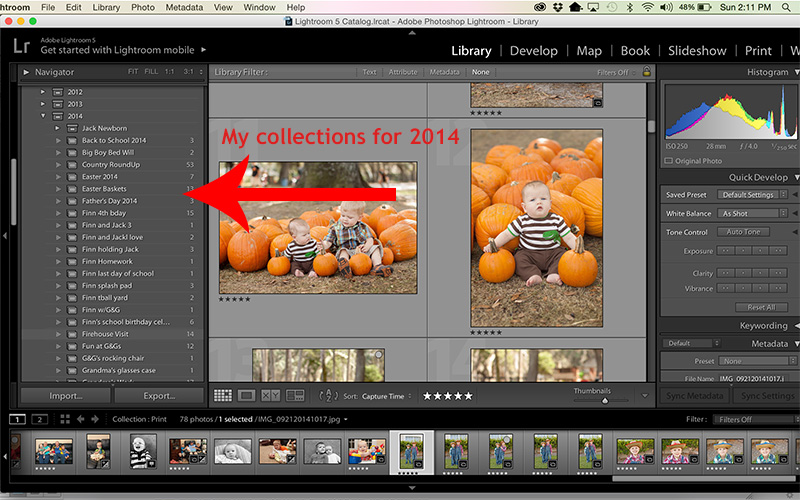
The first thing you need to do is think about how you scrapbook. If you do separate albums for each of your kids, then you may want to make Collection Sets for each child. I do yearly albums, so it made the most sense for me to have my Collection Sets by years. Your Collection Sets are going to be the main sections, and you are going to create collections within the Collection Sets for each layout you want to make. Here is a screen shot of my Collections panel so you can see how I have things set up:

Are You Ready to Scrap? Using Lightroom Collections to Plan Your Layouts

Next comes importing your photos. Import your photos into Lightroom using whatever file organizing system you use. I organize my photos by year and then month, but you can do whatever makes sense for how you scrapbook. Once you have imported your photos, take a look at what is there that you might want to scrapbook. I grab any photos that might go into a layout and create a collection for them. So, if it was my son’s birthday, I would grab all the photos from that day, go under the collection year, and then create a new collection titled “Birthday Max.” I do this for all of the photos that I have imported at that time, so I may have several different layouts that might come from the photos. There might be a t-ball layout, a school project, and a portrait shot of the baby all from the same import, so I would be creating as many collections as layouts that I want to create from these photos. It only takes me a minute or two because I am not culling or editing the photos, just grabbing all of them and throwing them into a collection.

If you do a weekly or monthly pocket-style album, Collections is also helpful for that. I grab all of the photos for that period of time and put them into a collection. You can use a Smart Collection to do this by specifying the date range that you would like to be included in the Smart Collection. Then, I am able to go through and review and rate the photos, deciding what I want to include in my weekly spread.

Now, when you are ready to scrap, you can just go to your Collections panel and grab a collection to get scrapping! You will know exactly what layouts you need to create without hunting through folder after folder. Once you have chosen a collection to work with, you can then decide which photos to include in your layout. Because all the photos are there, you can easily see which are the best to include on your layout.

Are You Ready to Scrap? Using Lightroom Collections to plan your layouts

My favorite thing about Collections is that once you are done with the layout, you can just delete the collection. It doesn’t delete the photos from your computer! It only deletes the collection of photos you have created. It couldn’t be any easier to stay organized and ready to scrap! I went back through all my older photos and created collections for each year, so I know that once I have deleted all the collections from the year collection set, I am ready to print my completed album!

I love being able to use Collections to keep my “To Be Scrapped” photos organized. I hope this tutorial helps you to get organized, too!

KatieAbout the Author: Katie is a member of the Creative Team here at The Digital Press. She lives in Central Florida with her husband and their four sweet but crazy boys. When she’s not dodging Nerf bullets or trying to dig out from under the never ending pile of laundry, she enjoys photography, cooking, going to Disney World with her family, and, of course, digital scrapbooking.