A few months ago, I wrote a post about taking pictures to help you document your everyday. This month, I’d like to discuss getting those photos off your cameras and phones and onto your computers in an organized way so they can be scrapped in a timely manner. I have found that automating this process as much as possible has helped me keep my camera’s SD card as well as my Camera Roll on my phone clean so that I never run out of space on either. Here is my process:
Phone Photos
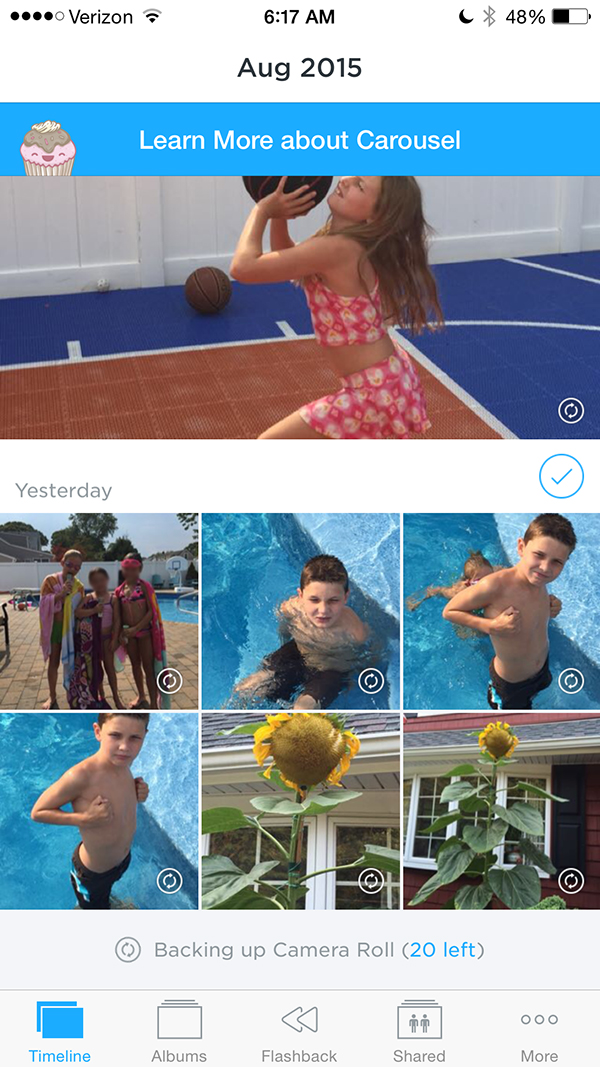
Like most of you, I use my phone to take a lot of photos. I use an app called Carousel by Dropbox to organize and back up my phone photos. When you take a picture, it automatically backs it up to Dropbox if you have that option set up. I have mine set to back it up when I am connected to WiFi so that it doesn’t use my cellular data. Therefore, when I am home, I just open up my Carousel app and it automatically starts backing up any photos on my camera roll.
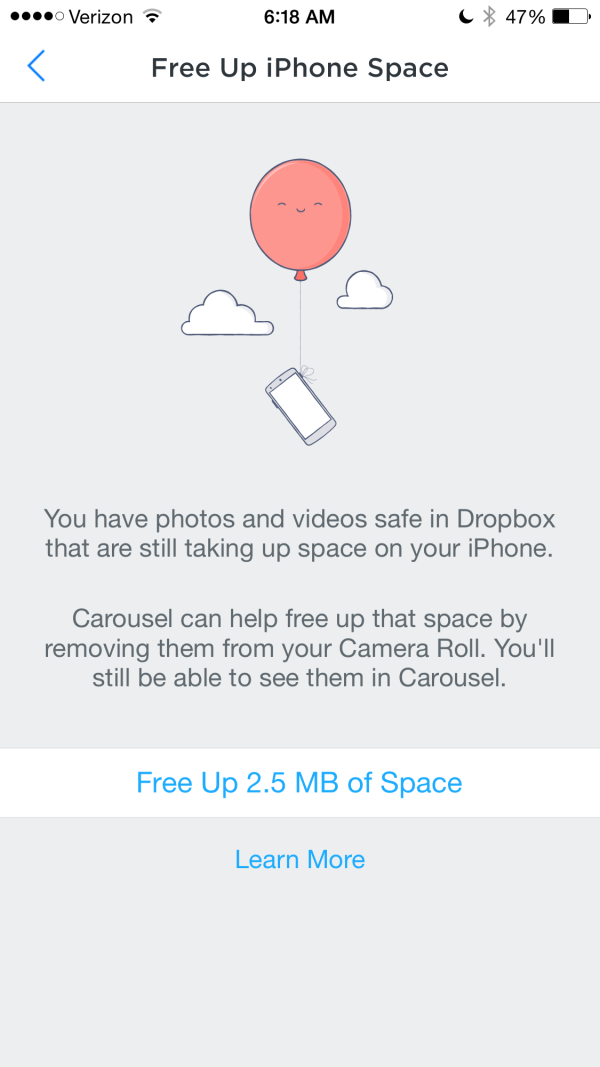
The beauty of Carousel is that it will also alert you when your storage is low on your device. This way, you will never get a message telling you can’t take another photo because you have too many old ones stored on your phone. I don’t typically wait that long. When I think of it, I tap the ellipses at the bottom of the app, go to settings and select Free Up iPhone Space. Then, Carousel will tell me how much space it can free up by removing my photos that are safely stored in Dropbox from my Camera Roll:
Wait. It gets better. Dropbox can get expensive so I don’t use it to store backups of all my photos. So, I need to get my photos out of my Dropbox folder and onto my computer. Enter Lightroom.
Lightroom works with Carousel by way of its Auto Import feature. Anytime a photo is uploaded to a watched folder, Lightroom will automatically import it into its catalog whenever Lightroom is launched and it will move it wherever you tell it. It’s pretty easy to set up. First, you need to enable Auto Import:
Choose File > Auto Import > Enable Auto Import
Next, you need to specify the settings:
Choose File > Auto Import > Auto Import Settings
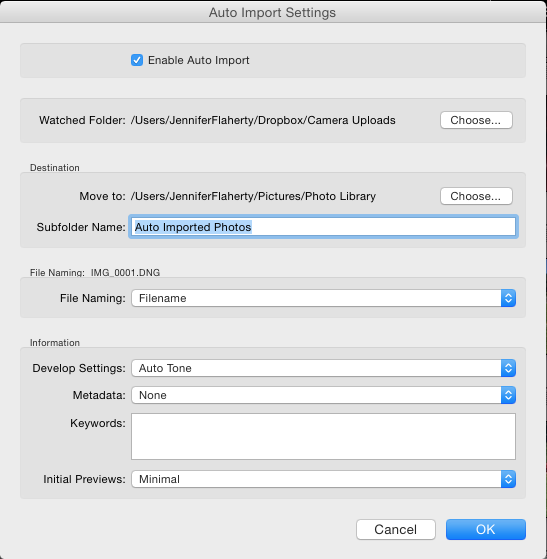
In the Auto Import Settings, you will specify the name of the Watched Folder. This folder must not contain any subfolders. In the case of Carousel, the Watched Folder would be the Camera Uploads folder within your Dropbox folder. Next, specify the Destination where you want the photos moved. I move mine to a folder on my hard drive called Auto Imported Photos. Next, you can choose a File Naming option which will rename all of your imported photos. (I don’t do this.) And finally, in the Information section, you can choose to apply Develop Settings, add Metadata and/or Keywords. I apply the Auto Tone develop setting upon import which applies automatic corrections for Exposure, Blacks, Brightness, and Contrast:
While a lot of what I said may sound overwhelming, let me stress that that is a one time set up. To be clear, my process for uploading my phone photos to Lightroom with color corrections is as follows:
Open Carousel.
That’s it. All I have to do is open the Carousel app and everything else is automatic!
Now, onto my process for downloading my dSLR photos. Unfortunately, my process for that is not as easy, but it can be.
dSLR Photos
I choose to tether my camera to my computer to download photos. My reason is this: I feel there is less probability for damaging or losing my SD card if I don’t take it out of my camera. I keep my camera and cord by my laptop, so it is not really a big deal. I just connect the wire, connect my EHD (because that is where I store my photos), open Lightroom and press the Import button.
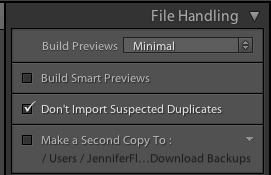
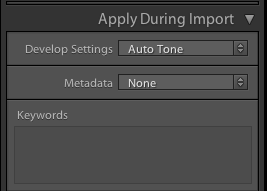
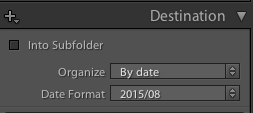
Along the right hand side, a number of panels open up: File Handling, File Renaming, Apply During Import and Destination.
Under File Handling, I check the box “Don’t Import Suspected Duplicates.”
I don’t do anything under Rename my files, however, this is where you could choose to rename all your files by date or event name. I just don’t do that.
Under Apply During Import, I choose the Develop Setting Auto Tone which can be found under the Lightroom General Presets. As I stated earlier, this automatically corrects the Exposure, Blacks, Brightness, and Contrast.
Finally, under Destination, I choose to organize them By Date using the Year/Month format. Then, I select my External Hard Drive and navigate to my Pictures folder. There Lightroom will automatically copy my photos from my camera to my EHD and store them in a yearly folder which is then separated again by month.
Once my photos are in Lightroom, there are a number of ways they can be organized to make scrapping them a breeze. I will talk about this in another blog post. However, I did want to share with you how some others on our team get their photos off their computer.
Sabrina says: I use an app called PhotoSync and it transfers the photos wirelessly. I also have downloaded the application my computer so it can do the transfer. Super easy!! You can get it for iPhone or Android.
Jamie says: If you’re working with everything Apple (Mac and iPhone), Airdrop is a great feature to get pictures from your phone (or anyone else also on an iPhone) to your computer. That’s what I usually use to get pics from my phone to computer, then I import them into Lightroom at that point. When getting them off my DSLR, I just put the SD card in my computer, and import through LR. (Note: If you are working with an older Mac computer or iPhone, Airdrop may not be compatible.)
Juliette says: My compact camera automatically files my photos by date on my Mac (over wifi from anywhere in the world provided the Mac is turned on) when I press a button on the camera. It’s a Samsung WB800F; it’s absolutely brilliant!
Kathryn says: I use Google Photos auto sync to back up my phone photos. It’s a really easy process for Android users as it’s built in and the backup is free. I do also have an Eyefi SD card to do wireless transfer from my dSLR.
So, as you can see, there are a number of ways to get your photos off your camera pretty easily, so they are ready and waiting for you to scrap them. So, how about you, what’s your process?
![]()
About the Author: Jen is a member of the Pocket Team at The Digital Press. Having scrapped digitally for many years, she has come to embrace the simplicity of Pocket Scrapping since it fits more easily into her busy lifestyle of shuttling her three children from field to field. When she is not on the computer, you will find her working out or really doing anything else she can besides cooking, cleaning and doing laundry.

One comment