Hey digi- and hybrid scrappers! I hope you are ready for a tutorial about how to get your layouts on instagram easily and in the blink of an eye. Because if you’re like me, you want your layouts to be seen. The more, the better.
When I began uploading my layouts to Instagram, I thought it’s complicated and extra work. Now that I played a little and found ways, it’s actually not that much more work and it’s even saving me some time on other tasks. What I love most though is the fact that I can be anywhere and use my phone to upload to Instagram and in the same step to facebook. I can be on the couch while watching tv, while I’m waiting in line at a store, while I’m having a little downtime… you get the picture.
Why would you want to upload your layouts to Instagram anyway? For me in the beginning it was just another way of giving my designers additional airtime. I uploaded my layouts to spread the love a little more. Over the months it has become an inspiration board, informational tool, documentary of my own life and much more. The community at Instagram is a little different from facebook. It’s closer and more „intimate“. I get a lot more views and likes. I happily like the posts of the people that I’m following, too. It’s really a loving place.
How do you get your layouts up to Instagram in a whim? I know of three different app uploads. It depends on your choice of online tool. Do you use flickr, photobucket or dropbox to upload your layouts to show them to your creative teams, family or friends? Do you use facebook for doing that? Then it’s even easier to get your sweet stuff on Instagram and at the same time on facebook. Once you did it a few times, it’s a breeze.
All the phone screenshots you see here are taken from my S4. Although I’m not 100% sure if this works on apple devices as well, it might just be the same process. As far as I know, the windows machines have instagram beta running currently. I tested it and I couldn’t upload from other apps than the standard windows photo gallery. Sorry!
To use this tutorial easily, you have to have Instagram installed on your phone and know how to upload pictures from your phone’s gallery to Instagram. You have to be logged in to the app.
First and foremost, you use your own picture cloud service. I use flickr and dropbox and have used photobucket in the past. All three are available as an app for android and apple devices.
When you want to upload to Instagram, you have to get the coordinating app for your service first. Install the app, log in to your account.
Because I know lots of you use photobucket, I will get you through the uploading process from there first. The photobucket app is called Photobucket Share Print Photos.
- On your computer: upload your layout to photobucket like you usually do.
- On your phone: open photobucket, access your uploaded layout (via „your library“)
- Tap on the „share“ button, that looks like three connected dots in a half triangle.
- Search for Instagram, tap on the icon
- The usual Instagram dialogue runs now (crop, edit) and you can insert your text before you post it.
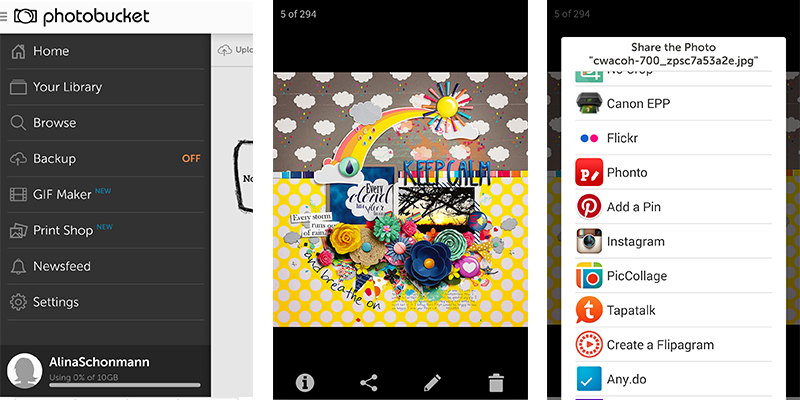
There is no need to download your layout to your phone first. You can directly upload from your cloud service to Instagram.
- The upload process from flickr is the same, only that you use the flickr app.
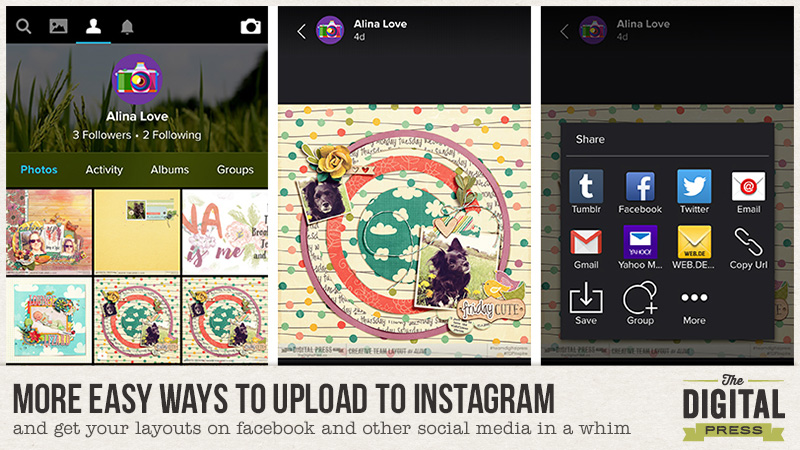
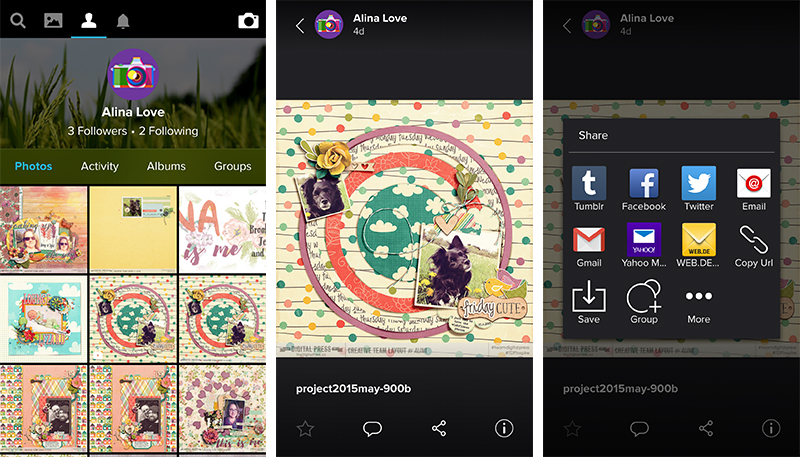
- To access your earlier uploads, tap on the portrait icon in the top line, then access your layout (left screenshot).
- Then tap on the share icon/the connected dots (middle screenshot)
- and if Instagram doesn’t show up, tap on “more” (right screenshot).
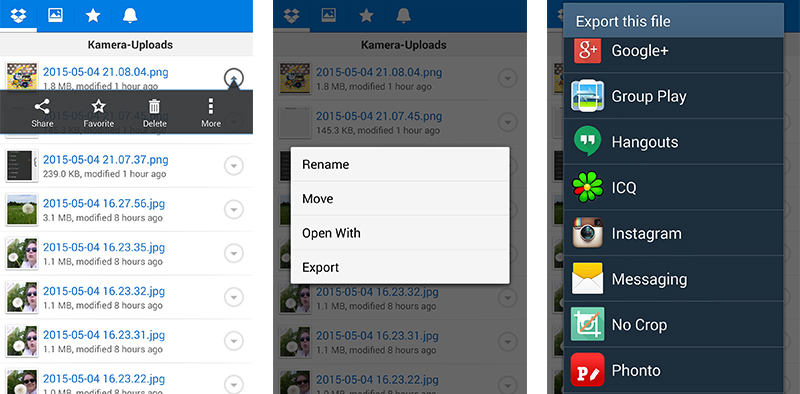
From dropbox I can’t use the share button.
- I have to tap on the three dots in a row “More” on the right (left screenshot)
- and tap on „Export“ (middle screenshot)
- and on the Instagram icon (right screenshot) to start the upload to Instagram.
So far, so good. If you want to make your upload even more efficient, you might want to share your layout on various other social media. On my phone I can share to facebook, twitter, tumblr and flickr. You can do that on the same page in Instagram, that you type your text in before you post. Your device might ask you to log in to the service if you didn’t do it before.

When you share to facebook, your layout appears with your full text from Instagram on your timeline and you can share it to any facebook group or friends. I show you how.
- Search for the posting you made via Instagram on your timeline (left screenshot)
- Be sure first, that the setting for the posting is public, otherwise your picture might not be visible. To check the privacy settings tap on the tiny light gray downward arrow on the upper right of the post (left screenshot), tap on “Edit Privacy” (middle screenshot) and set it to “Public” (right screenshot). If it has been on public the first time, it will most probably always be.
- Tap on “Share” (left picture, low right)
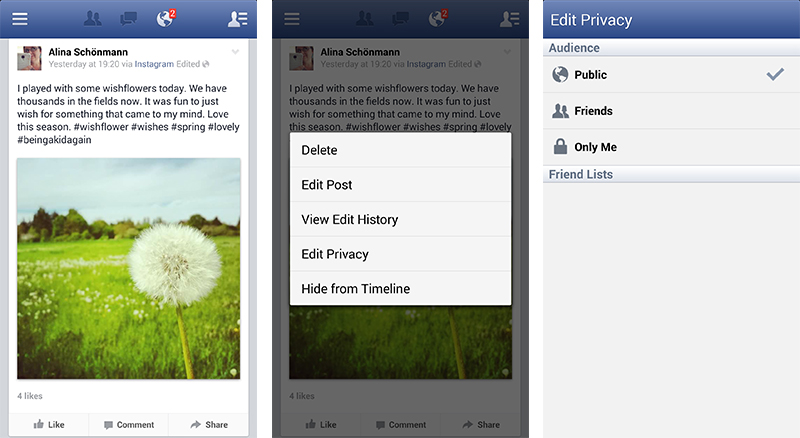
- Left screenshot: In the low line on the right you see the earth icon on the right. This shows, that it’s a public post. Tap on “on your own timeline” (down left)
- Set it to “In a group” (middle screenshot)
- Choose your group or type in the group you want to share your layout to (right screenshot).
- In the next dialog you can share it directly as it is or you can also add more text if you want to (not shown here).
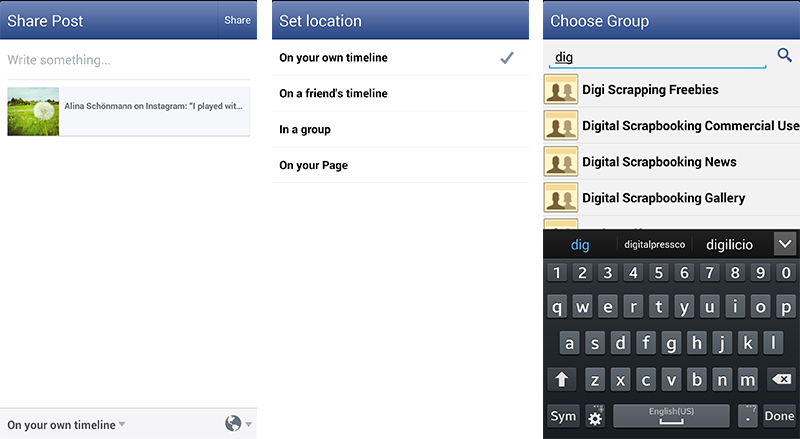
In case you want to add more info like product links on facebook along with your layout, I’d recommend doing this step (the sharing in groups) on your computer as it’s not that easy to get your links into your post on the phone.
Some more info on hashtags.
- Use hashtags. If you want your layout or picture to be seen, use them. For instance every time I upload a layout with my dog in it, I use #dogs and #dogsofinstagram and #dogsofig. I get a lot of likes from people who would usually not see my layout. People who don’t even know scrapbooking! The more views you get, the more people will follow you. Don’t be shy on hashtags. Think of words that fit your layout in any way and type them in. My phone shows me how often the hashtag has been used on Instagram in the past when I have typed it in. This helps you in deciding if you want to use it or not.
- Once you typed a hashtag in, your phone remembers it. You won’t have to type it in again and again. My phone even remembers series of hashtags I used and I just have to tap on them, to make them appear in my text.
- Recommended general hashtags for your layouts: #digiscrap #digitalscrapbooking #digiscrapbooking #scrapbook #scrapbooking #pocketscrapbooking #hybridscrap #hybridscrapbook
Of course you don’t have to use all of them, but if you want to, you can! There are many more. I learned a lot by looking at other Instagram peeps and watching what hashtags they use. - Recommended hashtags for your The Digital Press layouts: #thedigitalpressco #TDPinspire and the hashtags of the designer, whose product you used, if you want to.
- Please mention us with @thedigitalpressco when you upload your The Digital Press layouts, so that we can like your layout and time and time again we might regram (repost/share) your layouts on our own instagram account. Wouldn’t that be great? When you set your Instagram account to private, we usually can’t regram your posts. Sometimes it works, sometimes it doesn’t.
I hope this has been helpful and you are full of motivation to try new things out! We hope to see you on Instagram! Follow us @thedigitalpressco . Please remember …co at the end! This is the real one.
 About the Author: Alina enjoys sitting in front of her large computer screens too much. Apart from that she loves walking her dog and watching sunsets while being amazed of life in general. She is married to her best friend. Tries to manage the needs of her two cats and her dog and badly fails when they all want their cuddle time at once. Everything else is scrapping, taking photos and currently crafting. Having said that, she needs a bigger craft room.

Thx for this! I need to IG more.