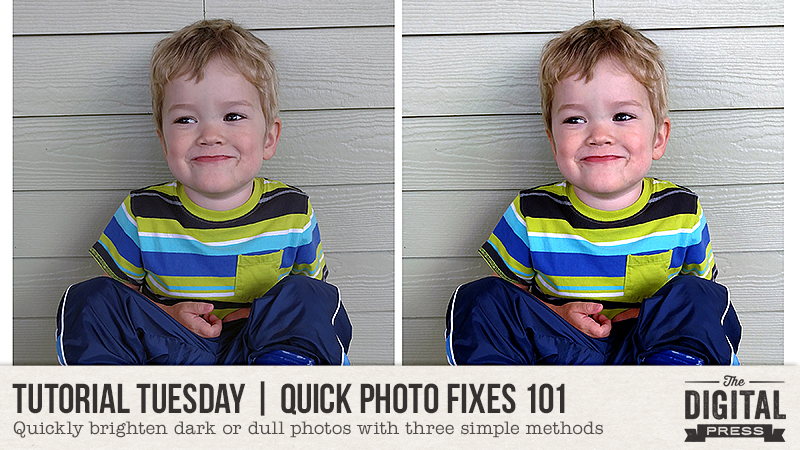
Have you ever just been browsing through the gallery and seen a page that really just POPPED right out at you? More often than not, that page popped like that because of a gorgeous photograph that the scrapper used. Photographs, and I mean really good photographs, can really make even the most simple page shine!
I hear scrappers comment “Well, I am not a professional photographer, and I don’t have time to learn, so I just use whatever photos I have!” Believe me when I say, “I GET THAT!” Life is crazy! At least I know mine is, and I don’t want to spend hours tweaking every single photo I put into our memory books either.
But what if I told you that you could tweak most photos, even the photos you take on your phone, just a little, and improve their appeal incredibly? Would you be interested to learn how?
Here at The Digital Press we are starting a simple Tutorial Tuesday Series entitled Quick Photo Fixes. Little tips and tricks to help you step up your everyday photos quickly and easily, so they shine on your layouts and even make those layouts pop right out of the galleries.
Today I want to start with something simple – brightening dark/dull photos. We all have photos that we took (often with our phone) that are just too dark and drab feeling. Sometimes they are WAY too dark and you can barely make out the subject matter, but a lot of the time photos are just dark enough to look muddy and dull. They are still usable, but they don’t say WOW! Today I want to show you three simple ways you can brighten those photos and make them stand out just a bit more.
Now, before we start, I want to say that in the world of photography, how under or over exposed a photo is has really become a very personal and artistic thing. Some photographers swear by certain levels and others just go with what makes them happy.
Here are two different portraits taken from a popular photography site – both are beautiful, and tell their story well, but have different levels of brightness/exposure and so create a different feel.

Since we are working on photos to use in our family memory keeping, I want you to feel free to go with whatever level of brightness makes you happy or fits the mood of your layout. I personally tend to lean towards brighter, lighter photos with lots of contrast, and sometimes get told mine are “overexposed.” But that is OK with me, because I like the way they feel. Unless you are a professional photographer and make a living on other people’s desires and opinions, don’t let other people’s aesthetics make you doubt yourself. These are your memories, you make them as bright and happy as you want!
Now, for the fun stuff.
These days I find I am taking a lot of photos with my phone, mostly because my favorite DSLR is starting to die on me and I can’t face the pain of admitting that. But also because I almost always have my phone with me, but my big bulky camera, not so much. Camera phones really have come a long way, but I find mine still tends to struggle with getting the brightness levels right – especially when we are indoors, and I currently live in the Pacific Northwest where rainy season has taken on a new meaning – even for this Southeast Asian Tropical family – so most days we are inside.
However, I have found that most of the time I can correct the dark drab look of my photos, through one of these three different methods.
1. BRIGHTNESS and CONTRAST
The quickest and easiest method is to play with the Brightness and Contrast. Granted, this won’t always do the trick, but it is a good place to start if you are new to photo editing or get overwhelmed in PS or PSE when playing around with photos. It is pretty quick and simple, but it will still make a lovely difference in your photo.
Take this photo for example.

I took this photo of my daughter in a little shop outside a Thai village up in the mountains somewhere. It was the middle of the day, very hot, very bright outside, but there was no lighting inside the shop except what came through the windows. That made the shop nice and cool, but it also meant that my photos ended up pretty dark.
To correct this, I opened up the brightness/contrast control panel. You can find it under Image>Ajustments>Brightness/Contrast.
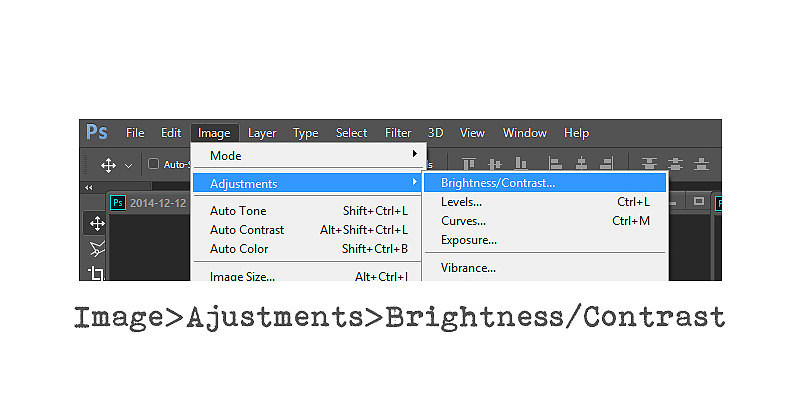
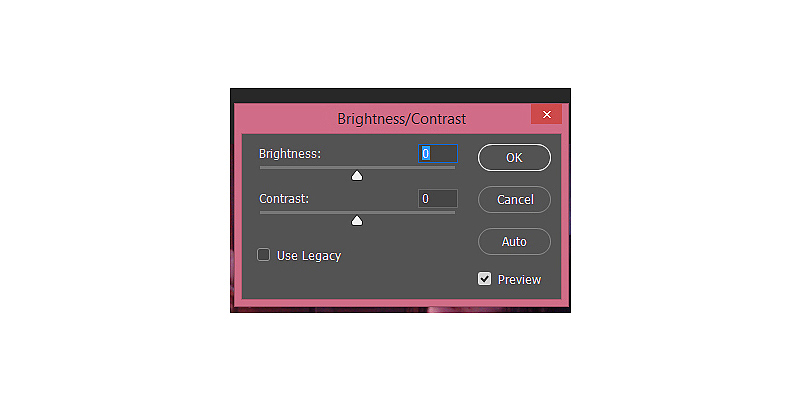
That will open up this little box with sliders for both brightness and contrast.
I brightened my image just enough to bring her face to the right skin tone and leave behind that grey tinge.
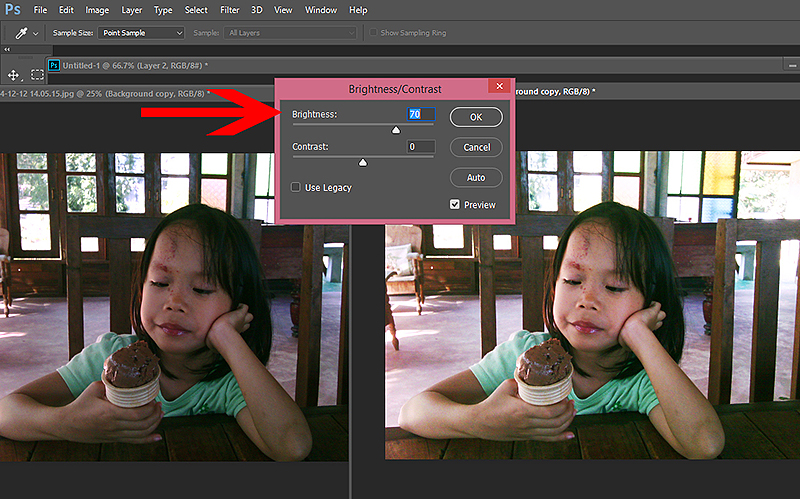
Then I added some contrast to bump the shadows back up and bring some pop to the photo.
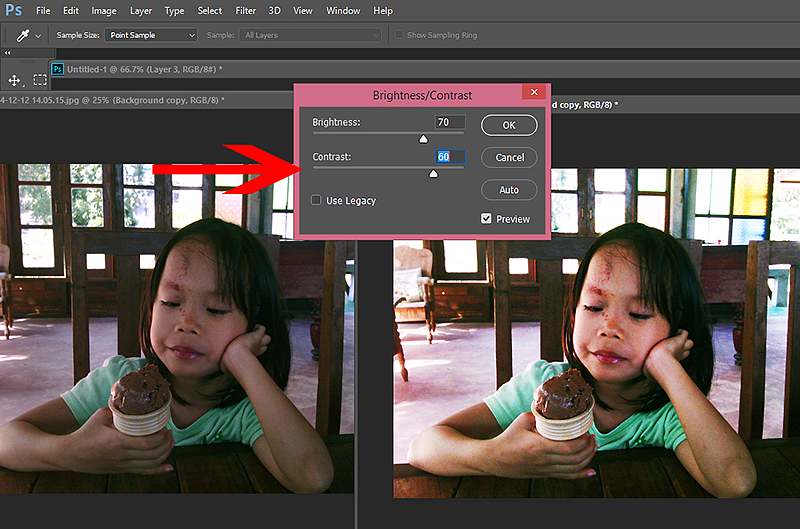
You will notice that this washed out the background a bit – after all there is a LOT of bright sunshine poring in from those windows. In this case, I don’t really care, because the background was not so important to this photo, but there are techniques that allow you to adjust for that. We will cover those at a later date.
Here is a side by side of the original and final photo.
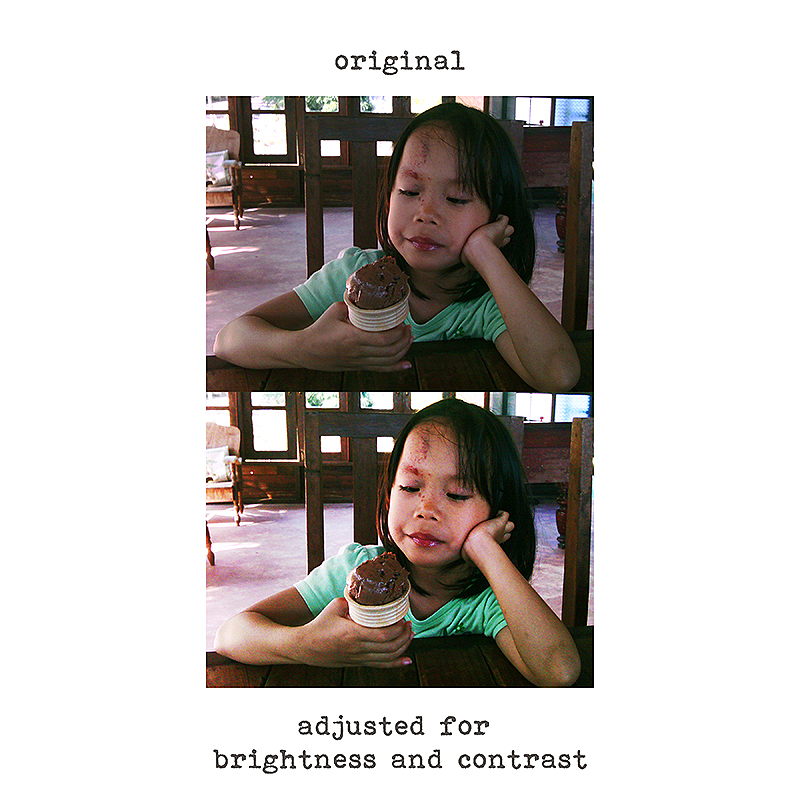
The whole process took less than a minute, and now I can plop this photo into a page. The photo is not that great to begin with, a bit grainy because my phone was an older model, but the final product has much more appeal to me than the original photo.
2. ADJUSTING LEVELS
A second way to brighten up dark dull photos is by playing with the Levels. This method is my personal favorite, and although it can seem a bit scary if it is unfamiliar to you, it is really not that difficult to get the hang of. I like adjusting the levels because it gives you more control over all sections of your image, from shadows to highlights, while allowing you to make more subtle adjustments, and yet it stays pretty simple if you want it to.
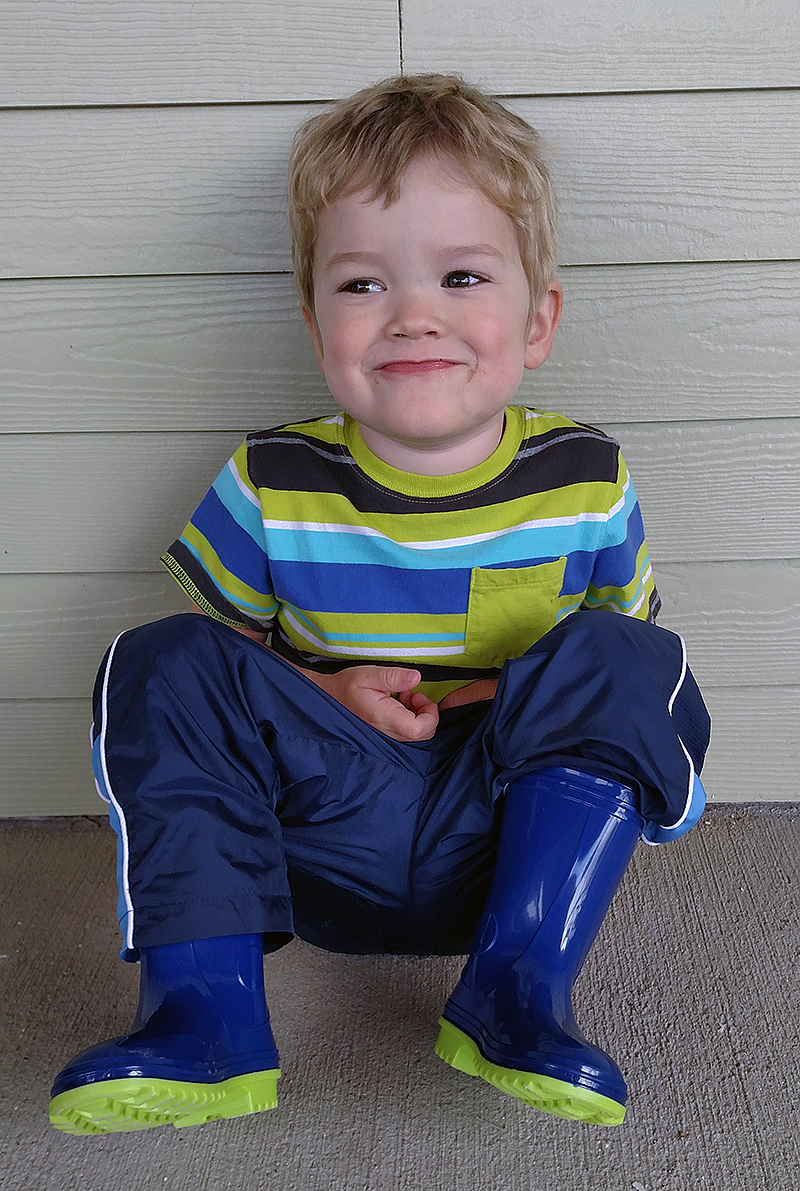
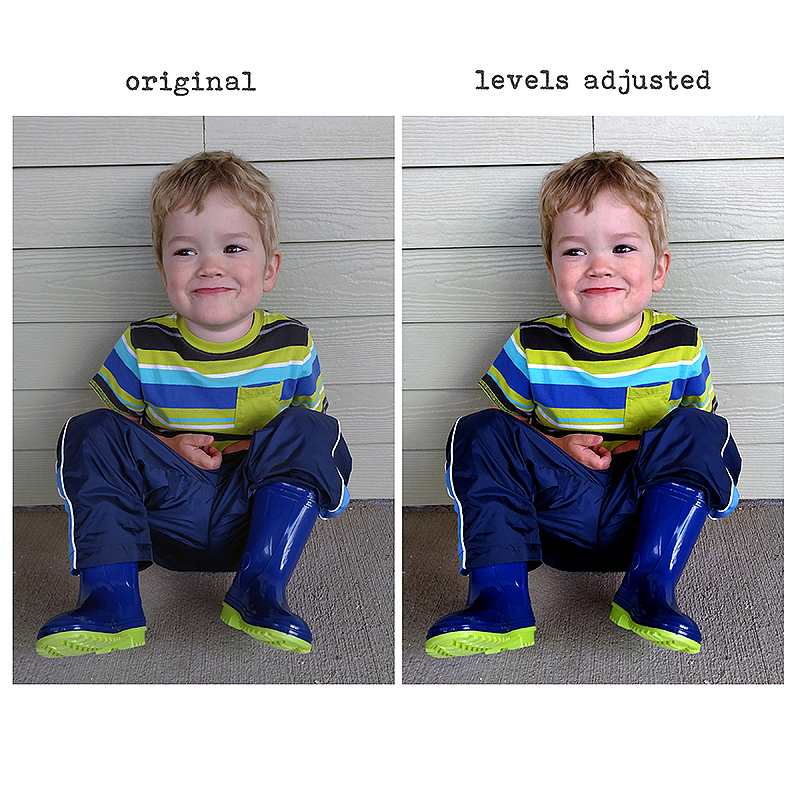
I took this photo of my youngest on our front porch during a rain storm. While there is obviously some light, the photo still ended up dark and dull feeling. We can easily fix that with levels.
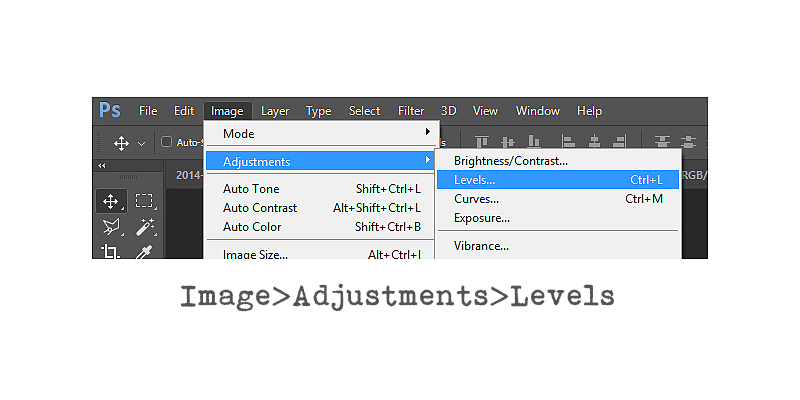
To adjust your levels go to Image>Adjustments>Levels and you will get a little box like this.
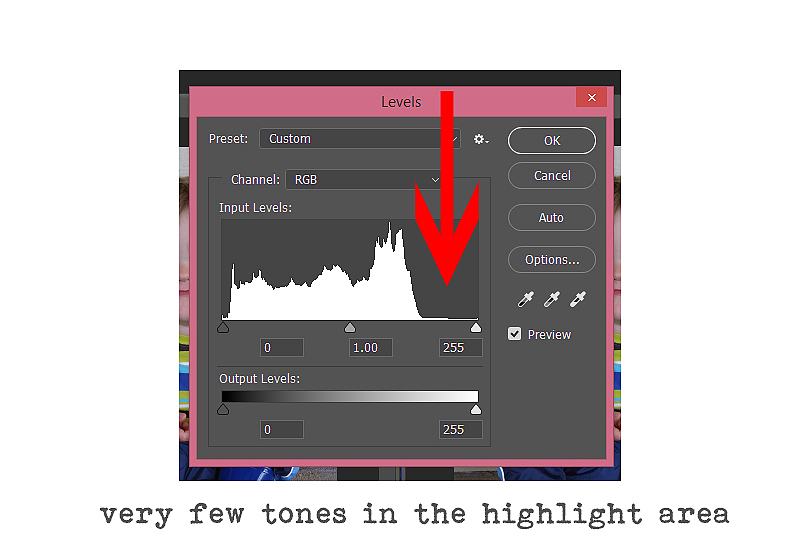
The graph that comes up that looks like a mountain range is called a histogram. A histogram is nothing more than a graphical representation of the tonal values of your image – so basically it shows the amount of tones of a particular brightness found in your image. Simply speaking, the blacker, or darker tones, are to your left while the whiter, or lighter tones, are to your right. A good image will have a “mountain range” that spreads pretty evenly through all the values, stretching from left to right. You can see from my histogram above, that this photograph is missing most of the lighter values to the farthest right. We correct that by adjusting the sliders that you see at the bottom of the histogram.
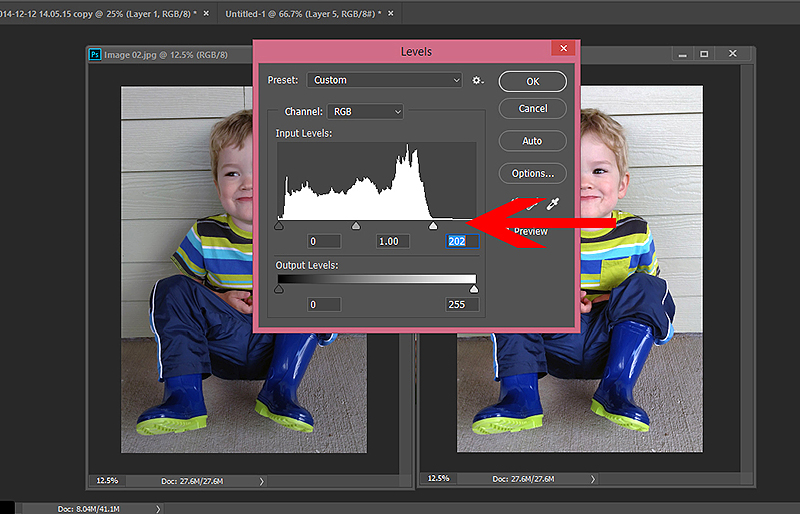
For my photo I started with the right most slider, and pulled it towards the left, until it was right at the edge of my “mountain range” That brightened up the lighter areas of my photo.
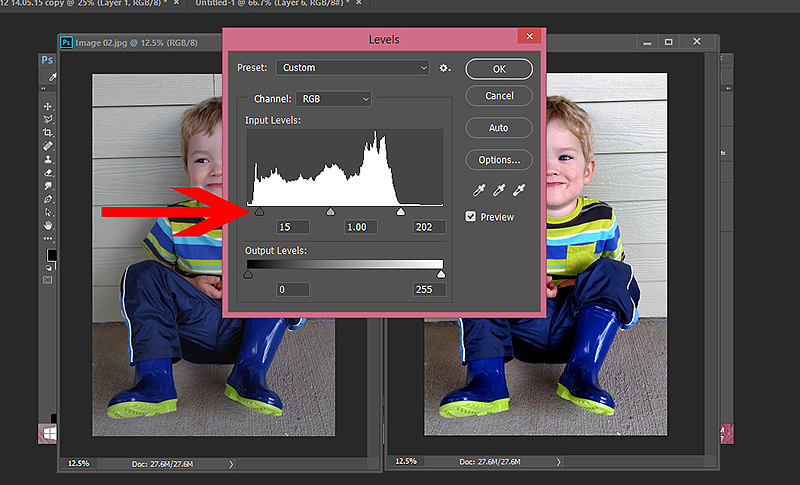
I then pulled the leftmost slider over to the right a little, to deepen the darker areas back up a touch.
You can also adjust the middle slider to correct the mid-tones if you feel the need. I adjusted mine just a bit to bring back the facial features and little details of the photo I wanted to capture.
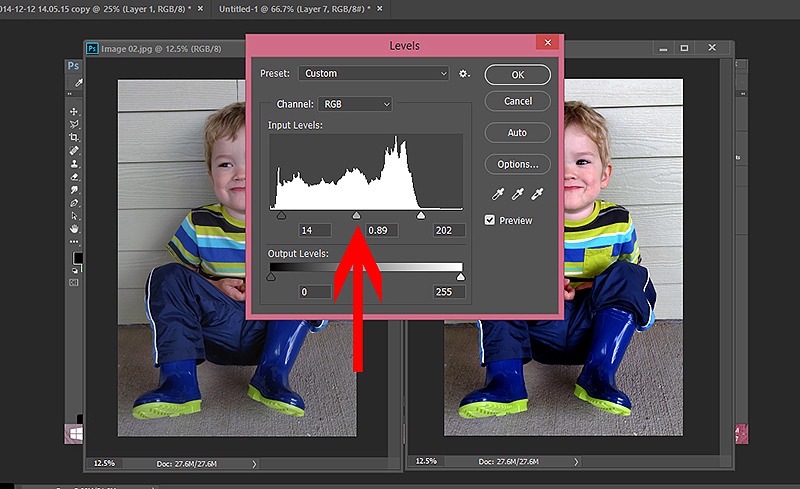
And again, in just a minute or so we have taken a dull photo up a notch to a fun, colorful capture of a playful moment. There is a lot more you can do with levels if you really want to learn, but this simple step will give you a bit more control over your photos.
3. CURVES
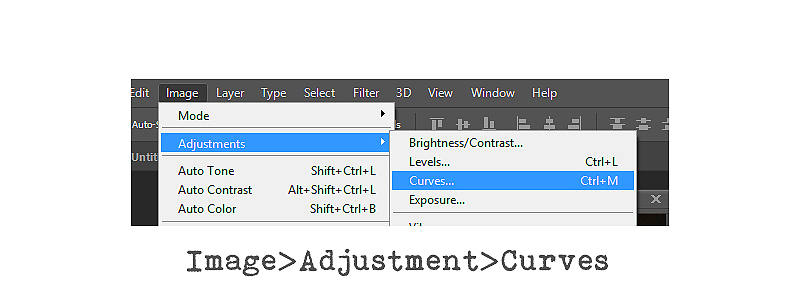
Finally, the third way to quickly brighten dark/dull photos is to use Curves. You find curves in the same place, go to Image>Adjustments>Curves.
Now, there is a whole lot that you can do with curves, and it can get complicated. However, for the sake of today’s tutorial we are going to keep it simple.
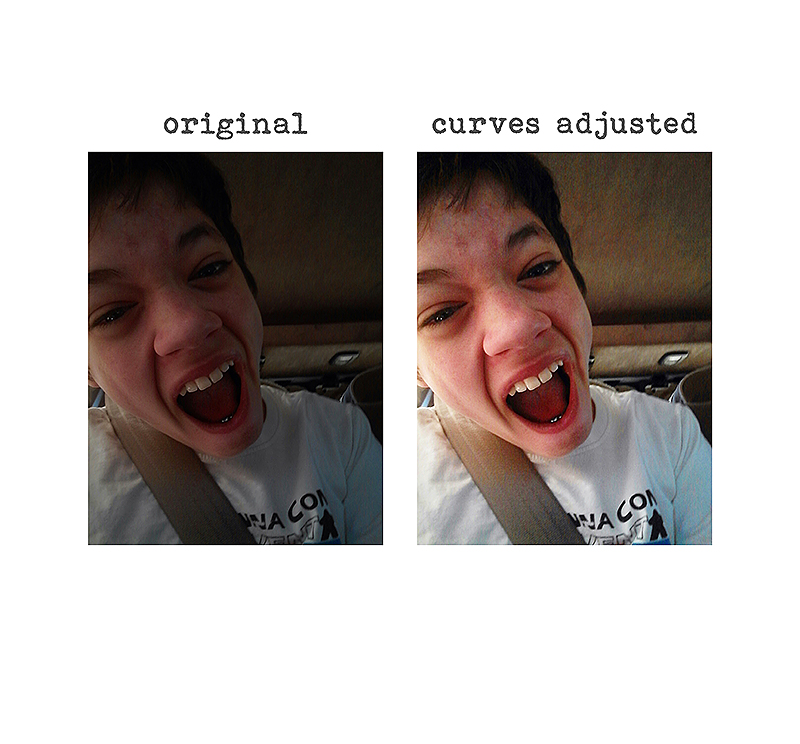
This time I am using an image that my oldest took in the car. The selfie camera on his phone is not good at all, and it came out really dark!

So I open my image and go to adjust the curves. Again, a little graph will pop up, this time showing both your histogram, and a line running diagonally through it.
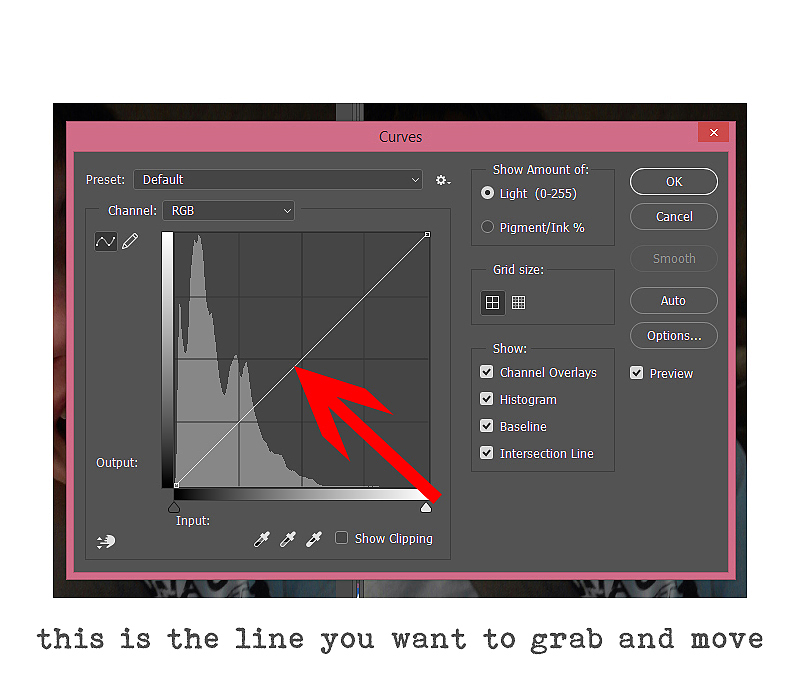
To adjust your curves for brightness, you want to make sure that the RGB path is selected in the channel drop down menu and then you are going to place your cursor on the mid-point of the line and drag it slightly higher. You generally don’t need to move the line too far in order to change up the image, but you can move it around a bit, both up and down from the starting line, to get an idea of what happens when you do.
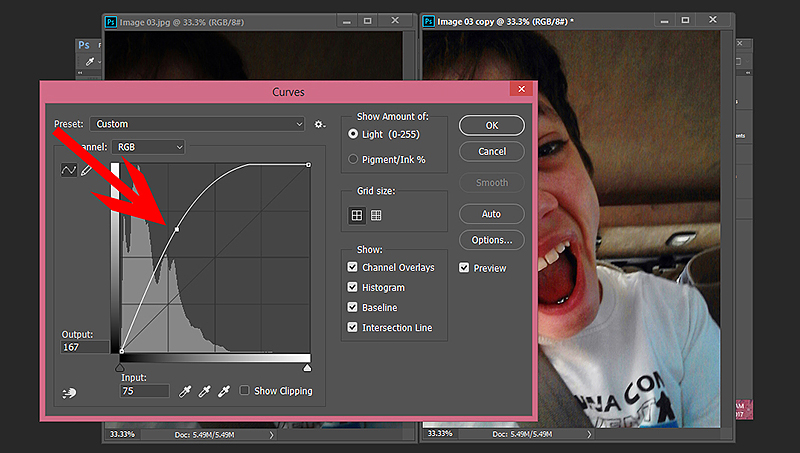
Here they are side by side, still not the best image in the world (what kind of face is that anyway ) but much better than the original don’t you think?
So, I hope that gave you a few new ideas on how to quickly brighten up dark or dull photos and really help them pop. If you find one method does not give you the results you want on a particular photo, then try one of the other two and see if that works better. Or, if you really want to have some fun tweaking your images, you can combine two or even all three of these techniques to really add contrast and color to your dull photos. If all of that still seems like too much work, you might want to look into some Photoshop Actions. There are some really fun ones out there for the daring, and just plain simple ones as well for everyday fixes like this one. Some are free, and others cost a bit of money, but actions really do make photo edits quick and easy. I use actions for a lot of my photo helps, so feel free to ask for recommendations if you don’t know where to look.
Thanks so much for following along with me, and have fun making those everyday photos just a bit more appealing!
 Erin is an artsy crafty kind of girl who is currently dabbling in far too many things, but is working hard to enjoy every moment of it, while avoiding the rain, which is difficult due to living in the land of many rains. She is slowly learning to use her smart phone to capture all the fun little bits of life that would otherwise go unremembered in the busy,craziness that is raising a family!

Thank you very much for demystifying photo adjustments with this awesome tutorial!
I needed this quick reference, many thanks 🙂