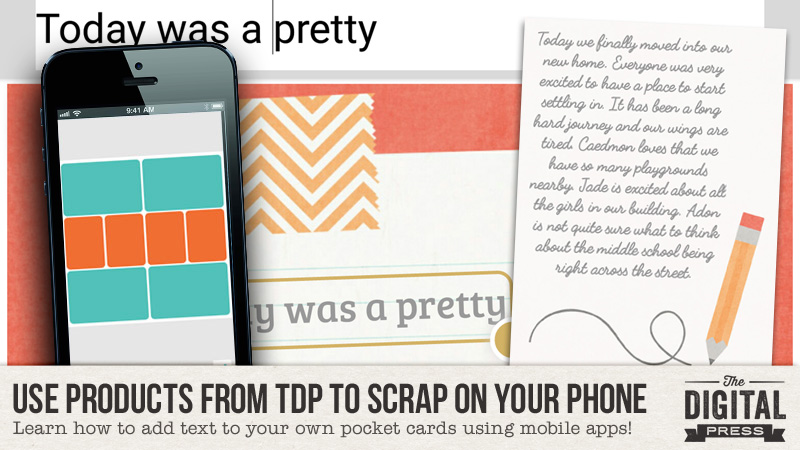
A few weeks ago, we showed you how to use products from The Digital Press on your mobile device (using the Project Life app) to make quick and easy Pocket Pages on your phone using your own digital stash. If you missed that post, be sure to check it out HERE; it’s full of a ton of great tips to get you started with mobile scrapping, and we promise you will not regret it!
Today, we’re here to share PART 2 of this 3-part series… and show you how to add journaling and/or other text to any journal cards you import into the app from your own digital stash (again, that part is covered in PART 1 — and now we’ll cover the addition of text here in PART 2).
PART 2 — ADDING TEXT TO A JOURNAL CARD ON YOUR MOBILE DEVICE
If you already read PART 1 of this tutorial series, you know that the Project Life app allows you to journal directly onto the cards that come pre-installed in the app itself (and/or the cards that are purchased as in-app purchases)… but when we import cards from our own digital stash, the app treats those cards the same as “photos” and does not provide the options to add text. In order to add journaling to our own imported cards, we need to add the text to the card in a separate app before importing that card into our layout within the app.
There are a number of different apps out there that allow you to add text to images (just do a search in your app store for “adding text to photos”)… but there is no way we can cover all of them in this article, so today we will highlight just a few of our favorites and give you a step-by-step snapshot of how we do it.
Textgram App
Erin uses Textgram, which is a free app that anyone can use. If you check out PART 1 of our series, you’ll see that she added journaling to her card for the layout she created in that post. The Textgram app is simple to the point of being somewhat limited in terms of design choices… but it’s definitely adequate for most things, and fairly straightforward to use. Below, she walks us through her process.
- To begin using Textgram, open the app, start a new project using the red plus sign button on the bottom right, and choose the empty canvas option…
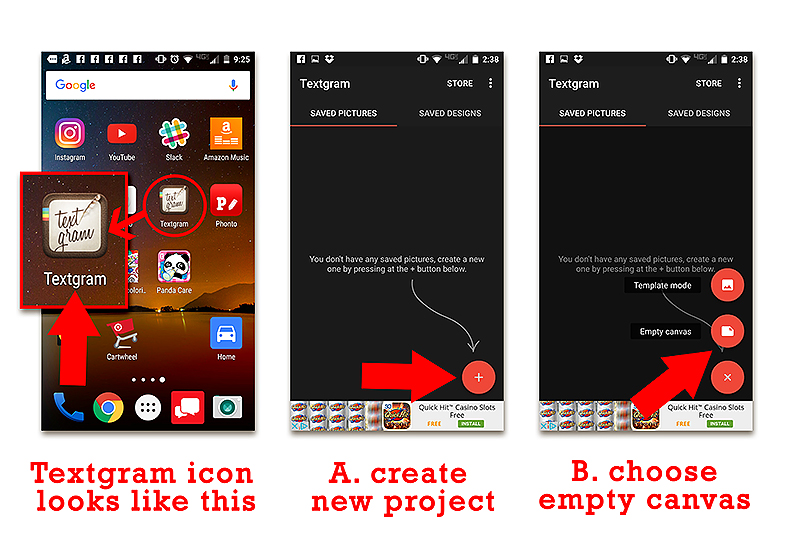
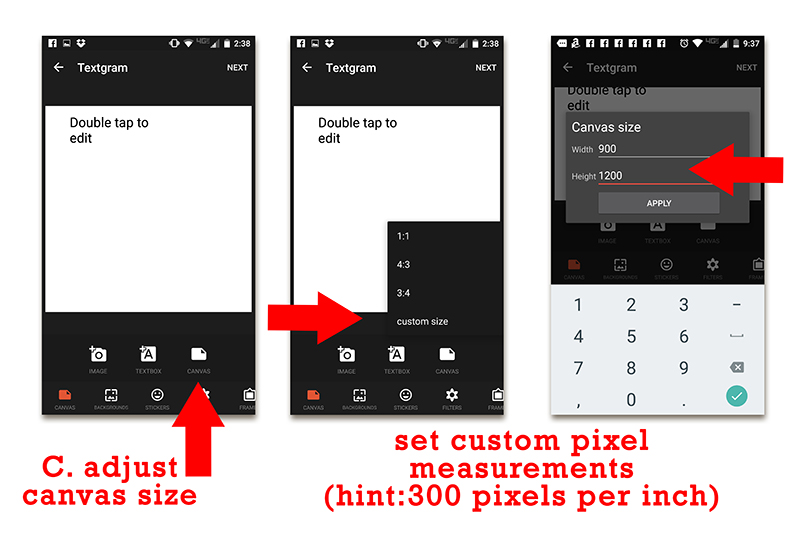
- Select your canvas size. You can choose pre-set sizes, or build a custom size using pixels. I have found that the presets are actually bigger than my journal cards, so I prefer to use the custom size option and build my canvas in the exact measurements. **NOTE** Most 3×4 pocket cards (without bleed) are going to be 900px x 1200px… 4×3 cards are 1200px x 900px… 6×4 cards are generally 1800px x 1200px, and 4×6 will be 1200px x 1800px.
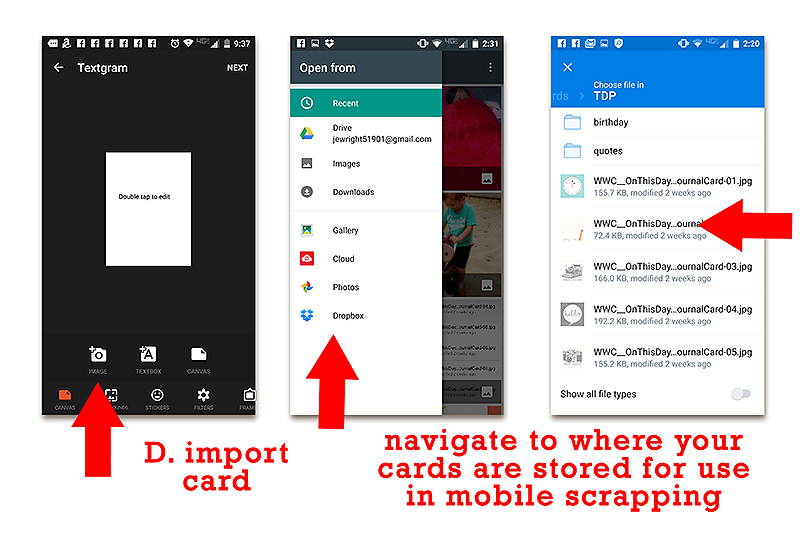
- Now you can add your card by selecting the +image button. Choose the folder where your cards are stored (in my case, it’s Dropbox), and select a card.
- Once your card is on your canvas you can move it around and adjust it as needed.
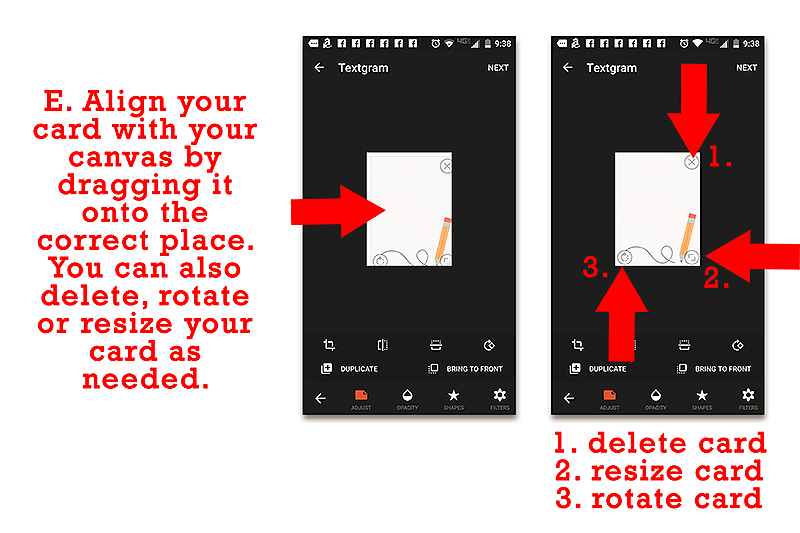
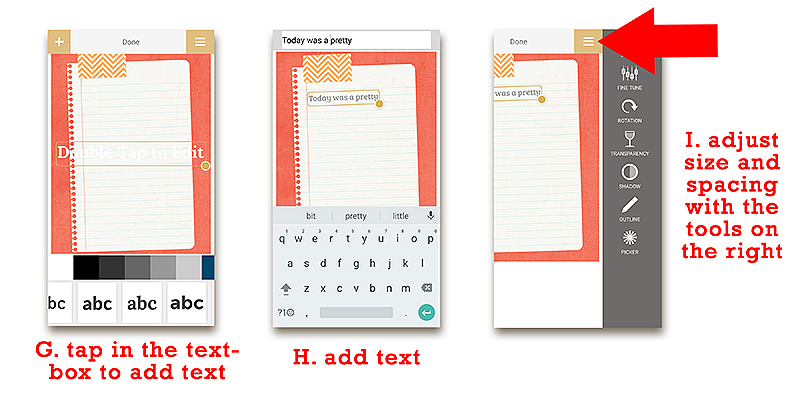
- Next, you will have to navigate back to the main menu area by using the back arrow. Once there, you can add a text box to your card with the +textbox button. Double-tap to add your journaling.
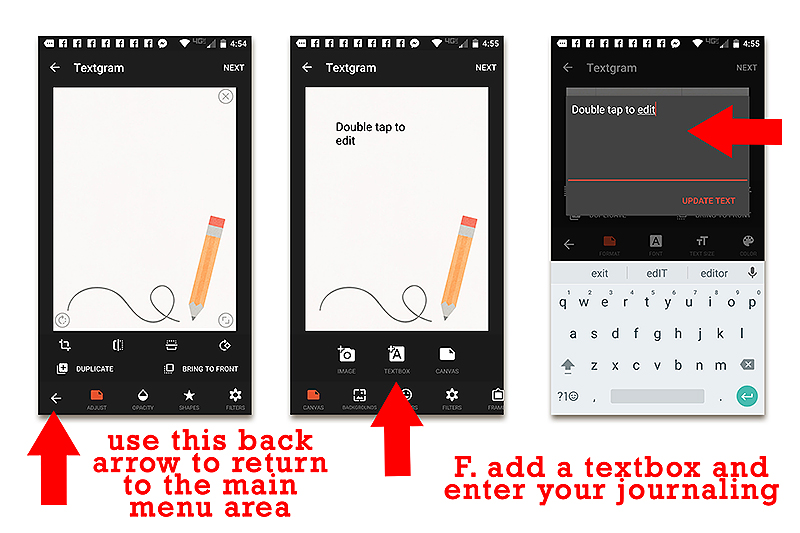
- Once you have added all of your desired text, drag the resize corner out to fit the text area of your card. You can format your text as needed. There are options for choosing a font, font size, color, and even for adjusting your character spacing and paragraph alignment. **NOTE** I suggest choosing your font first, as this can change the size and spacing of your text dramatically. The sliders for font size and character spacing are a bit difficult to control and you don’t want to have to keep adjusting them.
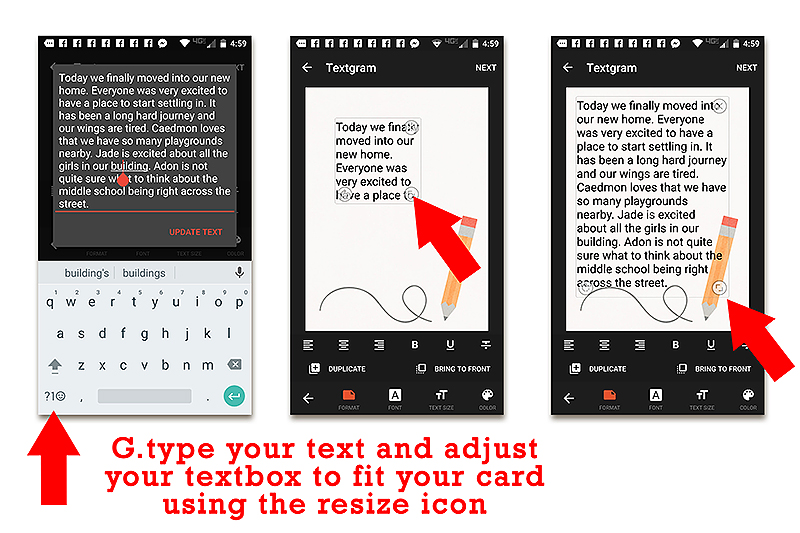
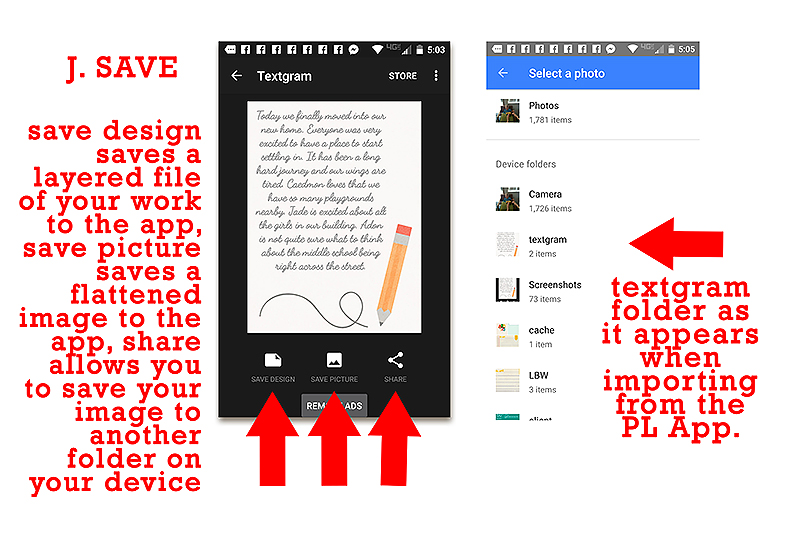
- When you have your text the way you want it, hit “next” at the top of your screen and save your card. If you would like to keep a layered project in case you need to make further adjustments later, you will also need to save the design. Both of these options save your work to the textgram app itself. If you want to export your work to another folder (for example, to Dropbox), you will need to use the share button. This is not necessary, however, if you are using your newly-finished card in the Project Life app, because a Textgram folder should appear within your gallery files, and you will be able to access it from the Project Life app pretty easily.
Rhonna Designs App
Jen typically uses the Rhonna Designs app to add text to her journal cards from her phone. You have to pay for this app, but if you are really interested in scrapping on your phone… it is a pretty good investment, as it has a lot of great options for enhancing your photos, adding text, adding stickers and stamps to your cards, and even creating your own cards. It is also pretty intuitive and easy to use… which is always a plus, right?
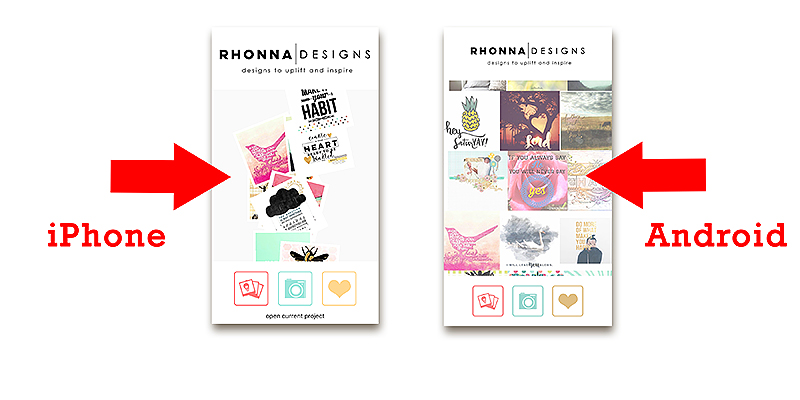
- The process for adding text in the Rhonna Designs app is pretty similar to that of Textgram, which we just covered. You will start by importing your card.
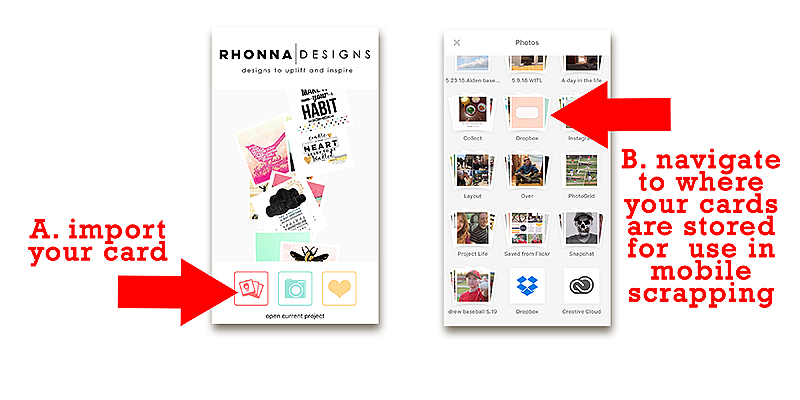
- Because the Rhonna App is designed with pocket cards in mind, it provides you with a good selection of preset sizes. Choose the correct size for your card (in this case 3:4), and hit “crop”.
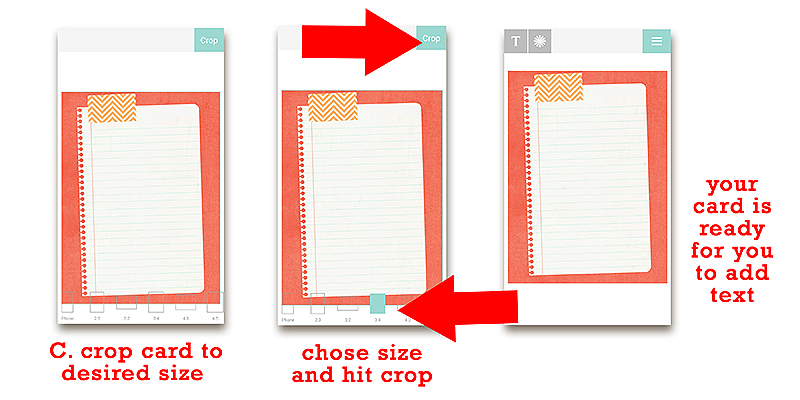
- Now, there are a lot of things you can do with this app, so feel free to play around… but for our purpose of adding text, you will select the “T” in the upper left corner, which will pull up your font choices. Some are free on the app, and others you will have to purchase. Each little icon is actually a set of fonts, so you chose a font set and it will pull those fonts up for you to scroll through.
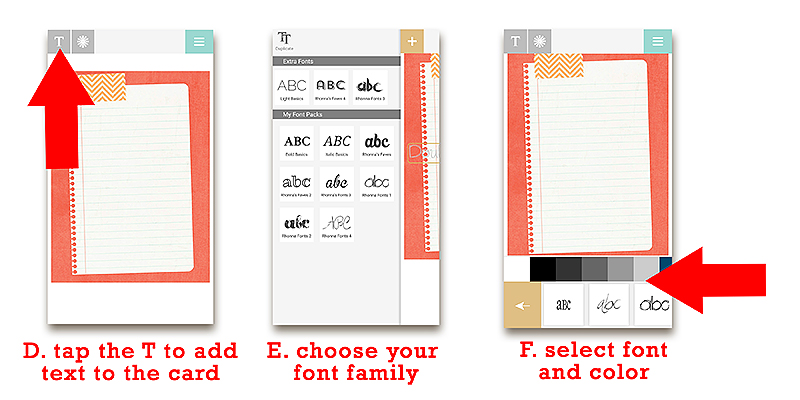
- When you chose a font, your text box will pop up and you can start adding the text. You can switch the font and color using the panel at the bottom. The tools for adjusting spacing, tilt, and a multitude of other aspects are found by tapping the triple line icon on the top right.
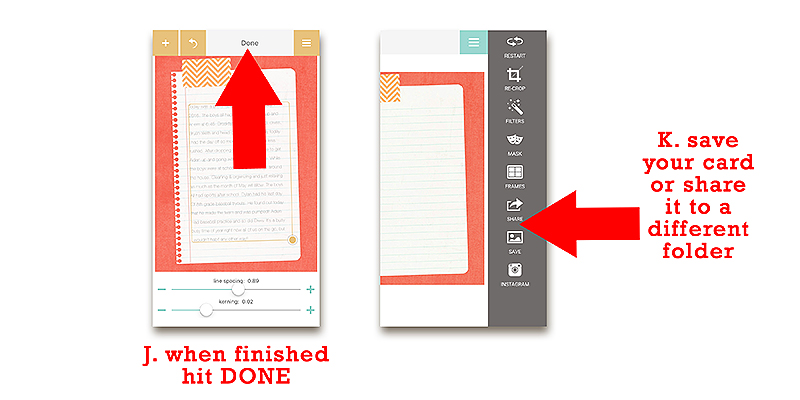
- Once you have your text just the way you want it, tap on DONE at the top of your screen and you will return to the main screen where you can save or share your work. Just like Textgram, the Rhonna Designs app creates a folder in your gallery where your projects are stored, and these are easily found within the Project Life app, as well.
And that’s it! …just a quick look at a couple of simple apps out there that will enable you to add text and journaling to your own pocket cards from your mobile device. Now, with the combined information from PART 1 and this new PART 2 post… you should be able to create an entire pocket-style page, complete with journaling, on your mobile device! How exciting is that?! 🙂
And don’t forget, we will have one more installment in this 3-part series coming in just a couple of weeks (late-September), in which we will show you how to use what you create in the App to make a non-pocket style page. Stay tuned!
Enjoy, and happy scrapping!

About the Authors
Laura Passage is the owner of The Digital Press, and also the designer behind Wishing Well Creations by Laura Passage (WWC). She works now as a graphic designer in both the digital and paper scrapbooking industries, but previously spent over a decade working as a college soccer coach. She lives in the Pacific Northwest with her husband and two young sons (affectionately referred to as The Tiny Terrorists), and will rationalize eating coffee ice cream for breakfast to anyone who questions it.

Erin is a work from home mom of three now living in Oregon. She loves playing with her kids and anything artsy. She can often be found knee deep in toys with paint on her face. She is slowly learning the meaning of living an authentic life, and enjoying every minute of the adventure.

Jennifer Hignite is a mom of three boys and new homeowner with her fiance in the mitten state of Michigan. When she is not scrapbooking, she enjoys photography, decorating, and shopping at Target.

Awesome! Thanks for the tips. I add text directly onto my photos using the Over app before importing to the PL app, but would like an easier solution for journal cards.
I should also mention that you can upload your own journal cards to the Over app and put text on them before they go to the PL App. Even better, you can import your own fonts to Over!
Thank you so much for this series! I shared these articles with the PL App group on FB!