Category: Inspiration

Flourish Your Journaling Skills

Flourish Your Journaling Skills

Journaling on your scrapbook pages can be a great way to both communicate basic information as well as give the reader a more in depth picture of what took place during an event or photo. We often find it fairly easy to include the five W’s on our pages (who, what, where, when and why) because they are the easiest things to pull to the surface as they are the most basic information about something. I’d like to share five ways to go beyond the five W’s to capture your stories on your scrapbook pages. Using these five suggestions can allow you to tell meaningful stories and show your personality on the scrapbook page.

  1. Just Write – My first suggestion is to just write. Don’t worry about grammar, sentence structure, spelling or any of the rules that we think of when writing. Just get your thoughts and words down on the page. You can always go back and edit later, if you feel the need. Don’t over think things or get caught up in telling yourself you can’t journal or worrying if it will be good … just write! The more that you journal, the better you’ll get. Practice really does make perfect. And remember – there is no right or wrong way to add journaling to your scrapbooking. There are no rules so just let go and write!
  2. Write Like You Speak – Imagine yourself telling someone about a scrapbook page you’re working on … what are the things you’d want to share? Writing as you speak is the best way to ensure your unique voice is captured in your scrapbook pages. It can be easier to let go of the idea of formal writing and just write whatever it is that you’d say when describing what’s on your page. It will ultimately be more authentic and more YOU!
  3. Focus on the Unique – Instead of just answering the basics (the five Ws) on your pages, try to find something unique about your photo or event and focus your journaling on that. Think about the various stories or facets of experience that someone might appreciate knowing and focus your attention there! You will make more impact by focusing in areas of detail within the story – it will help your audience feel something more about the story you’re trying to tell.
  4. Journal Outside of the Box – It’s not always necessary to journal in the traditional way. Journaling outside of the box can help you journal in less complicated formats. Examples of these techniques would be using pie charts, Q&A and bullet point lists to tell your story in a new and unique way. You can also record conversations as well as use poems/quotes/songs to communicate a story. Don’t get hung up on traditional writing as the only way to communicate something – use other techniques and methods to tell your stories in new and different ways.
  5. Appeal to the Senses – One of the best ways to connect your audience to the experience you’re describing in your jounaling is to use the most descriptive words possible. Descriptive language can help clearly describe any number of sights, sounds, smells, tastes and feelings that were experienced. Journaling that connects to the sensory experience can add an entirely new dimension of interaction for the audience.

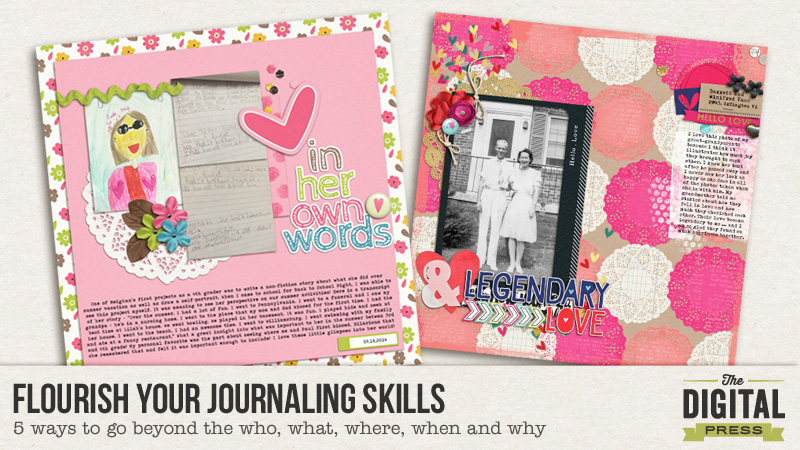
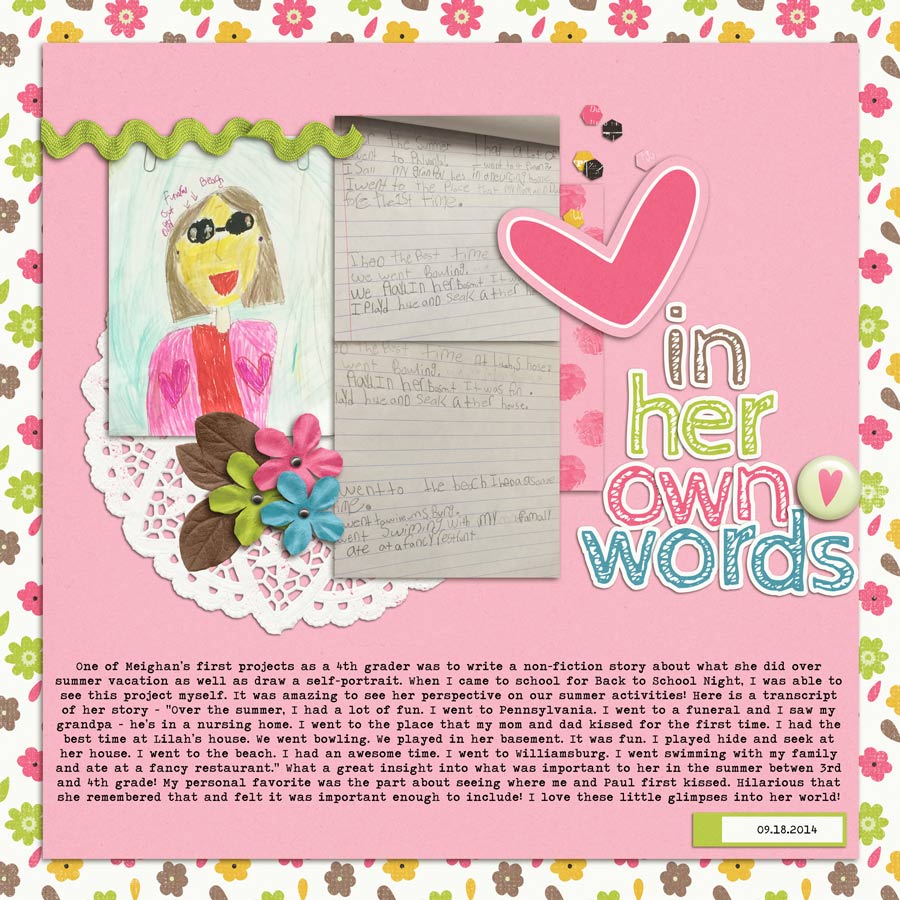
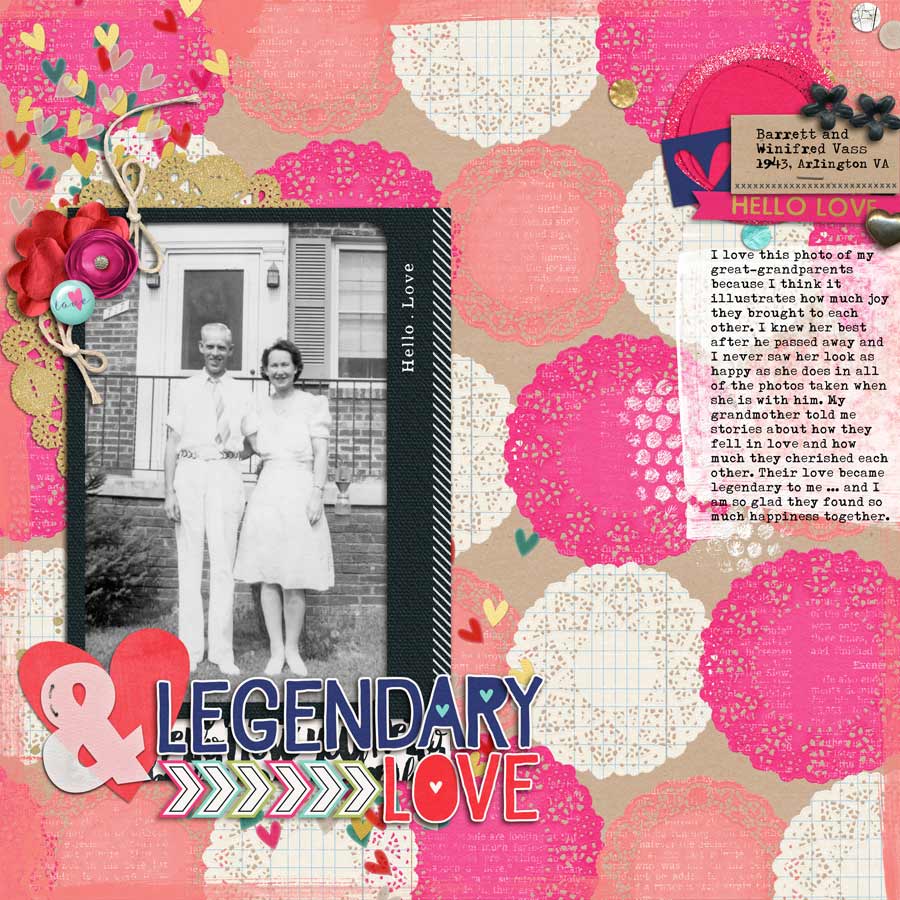
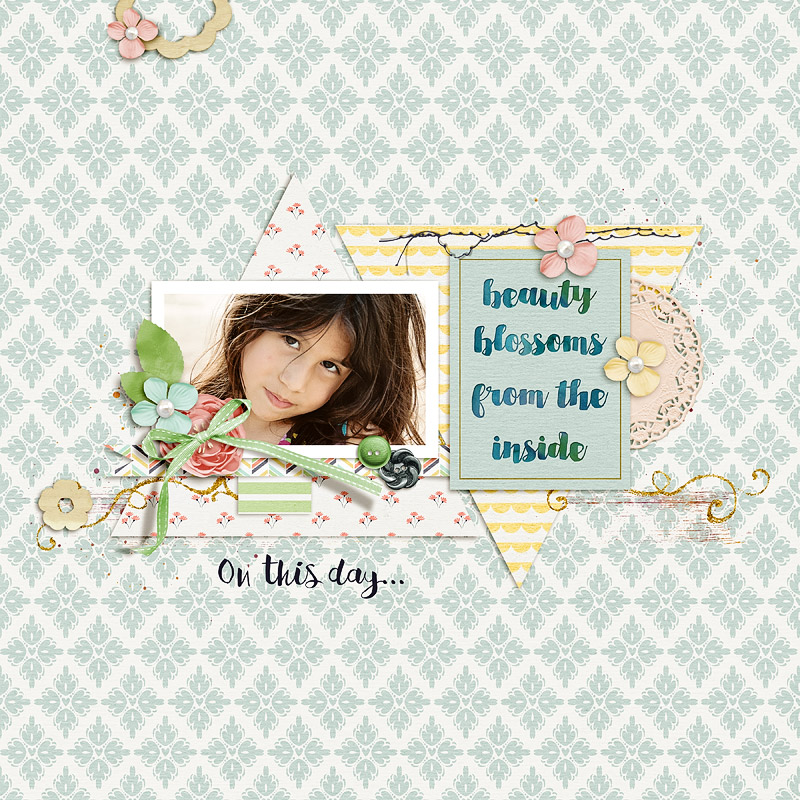
Here are a couple of layouts that I wanted to share that demonstrate my using these suggestions to create meaningful journaling on my pages!

Flourish Your Journaling Skills

Flourish Your Journaling Skills

I hope that these tips and suggestions will help you to flourish your journaling skills!

Please head over to check out the Challenge Forum where I’ll be hosting a journaling challenge! I hope to see you there!


Amy

About the Author: Amy lives in Reston, VA with her husband of 13 years and their 9 year old boy/girl twins. Their 18 year old daughter is in the midst of  her second year at West Virginia University!  Amy has been scrapbooking since the early 1990s but discovered digital scrapbooking in 2005 when her twins were born and has primarily scrapped digitally since that time. She is passionate about telling her family’s stories and documenting their life together! Amy is a huge reader (mostly literary fiction) and is a pop culture junkie! She also LOVES all things beauty & makeup!


Adding your layouts to Instagram

AddingLOtoIG

With Flourish being our word for the month, it’s time to learn a new skill or take a look at a process and streamline it. With that in mind, it’s time to get social, more specifically – Instagram social!

We hear a lot about how people love seeing layouts on Instagram, but we also get asked quite often about how to get your layouts from your computer on to your phone in order to upload them!

There’s several options, so we thought we’d share a couple to get you started: The Email method, the Flickr method and the Gallery method!

The Email Method

Make sure your mobile device (phone, tablet or music player) has an internet connection, the Instagram app installed, and access to your email account.

When you’ve finished your layout and created your usual gallery friendly file for uploading, all you need to do is take a few minutes to also email your layout to yourself.

Then, open the email to yourself on your mobile device and save it to your Camera Roll or Photo Album so you can access it later.

Next, open the Instagram app and press the central icon on the row at the bottom to begin an image upload. Choose your layout that you saved to your Camera Roll or Photo album.

Follow the prompts on screen until you are prompted to write a caption.

In your caption, don’t forget to use our hashtags and to mention us!

#teamdigitalpress #tdpinspire @thedigitalpressco

 Post-Graphic

The Flickr Method

If you usually upload your creations to Flickr, then I have good news for you! You can skip the email step.

Inside of the Flickr app on your mobile device once you have navigated to your image, you can press the ‘share’ icon (in the shape of an arrow). This will give you several options, including the option to save to Camera Roll or Photo Album. Choose this option.

Then, follow the instructions from the Email method and don’t forget to use our hashtags!

The Gallery Method

Once you’ve uploaded your creation to our gallery, you can visit the gallery on your mobile device and navigate to your layout. When you’ve made it to your layout, then you can save your layout image directly from the page – you should be able to press and hold the image until you see the ‘Save Image’ dialogue appear. Save your image to your Camera Roll or Photo Album.

Then again, follow the instructions from the Email method and don’t forget to use our hashtags!

Instagram Contest

TDPbyME-contest400px

So, now you know how to upload your awesome creations to Instagram, we really want to see them!

From now, until Friday the 17th, we are running a small giveaway for $5 to spend in store, you can enter as follows:

1 – follow us on Instagram at @thedigitalpressco

2 – find our contest image, and like it.

3 – upload your layout to your Instagram account, and use your usual hashtags along with the contest hashtag #TDPbyME


Rules:

– There will be one winner selected at random from all entries received before 12.00 noon EST on Friday 17th April.

– The contest is open internationally.

– Giveaway and Contest accounts on Instagram are not eligible.

– You may enter as many times as you like, with as many layouts as you like!

CynthiaAbout the Author: Juliette is a Social Team CT Member here at The Digital Press. She is a girly crafter, and a creative procrastinator, and she shares her home with her husband and a rebellious cat. She loves scrapping, photography and music!

Flourish with your words

let your words flourish

For me, one of the hardest parts about scrapping is coming up with my titles or my journaling. Maybe it’s because I’m too scared to pour it all out, or that nothing will make sense and will look like a messy, hard-to-read jumble of words. So what do I end up doing most of the time? Well, of course it’s quotes to the rescue! I find most of the times that I can include a quote that perfectly sums up what I wanted to say in the first place, or make me smile or feel better or even a bit teary-eyed.

Let your words flourish

There are tons of quotes that can be uplifting, that can make you feel better in a moment’s notice, and that can take the place of journaling in a snap.

Let your words flourish

So next time you find yourself in a tight spot as far as journaling goes, give quotes a chance, you might be surprised!

Don’t forget the check the forum here for a great challenge using, you guessed it, quotes! Hope to see you there!

CynthiaAbout the Author: Cynthia is a CT Member here at The Digital Press. She lives in sunny (way too sunny!) Mazatlan, Mexico with her hubby and their 8-going-on-40 yo daughter, plus the 2 most spoiled Westies who ever lived. She loves reading, cooking, photography and of course, scrapping!


Flourish: In Your Art & In Your Life

flourish-header2

I’m so excited this month to be able to share our new monthly theme with you: Flourish.

As I thought about this word and what it means to me… my designer side thought of all the fun extras: swirls and curls and accents! Even the simplest layout looks better with a few flourishes added to it. On a more personal note, I thought of the past year and how I was able to both take risks and allow myself to take a leap and flourish in my professional life.

While I was browsing Pinterest for inspiration, I found several fantastic quotes that really struck me:

Pinterest (1, 2, 3, 4, 5, 6, 7)

Here’s what caught my attention: a common theme of having to push through fear and pain to get to a place where we can flourish and grow. This rings true in both art and in life. We hope that as you go through this month with us, you will find yourself inspired by the theme and allow yourself to push through the dirt to get to where you want to be — both in life and creatively.

As you know, each month we do our best to bring you articles and challenges that really stretch your creative mind. We do know, though, that some of you have expressed that you’ve had difficulty keeping on top of our monthly challenge schedule and/or knowing what to expect. To help you keep track, we have created this handy graphic with dates! It details exactly when you can expect our challenges, along with the theme for each. For more information about our challenge system please read this post in our forums.

Challenges in April at The Digital Press

This gorgeous challenge schedule was created by creative team member Alina, using the brand new store collab Gingham Style that you can purchase for only $4 for the first 4 days of the month! We look forward to seeing you in the forums and here on the blog! Happy April!

Leah/Mommyish

 About the Author: Leah is the designer behind Mommyish and owner of The Digital Press. She lives in the beautiful lower Hudson Valley of NY with her husband, two girls, and in-laws! She has a love for all things geeky and quirky. In addition to being a graphic designer, she is an avid pianist.

Listen to Your Inner Thoughts

blogtemplate_inner-thoughts


For this challenge I want you to step outside of your comfort zone. I certainly did and I definitely feel like I’m waving a neon sign which is definitely not something I would ever do. I am asking you to pick a day where you know you will have more time to hear your inner thoughts. A day where you can hear these random, mundane, quirky, sad, honest and true thoughts. A day where you are inside your head more. For me this was Saturday. One of my toughest days because both kiddos are with me. My son is gifted and having an attitude right now plus my toddler is well a toddler. So the days are long and the thoughts in my head go round and round. Perfect day to listen to these thoughts and write them down. I am laying myself bare and I am hoping you will as well. I know for some of you the thoughts might not be something you want to share; but the point of the exercise is to embrace these thoughts and celebrate them. And for us scrapbookers the best way is to make a layout.

Listen to the inner thoughts. Listen and spend some time inside your head. Jot down all those thoughts from the day or if you can’t do a day do half a day, at least. And make a pretty layout about it. Listening to all those thoughts makes you see the good, the sad and can be a reflection of you. This may also give you the push to make change. With me, I already know and am working on being not so hard on myself. I hope you have fun listening to your inner thoughts and enjoy being inside your head some more.

Here is my layout. And don’t forget to snap a photo of yourself to include in the layout! I didn’t my hair fancy or made sure the background was fancy or got myself in some nice clothes; I just snapped a few photos and hoped for the best.

Me-Listen-Thoughts-SP


I can’t wait to see what’s inside your head!


SabrinaAbout the Author: Sabrina is a wife and mom to two kiddos- Captain and Sunshine- living in sunny California. When she has free time she loves to do some type of project whether it is scrapbooking, a string art board, a washi tape project or other DIY project that is usually inspired by Pinterest. Her favorites are creating colorful layouts or pocket pages.  Another lofty goal she has for the year is reading 100 books.


Pocket Minibook

jcminibook-blogheader

Creating pocket pages with 3×4 cards is definitly not the only way those cute cards can be used. Today I want to show you how I created a minibook using different cards and a few of my favourite photos. One of them is actually the very first picture that was taken of us, so it is very special to me. It’s the top right one. The others are selfies we took during our citytrips in the netherlands and belgium.

So let’s get started! First of all I created two rows with five journaling cards each in photoshop. I have a A3 printer, so I was able to print everything at once, but it is totally fine to create it with a A4 / lettersize paper aswell, you will have more rows then with three cards each.

Next step is to print the cards, without the photos and frames, cut the rows and fold them after each card. You can glue them back to back together, but leave the first and second card like they are for now. Your book should now look like the right picture below.

jcminibook-blog1

Now you get some ribbon, I like to use snug hug seam binding ribbon for minibooks, and cut it to one long and one shorter piece. The long one should go 2-3 times around the minibook. Glue both of them between the first and the second card, as you can see in the left picture below. The picture on the right shows you what the finish book will look like.  When the ribbon is in place and looks like you want it, glue card one and two together and you are done with the base for your minibook!

jcminibook-blog2

I printed the frames on the same paper as the cards and used my selphy for printing the photos, so they are printed on photopaper. I also added some wood veneer to my finished book. The next pictures show you what my finish book looks like in detail. I really love how it turned out!

jcminibook-blog3

jcminibook-blog4

Thanks for reading and see you next time!


Anika About the Author:  Anika is part of the hybrid team here at thedigitalpress.com. She loves to travel and use the photos her boyfriend takes (thanks for that!) to scrapbook. Digital, paper and hybrid. When she is not scrapping, she is most likely playing a computer game or in a city searching for a geocache.