Category: Tutorials

Tutorial Tuesday | Digital Quilting

Hi scrappers, and welcome to another edition of our Tutorial Tuesday series here on The Digital Press blog! Today, I’m here to show you how to create a “digital quilt” for your next scrapbook page!

I’m sure I’m not the only scrapper who also enjoys a variety of other crafting methods — right? I mean I love anything having to do with crafting; I love using all kinds of tools and supplies to make all kinds of things from home decor, to gifts, to (of course) memory books. I must have gotten the crafting bug from my mother (pictured above) because she, too, has had her hands in a huge variety of crafting hobbies over the years.  And thus, I thought to myself… “mashups are all the rage, why not mashup a couple of my craft hobbies?!”

To do so, I played around in Photoshop for a while and created a “quilt” as the background for my layout. I’ll share what I did here but I’d really love to encourage you all to mashup whatever other crafting hobbies you might have with your digital scrapbooking. There’s so much room for creativity; I’d love to see what others come up with!

OK here goes… the quilting / scrapbook mashup!

Step 1:

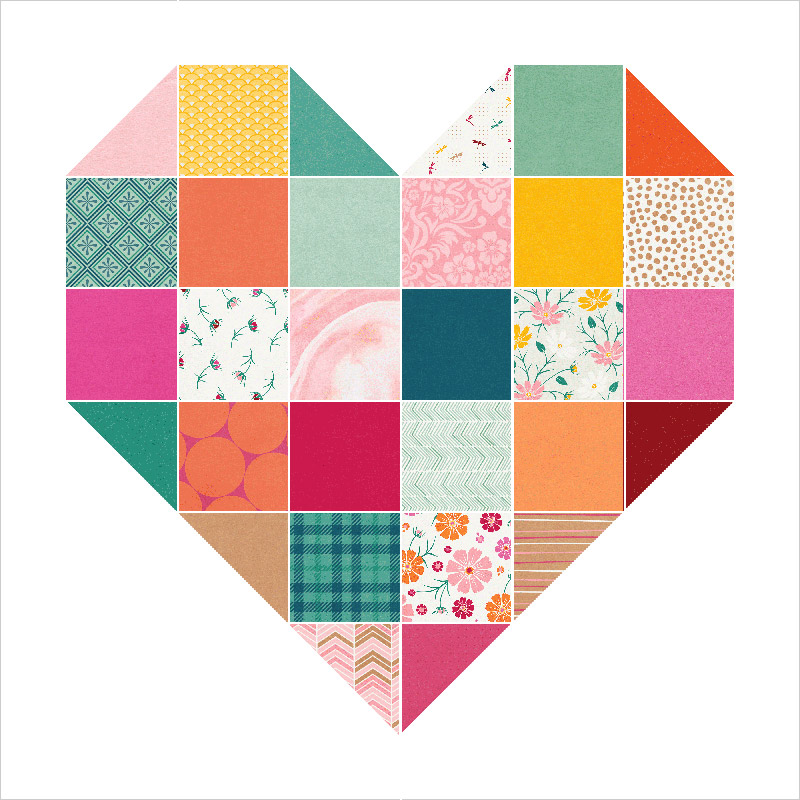
In Photoshop, using various shape tools (squares, triangles, etc.), I created the following pattern to use as masks to help build my quilt…
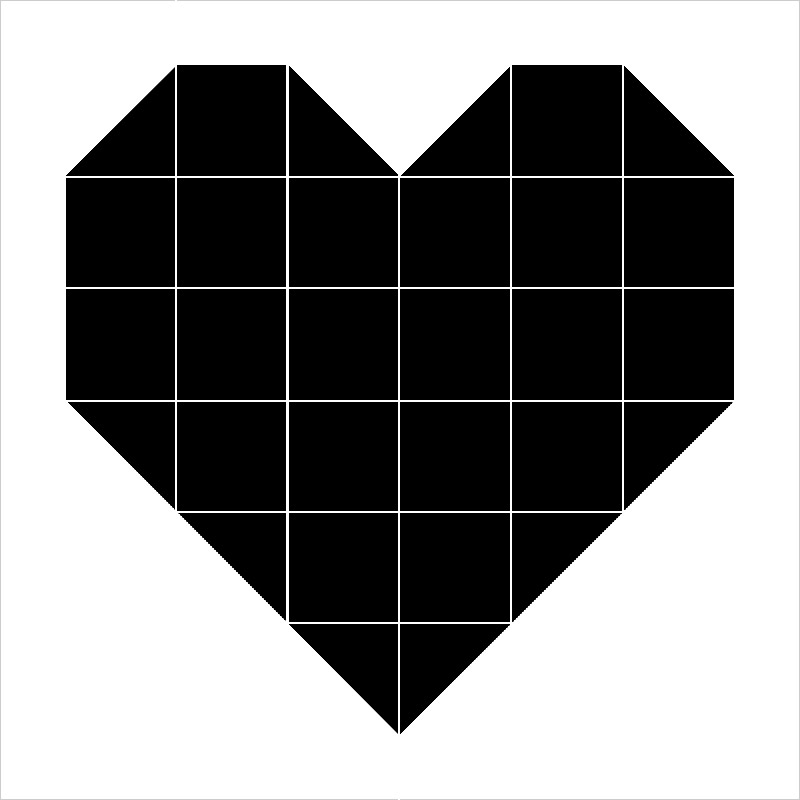
*TIP* Make sure that each shape is on its own layer so you can use it as an individual clipping mask.

Step 2:

I used each of my shapes as a clipping mask and used a different paper for each shape to create the look of a hodge podge sort of quilt (which is one of my favorites kinds!)…
 

Step 3:

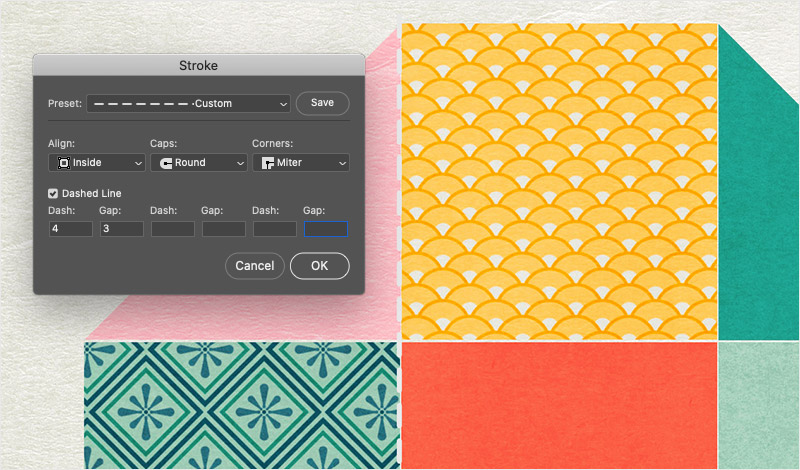
Next, using the line tool, I created “stitching” between each of the shapes using a dashed line. For the stroke, I made sure to change the “Caps” to “Round” (see next image)… and I bumped up the default “Gap” to be 3. In the picture below, you can see my dashed line (in white) between the pink and yellow shapes…
 

Step 4:

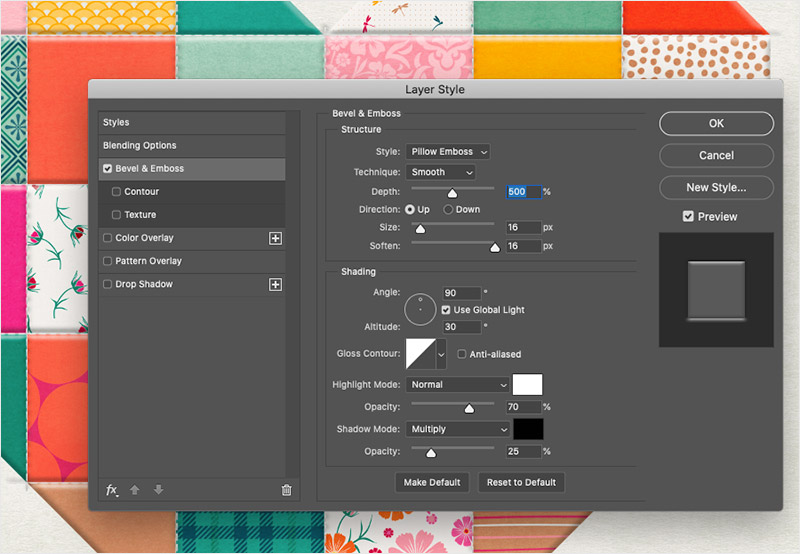
Once I had all my “stitches” added between the shapes (this is where they would be sewn together in quilting) I applied a Bevel & Emboss Layer Style to all layers of stitches.  This was to make those dashed lines look more like 3D rounded thread. You can certainly play around with the settings (I did!) but the image below shows the settings that I found to work best for the look I, myself, wanted to achieve…

  • Style = Pillow Emboss
  • Technique = smooth
  • Depth = 500
  • Direction = Up
  • Size = 16
  • Soften = 16
  • Angle = 90
  • Attitude = 30
  • Highlight Mode Opacity = 70
  • Shadow Mode Opacity = 25


After that was all said and done, it looked like this…
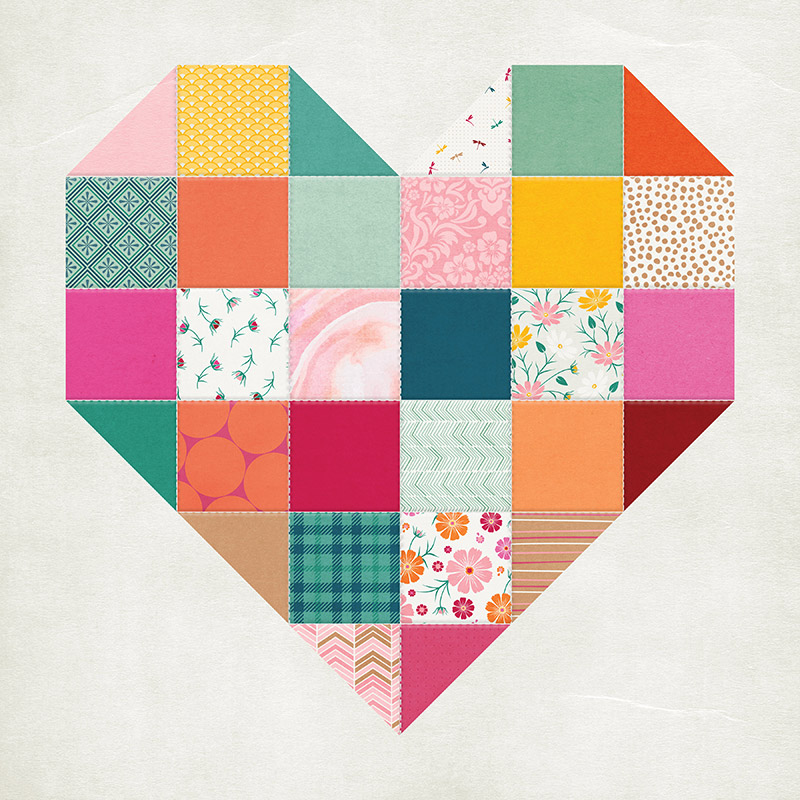
I found that I didn’t need to do any embossing on the quilt pieces themselves, since the effects I put on the stitches made the whole thing look just about right as it was (or at least how I wanted it to look!).


Step 5:

Quilting is not only about sewing pieces of fabric together. Once that’s all done, the quilter will also usually stitch a pattern of some kind — sometimes shapes, sometimes just wavy lines, sometimes hashed lines, etc. – across the entire surface of the quilt to bind it together with the backing and also create more texture and give it a really cool finish.  So… that’s what I did here! With the pen tool, I created heart shapes (to go with the overall shape of my quilt) using the same stroke settings as the first stitching I created.  It turned out like this…
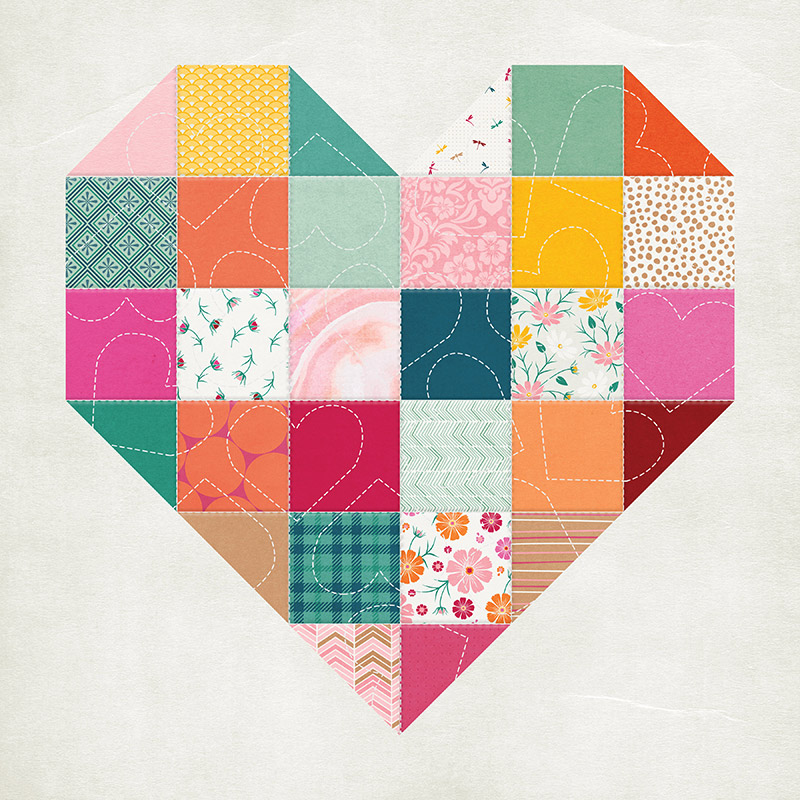
*Special Note* I did put the stitching on its own layer and then used a clipping mask to “cut off” any stitching that extended beyond the “quilt”.

Step 6:

Next, I applied the same kind of embossing settings to my new hearts stitching to make it all look the same as the stitching between the blocks (to do this, you can just copy what we did in Step 5 for the straight lines)…
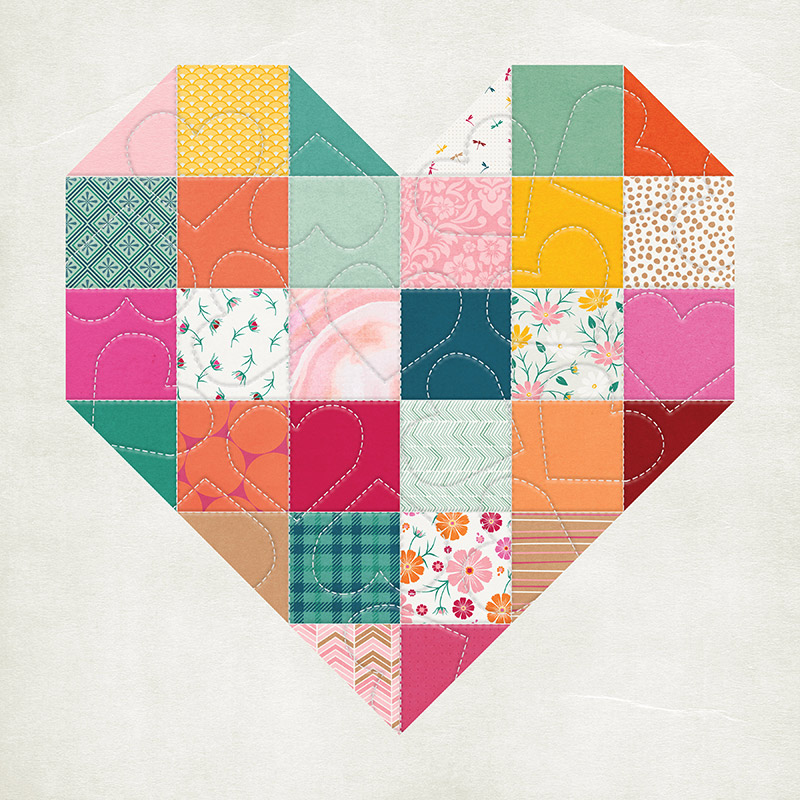
 

Step 7:

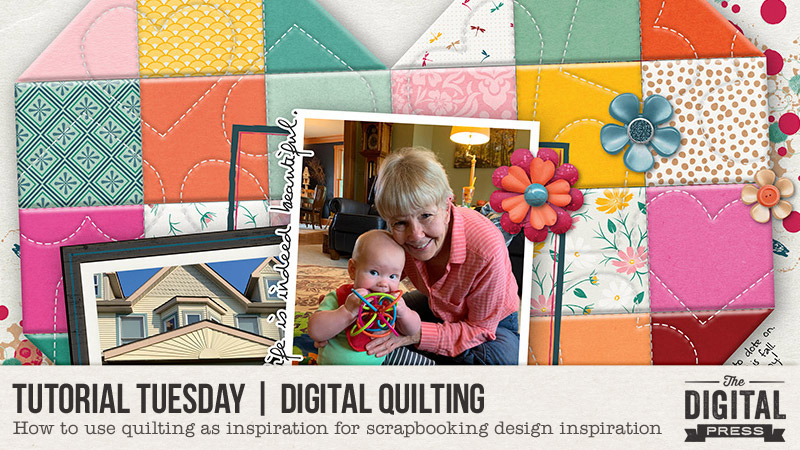
And then… all of a sudden I had a quilted background ready for my layout! All that was left to do after that was to add photos, embellishments, and borders… and I had completed the quilt / scrapbook mashup project! Here’s how the final page turned out…
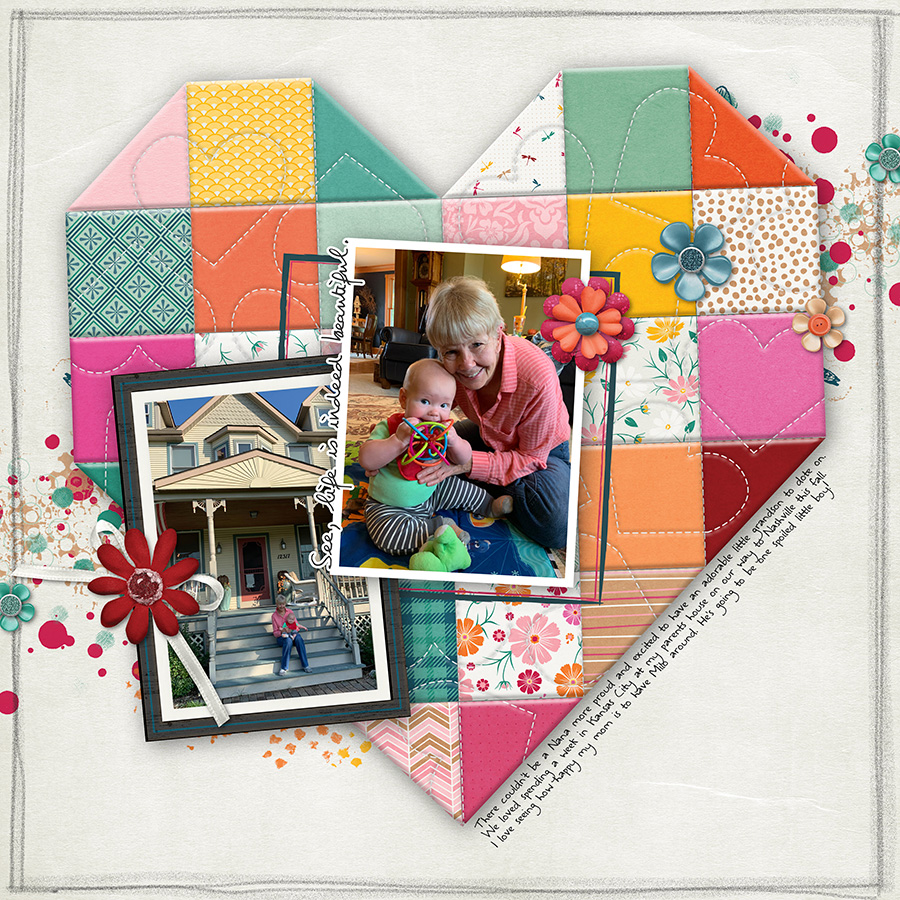
I hope this inspires some of you to either try the quilting technique or think about how you can mash up your favorite crafting hobbies too!  Can’t wait to see what everyone creates! Happy scrapping!


About the Author  Shannon has been completely addicted to digiscrapping since she began in early 2016 (though she’s been a scrapper since 2000). She is a part time web designer but since 2019, she’s now the proud mama of her son and loves to have all kinds of adventures with him and her husband. Her family has currently adopted a digital nomad lifestyle and lives in a different city each month by renting AirBnBs.  

Hybrid How-To | Custom Holiday Place Cards

Hello, and welcome to another edition of our Hybrid How-To series here on The Digital Press blog! Today, I am excited to show you how I made some quick, simple personalized place cards for my Thanksgiving day table!

We don’t have a huge crowd for Thanksgiving, but everyone likes to feel welcome and know where they’re sitting… so these place cards are both pretty and functional. And of course, you can use your digital kits for any type of celebration, but with Thanksgiving right around the corner I thought I would get these ready to go in hopes it will motivate me that this is happening in just a few weeks!

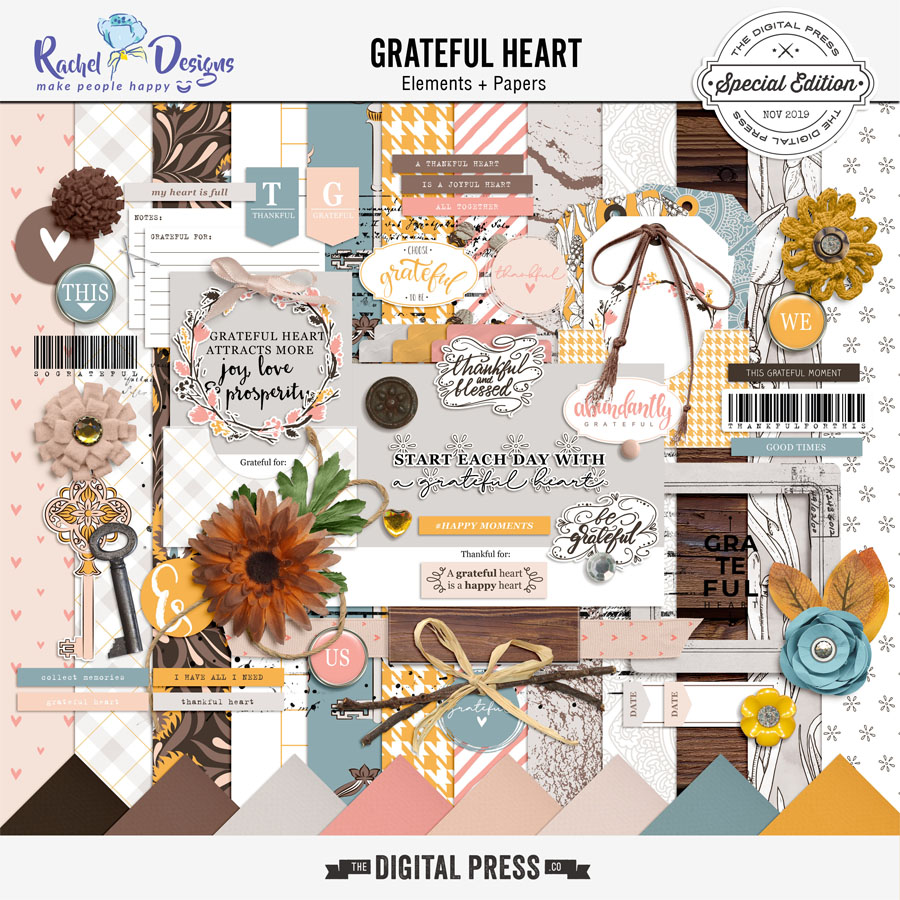
My first step was to select a digital kit to work with; I chose this beautiful kit from Rachel Etrog Designs called Grateful Heart

I was drawn to the colors of this kit, as I knew they would work with my tablecloth and dishes. I also loved that sweet winter wreath, and the tags, and the flowers… and so on.

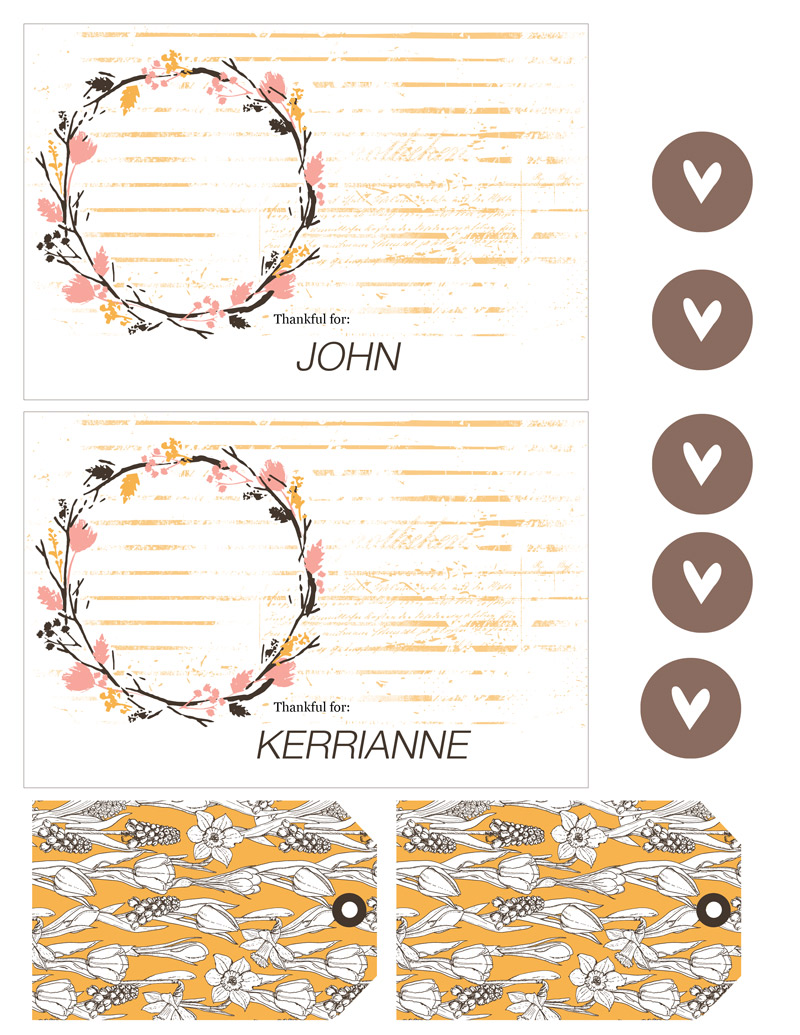
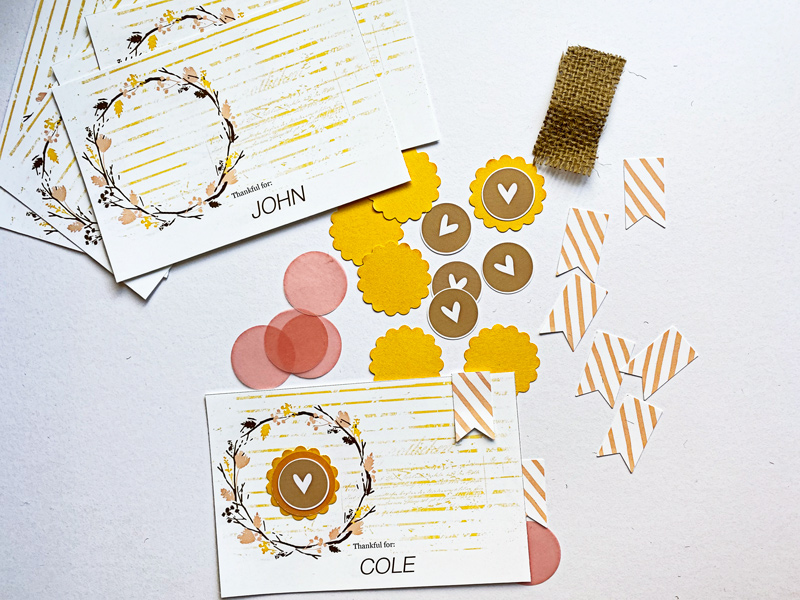
Once I had selected a kit to work with, it was time to decide upon on a basic design for my place cards. Using the wreath element along with some digital paint and solid colored digital papers, I drew out a 4 x 6 white card in Photoshop Elements (PSE). Then I applied the wreath and the “thankful for” word art to each card. I used the blank spaces to print some of my favorite printed papers and elements.

You can see how my pages looked in PSE (below). I then printed them as an 8.5″ x 11″ sheet on my Canon Pixar printer using matte presentation paper.

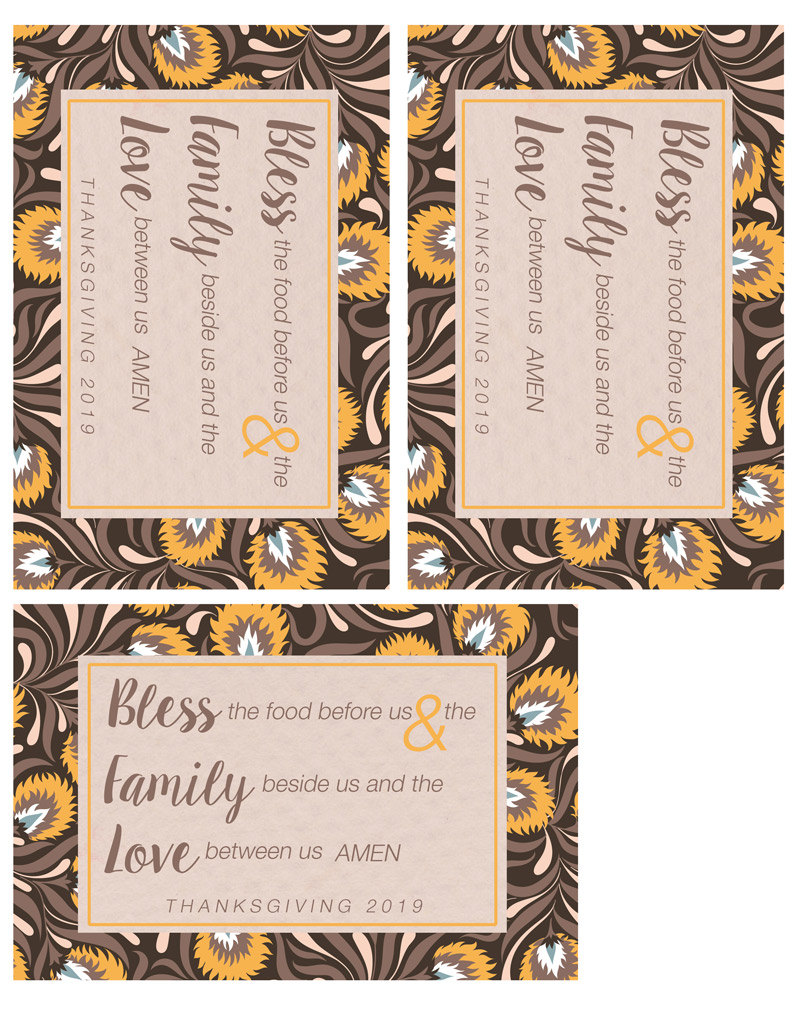
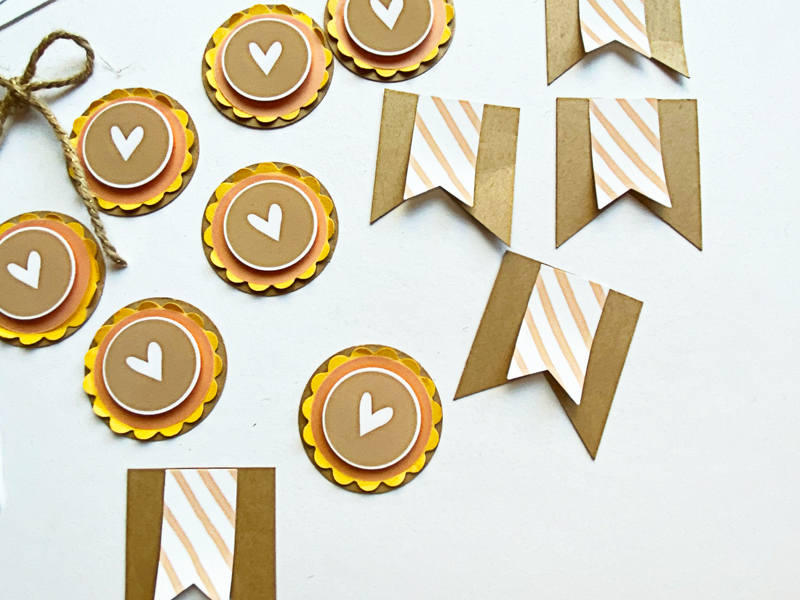
I also decided to add a simple blessing to the back side using more of the pattern papers. To do so, I just made a rectangle template inside the 4 x 6 card and added the solid paper… and then I typed in my words in PSE. I made a stroke around the inside rectangle, using one of the colors in the paper….I then cut and punched out all my cards and elements. I used different sizes of circle and banner punches with solid papers, patterned papers, and some vellum…


I basically played with the elements, putting the different shapes and sizes together until I got something I liked…

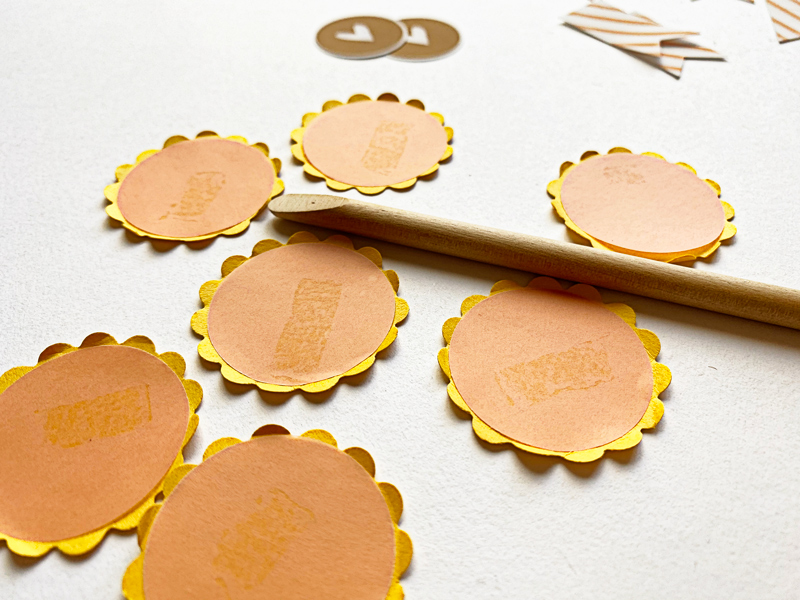
In using these layered embellishments, I was trying to give the cards some dimension… so I used a small tool and my fingers to “ruffle” the edges of one of the layers of paper in the flower, as shown here…

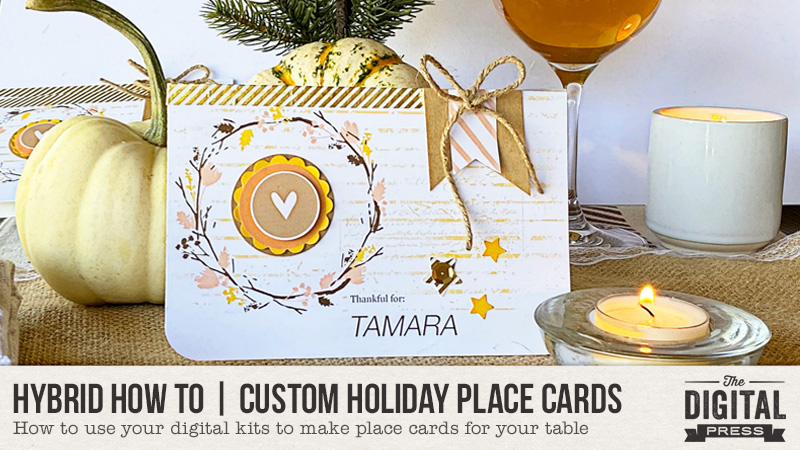
After securing everything on the front side with glue, tape and pop dots, I put the front and backs together. I secured them with a piece of scotch tape on the wrong side, and some pretty gold striped washi on the right side. Then I rounded the corners on the front of the card and attached a bow made out of string…

Then I cut out a few stars from my left over paper and found some sequins and glued them on the front for more interest and added dimension…

Here’s a look at the finished project on my table…

And that’s it! Super cute, and fun to make!

I hope I’ve inspired you to use your own digital products to make some holiday place cards! If you give this project a try, we would love to see pictures of your completed projects in the Hybrid Gallery at The Digital Press!

Happy crafting, everyone!


About the Author  KerriAnne is a homebody who resides in the desert southwest. She started scrapbooking when her kids were little, and hasn’t stopped despite the teenagers rolling their eyes and sticking out their tongues! When not scrapping or being a chauffeur, she can be found consuming large amounts of iced coffee.
Tutorial Tuesday | Digital Letter Boards

Hello, and welcome to another edition of our Tutorial Tuesday series here on The Digital Press blog! This week, I’m here to help you learn how to make a digital letter board image to use on your scrapbooking pages, thanks to our friends at Letterfolk.

Have you jumped on this trend and picked one of these up yet? The modernized-and-yet-vintage letter board of today is wildly popular and not likely going away any time soon. They are everywhere… and truth be told, they’re a lot of fun around our home. I have the Poet 10×10 size and enjoy adding quotes to it — both funny and sentimental. All the while, my kids watch to see what joke they can rearrange the letters into. It’s a fun way to decorate my home!

Now, with the help of this handy online tool at the Letterfolk web site, we can create digital letterboards to use on our scrapbook pages, as well (without the “help” from saucy teenagers).

It’s so easy! Let’s begin…

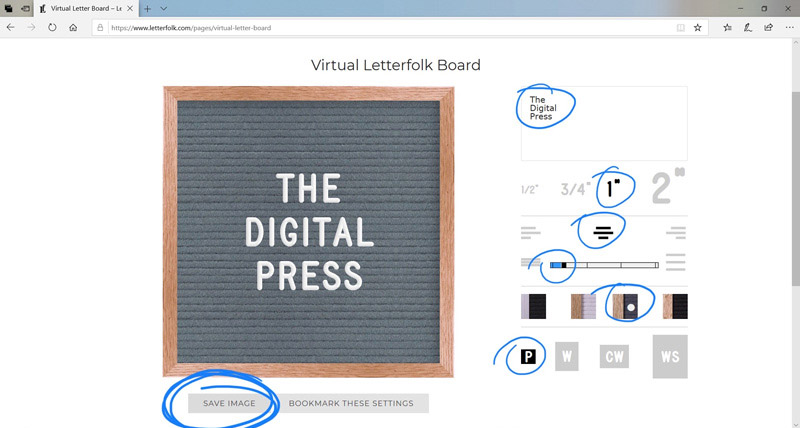
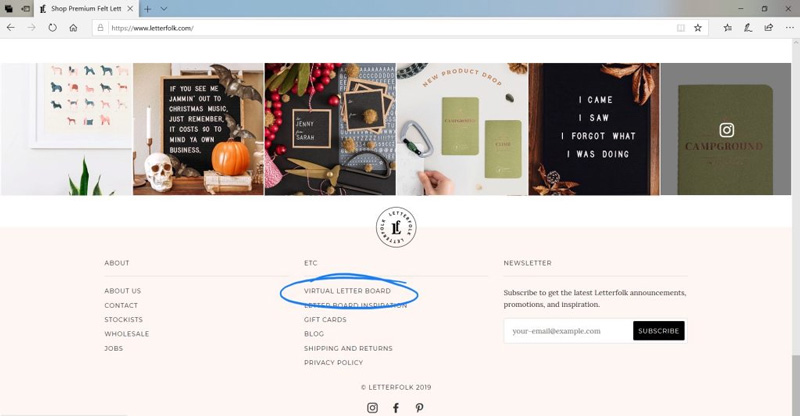
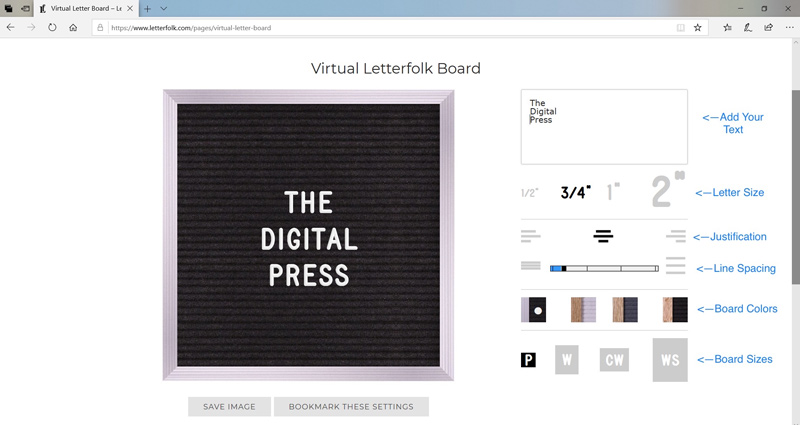
First, you will navigate your web browser to the Letterfolk website. Once there, scroll to the bottom of the page and click on the ‘virtual letter board‘ link…


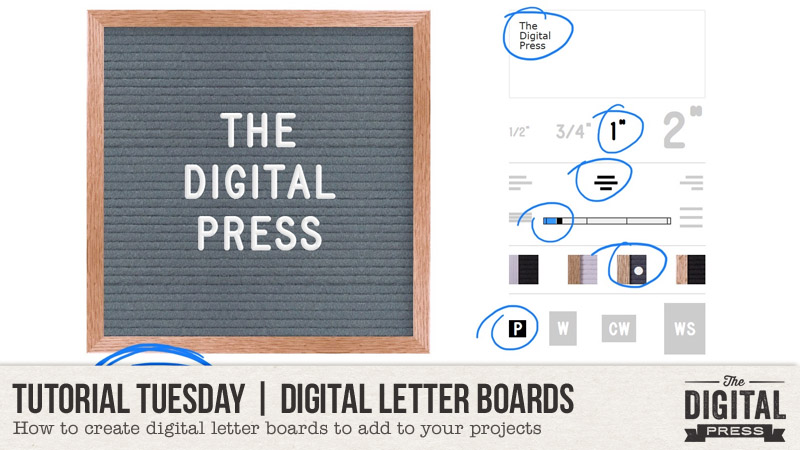
Next, it’s as simple as entering a few lines of text and clicking through the options to customize your board.

You can customize everything from letter size, to justification, to line spacing, to board colors, to board sizes. Be sure to look through all the possible combinations; it’s endless!


After you’ve fully customized your board, click on the ‘Save Image’ button at the bottom of the screen and navigate to the folder you wish to save to.


Once you have your image saved, you can add it to your projects. The PNG images save at 1600×1600 or 1600×1280 (i.e. about 2-3″ on a 12″x12″ page)… and so they will look great on digital pages!

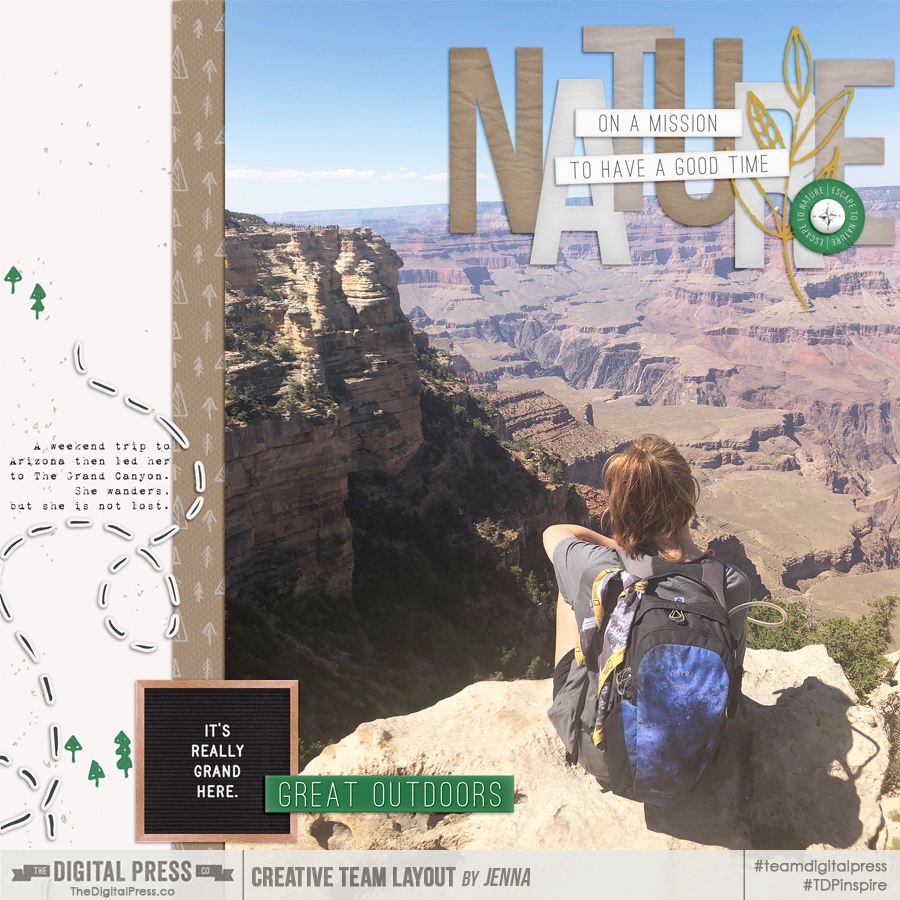
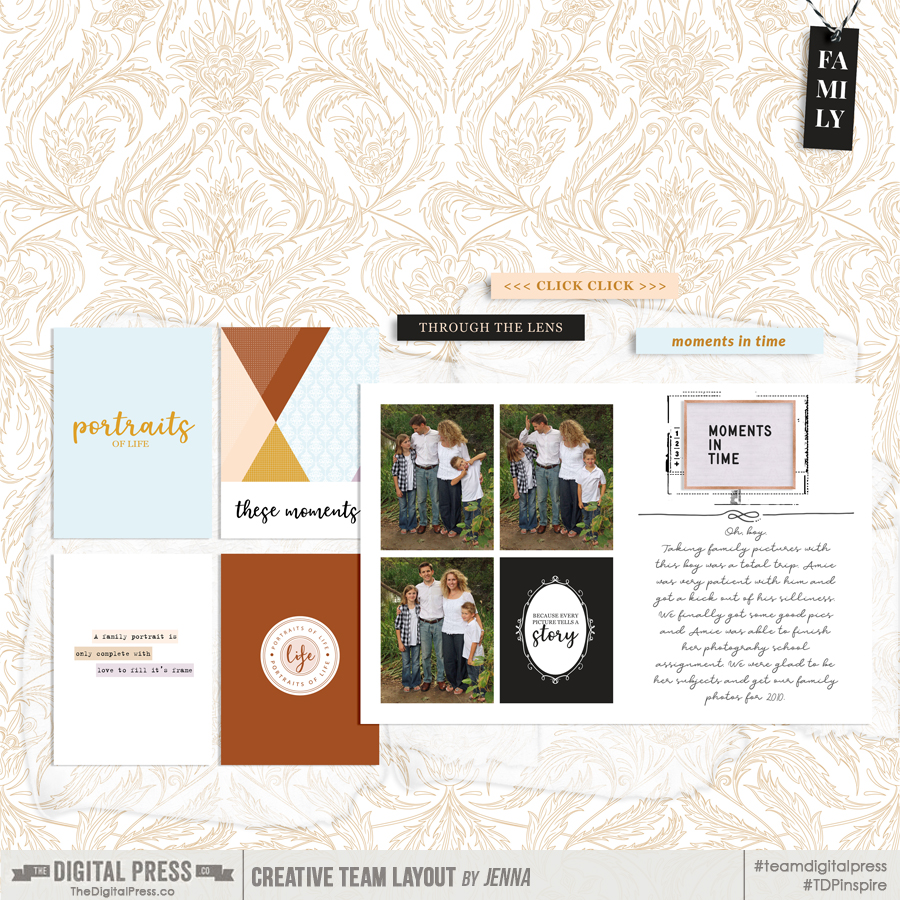
Here’s how I used these virtual letter boards on a couple of my pages…


If you’re not sure how to make one of these work for your pages, here are a few ideas…

  • Take a picture of your kid and use their funny quote on your letter board
  • Use a seasonal poem or quote along with some outdoor pictures
  • Don’t forget the first day of school and birthdays; add those special dates to the virtual letter board
  • Use song lyrics, bible verses, or a quote from your favorite author
  • Use it as a countdown image for an upcoming vacation, holiday, or special event
  • You can also search through Pinterest to find a lot of other great ideas, as well!

We hope you’ll give this fun process a try! We can’t wait to see what you come up with, and how you use your own digital letter boards on your own creations with TDP products to post in the gallery at TDP. Hop on “board” and we’ll see you there!


About the Author  Jenna is a traditional-scrapbooker-turned-hybrid-scrapbooker-turned-digital-scrapbooker-turned-app-scrapper. She’s made her way through each form of scrapbooking and loves them all, but for now her motto is KISS — “Keep it Simple, Sister!”  She mainly scraps on her iPad using a handful of apps, but the digital world often pulls her back in because there’s nothing like a good drop shadow. She prefers pocket-style scrapbooking, but isn’t one to shy away from an awesome template and a kit full of goodies.

Tutorial Tuesday | The Puppet Warp Tool

It’s Tuesday again! That means it’s time for another edition of our Tutorial Tuesday series here on The Digital Press blog! Today I want to share the tool that has changed my scrapping life – the Puppet Warp tool.  Ever used a piece of string, and the end is just on the wrong area of your photo? Or that beautiful piece of lace is just too straight for your liking? Using the Puppet Warp tool makes tweaking those gorgeous elements into exactly the shape you want a breeze!

Interested? Here’s how!

Step 1: Select the element you want to edit in the layers palette. In this case, I would like the green trim to curve instead of being so straight.

Step 2: In the menu panel, select Edit > Puppet Warp

Step 3: This should show a mesh over your element. If the mesh doesn’t show up, just tick the box in the middle of option bar next to “Show Mesh”

Step 4: Now you need to add pins to the areas you want to work with. Just click on the mesh where you want the pins to go.  When you start warping your element, the other pinned points will stay in position, with the rest of the element moving in relation to those points and the pin you’re moving.

Step 5: By moving the middle pin, I can create a curve in the trim. This curve is still to linear for my liking, so I want to delete the middle pin by right clicking and selecting Delete Pin.


Step 6: I then add two pins in the middle section and manipulate both these pins until I like the result. When I’m done warping, I just hit Enter to commit the changes. You can always change the outcome by double-clicking on the Puppet Warp filter in the layers palette.

And voila! I have a trim curved exactly the way I want it!

This is a super simple explanation of a very complex tool, but I’ve found that this is all I need in my digital scrapbooking process.  I hope you find the same joy that I have when I stumbled across the Puppet Warp tool.


ABOUT THE AUTHOR  Christelle is a creative team member at The Digital Press, happily creating for all of the talented designers. She’s originally from South Africa, and has recently relocated to the UK with her husband. She loves scrapping her 3 lovely step-children and 4 beautiful nieces and all of their (mis)adventures. If she could, she’d travel all the time, but for now she makes do with traveling as often as possible. Her other hobbies include machine embroidery and sewing, as well as reading soppy romance!


Hybrid How-To | Monster Banner

Hello, and welcome to another edition of our Hybrid How-To series here on The Digital Press blog! Today, I am so excited to be sharing my very first post with you after joining TDP’s team a few months ago — and with Halloween right around the corner, I thought I’d show you how to easily use your favorite digital supplies to create a fun Halloween banner.

I knew I wanted to make some cool, spooky, Halloween decor… and this project was actually so easy to complete, my 6 year old son helped me out (and then claimed the finished product for himself… which means I might have to make another one!).

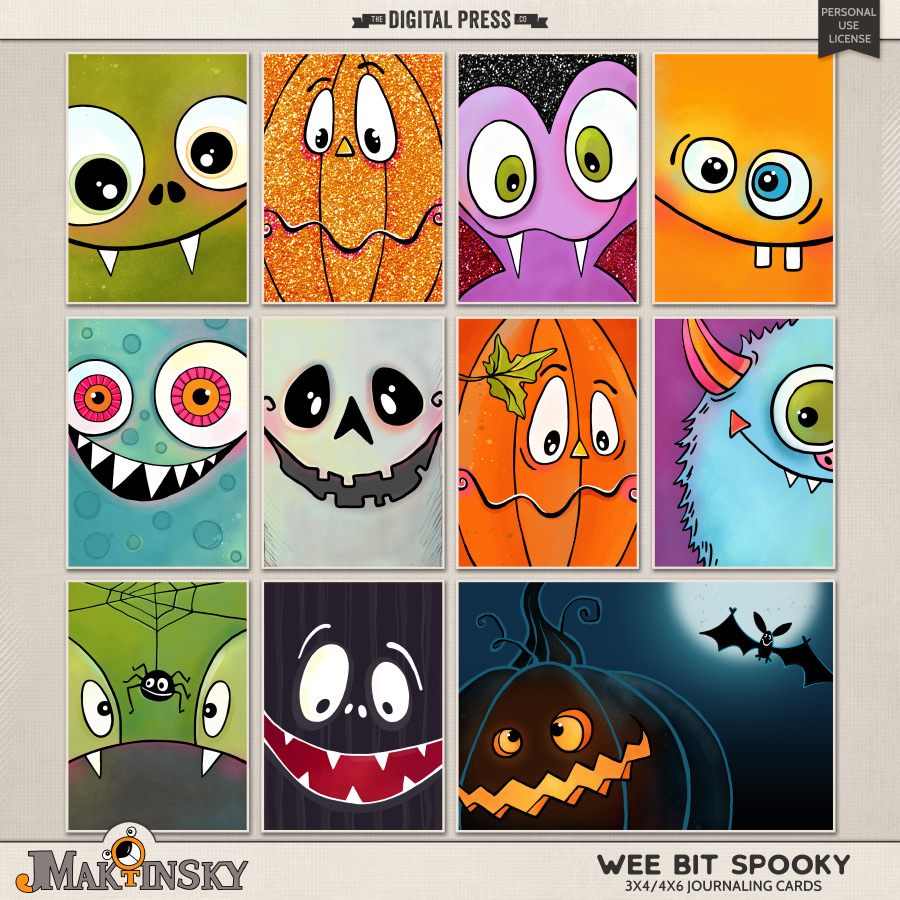
First, I found the artwork that I wanted to use in the shop at The Digital Press. I wanted a banner of monsters (cute ones though, not too scary!)… and I found the perfect product in Julia Makotinsky’s Wee Bit Spooky 3×4 Cards, shown here…

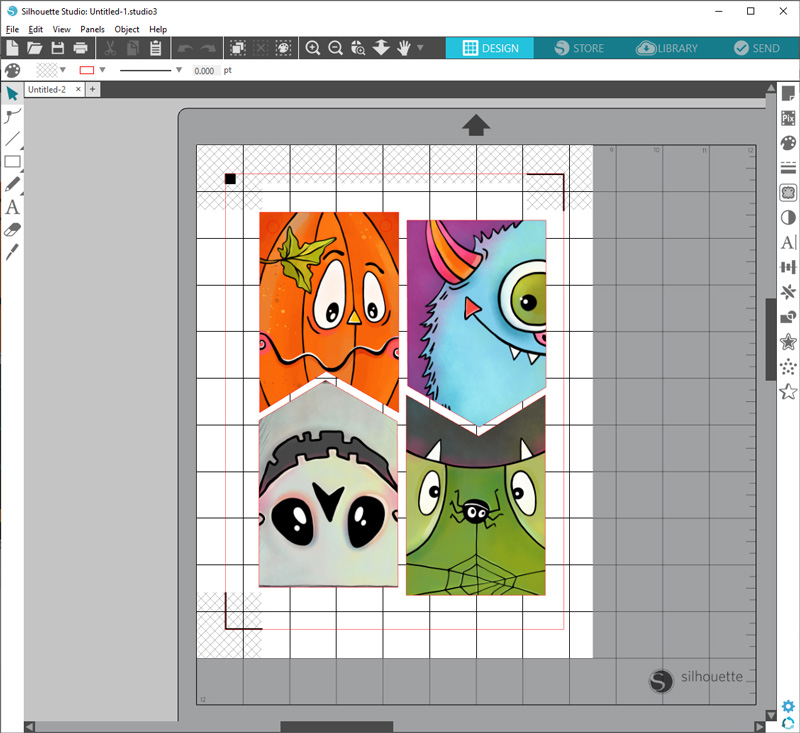
Next, I made 2 banner shapes in my Silhouette Studio software by simply altering the bottom of a 3×4 rectangle (see next image). Once I had my shapes the way I wanted them, I dragged the pocket card artwork from the folder and dropped it into the middle of each shape, as shown here…

*NOTE* You could definitely do this in a photo editing program like Photoshop (PS) or Photoshop Elements (PSE) using clipping masks — but — because I copied & pasted the bottom two shapes and simply turned them around to nest with the top ones, the Silhouette software automatically rotated the artwork for me so that the monsters were facing the right way. This is why I didn’t do it in Photoshop with a mask; I would have had to manually rotate them! Instead, Silhouette Studio did the work for me — but it would certainly be easy enough to use another program, too.

Next, I printed them with registration marks so that I could print and cut, but once they were out of the printer my son wanted to cut them out, so I actually ended up giving him half of them and a pair of scissors… and just cut the rest out myself.

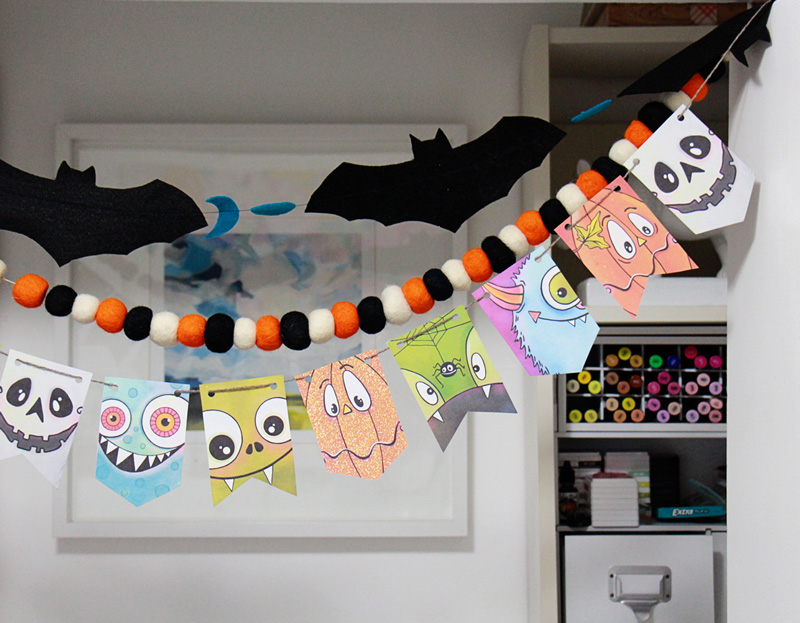
Once they were all cut out, I used my WRMK hole punch to punch a 1/4″ hole in each top corner (see next image)… and then we carefully strung them onto some yarn to hang up with our other Halloween garlands…

You can see from the close up image, above, that I strung them onto the yarn in opposite ways (some from back-to-front… and others from front-to-back). This helps them stay in place a little better, and they don’t end up in a bunch at the bottom of the string because each one will stop the next one from sliding down the whole string.

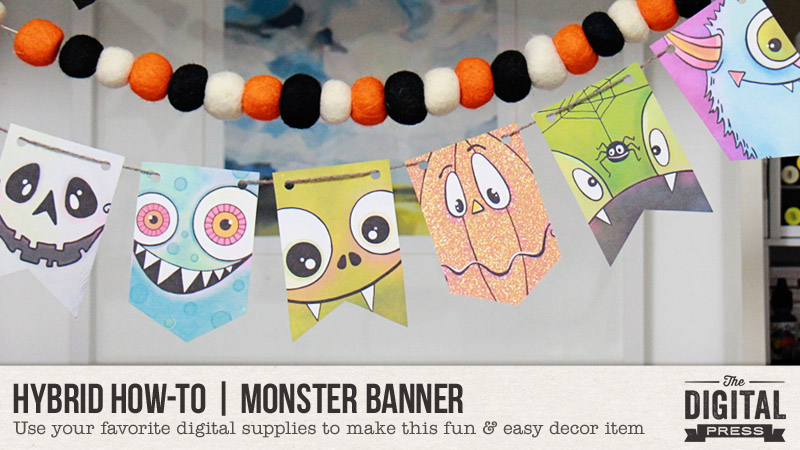
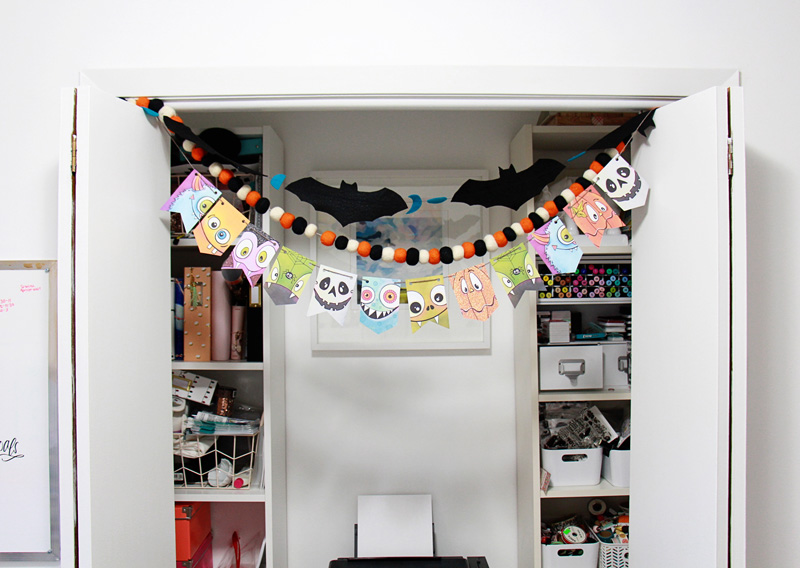
Here’s a look at my finished project, decorating my crafty office space…

I hope this inspires you to create one of your own for some holiday decorating this weekend! I know excitement for Halloween is very high in my house right now, and this was a really fun and easy project to do with my child!

Thanks for checking it out!


About the Author Amy Jo Vanden Brink is a Canadian mom, wife, music teacher, and scrapbooker who always takes on too many projects and loves to craft.  She is terrible at baking cookies, but great at eating them… and loves having a clean house, but hates cleaning the house! She lives in Edmonton with her husband, her son, and their pup Farley.


Tutorial Tuesday | Syncing Mobile Photos

Hello, and welcome to another edition of our Tutorial Tuesday series here on The Digital Press blog! This week, I’m here to help you learn how to easily get all of the photos off your mobile phone and stored safely so you don’t lose any of your precious memories!

Anyone who has ever received that awful warning message on your phone, telling you to delete photos from your device in order to make space before you could take any new photos… knows how important it is to get your photos safely off your phone and saved somewhere more permanent/secure.

Remember when we had to actually plug in / connect our phone to our computer or laptop & open the folders to drag/drop photos?! Soooooo tedious! I literally remember the moment I set up my lightroom app to sync DIRECTLY to my external hard drive (EHD)… and how LIFE CHANGING it was for me (and my workflow).

Let’s face it… most people these days are mainly using their phones to take photos; the cameras on these things are just amazing! If you’re like me and take a lot of pictures, then there’s no amount of device storage on the phone itself that can handle my photo addiction!


LIGHTROOM

Many of us digi-scrappers who use Photoshop CC have the “Photography Plan” for $9.99 a month. Did you know that in addition to Photoshop CC… that plan also includes Lightroom? (both the cloud-based app & the Lightroom Classic desktop-focused app). The wonderful thing about Lightroom is that not only is it amazing photo editing software… but it’s also an organizational work horse! I know many scrappers who use it as their primary photo organization source. And while I won’t be delving into that aspect of the software here today… I will say that when I discovered the Lightroom mobile app syncs with the Lightroom desktop software — my mind was blown! Not only does it sync with the software, but it will send photos to wherever you tell it to send the files (in my case, that means sending them directly to my EHD)! And the crazy thing is that it’s SO easy to set up!

First, you’ll want to open up your Lightroom Classic software on your computer (the desktop app logo that is light blue, as shown here)…

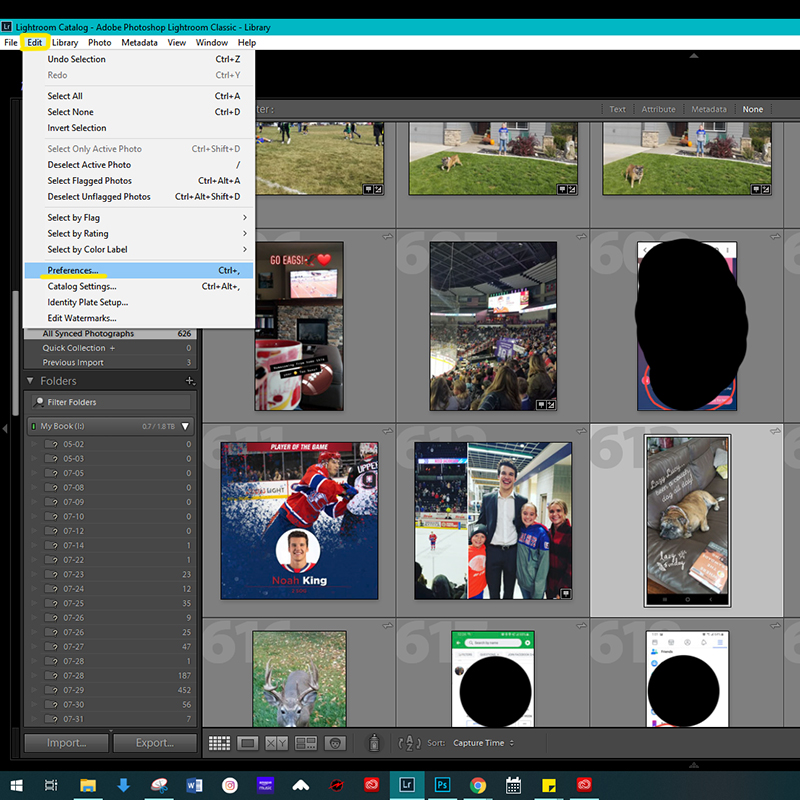
Next you’ll click on the EDIT tab, then Preferences

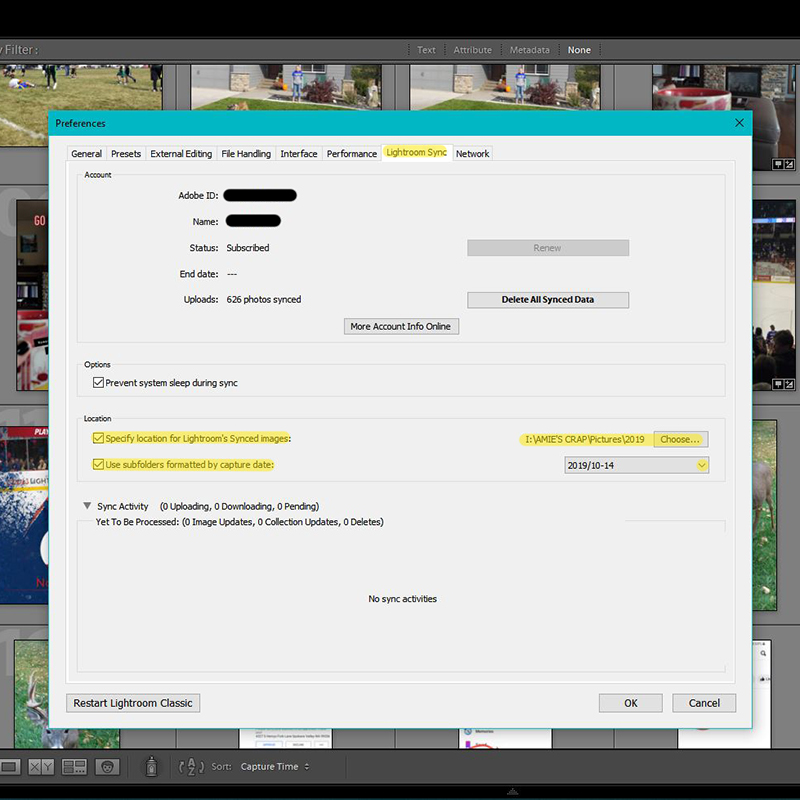
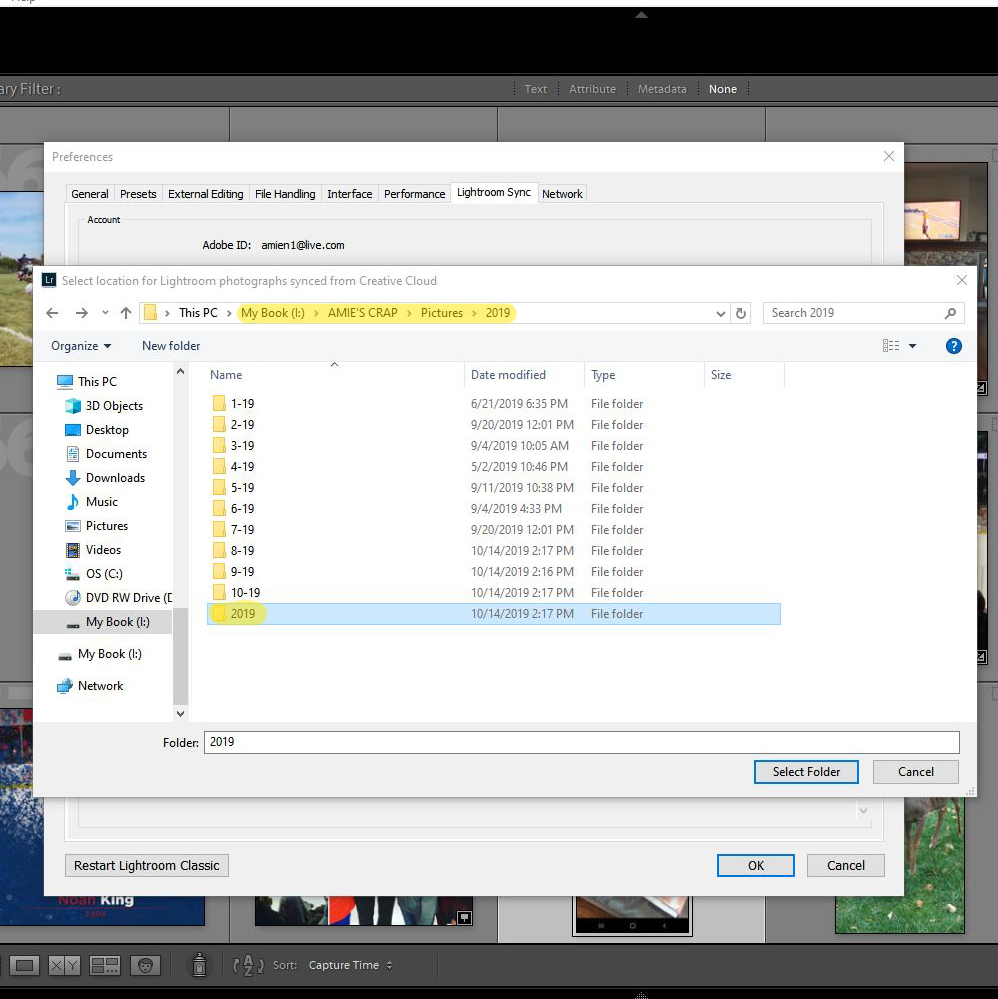
A window with all kinds of information will come up. Select the Lightroom Sync tab. You’ll want to check the box that says “Specify location for Lightroom’s Synced Images:” and then open the Choose button to select the folder you want your synced images to go into.

I also recommend you check the box to use subfolders, which will separate your photos by date (you can choose how your date folders are formatted with the dropdown menu, as well!)…

For my photos, I have them synced to a folder for the current year in my “PICTURES” folder on my EHD. Occasionally, I’ll go in & delete duplicates or random screenshots that I do not need to keep, & organize everything by month (not mandatory, but helpful)…

After doing that, you’re done with the Lightroom desktop set-up. From your mobile phone, now, you need to download the Lightroom app (the one that has rounded corners & is bright cyan, as shown here)…

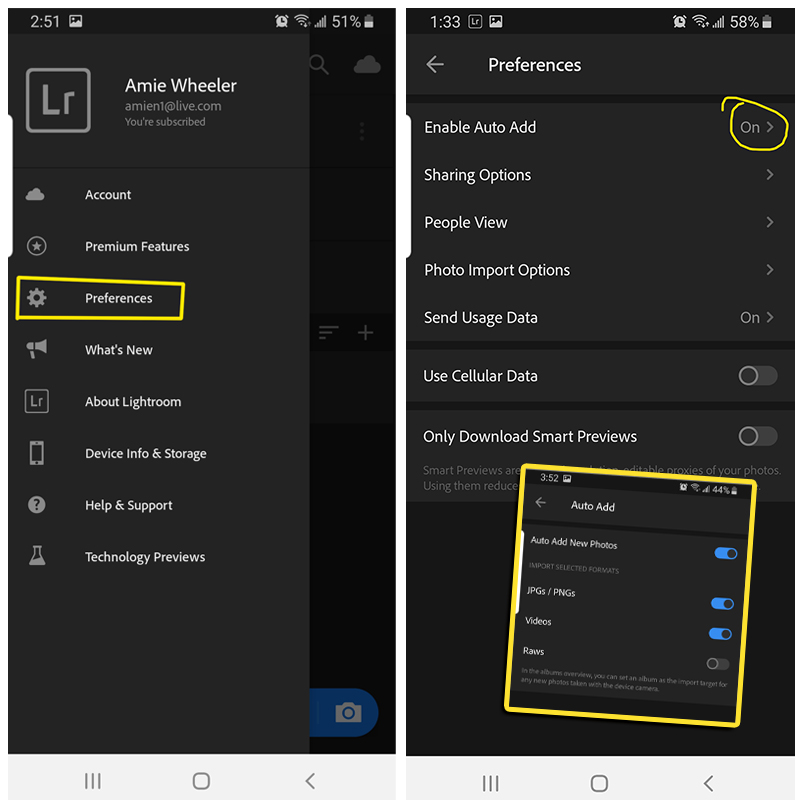
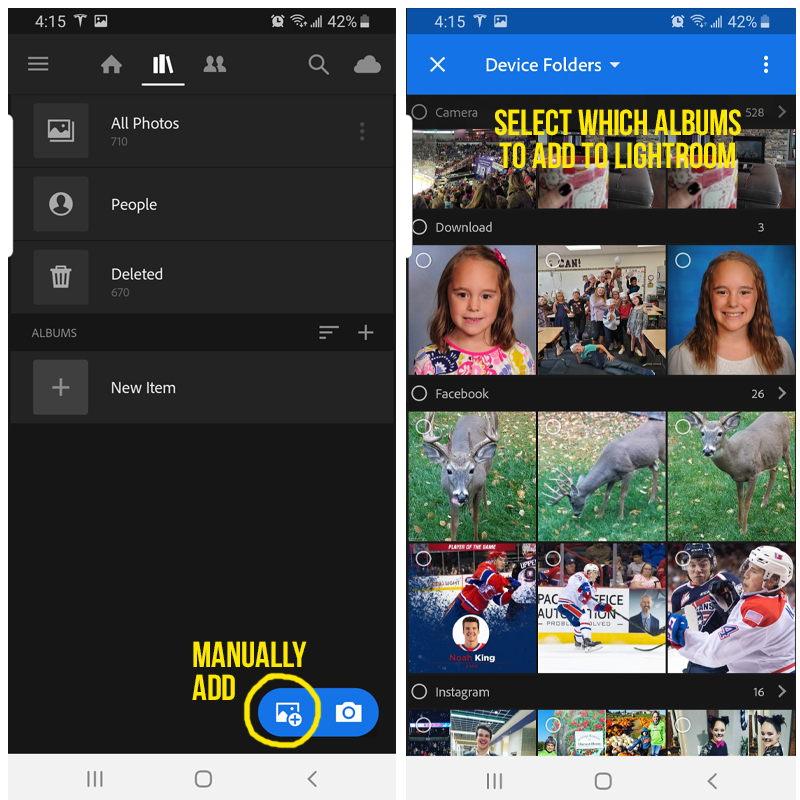
After you’ve logged in, at the home screen, you’ll want to click on the 3 horizontal lines (hamburger) on the UL side. Select Preferences. From this menu you can choose how you want your photos added & which albums to sync. I have my “AUTO ADD” turned on, then through that menu you can select which types of photos you want Lightroom to auto add to the app. I have everything except RAW photos added.

You do NOT have to have auto-add turned on. You can manually add photos to Lightroom, instead, by selecting the picture +  and then selecting which folders/albums to add.

Once your photos are added to the Lightroom mobile app… as soon as you open your desktop Lightroom classic app, your photos will sync! How cool is that?!

I typically open my Lightroom & Photoshop CC app on my desktop together at least every few days. All my photos seamlessly go where I’ve told them to go! Lightroom listens better than my kids! 😀


GOOGLE PHOTOS

The second app that is pretty crucial to my workflow is Google Photos. You may remember that at the beginning of the month, our resident App Scrapper — Sean — dove deep into Google Photos here on The Digital Press blog, & shared some great tips/tricks HERE.

I use Google Photos similarly, and the search function & ability to tag people are my favorites! The one thing that I also love about Google Photos, which he didn’t touch on in his post, was “Sharing” photos. I have my Google Photos account set up so that not only do MY mobile phone photos sync to my Google Photos, but also my husband & daughter’s phones/gmail accounts too! I love that I get my hubby’s pics, too — which are sometimes taken by me when his phone is handier than mine… and I also love that ALL of my daughter’s photos sync to me, as well… so it’s another level of monitoring what she’s taking pics of (all 42 billion pics of our dog… but I digress).

Within the app, under the main menu, select settings and then Shared Libraries. There, you can add gmail addresses for those who also use Google Photos. I also have my account set up to automatically sync (again taking one less step out of my to-do list!).

On my desktop, it’s super easy to download directly from the website. Also, when making QR codes for my layouts (of either videos or albums where there are just TOO many photos to scrap), I always link to my Google Photo account — much easier than uploading to YouTube, etc.


AMAZON PHOTOS

Last but not least, if you are an Amazon Prime customer, you are also eligible for Amazon Photos. Amazon Photos is another great way to back-up and share your personal photos with your friends and family. The company offers free, unlimited photo storage (at full resolution) to its Amazon Prime customers. Members get an additional 5GB of storage for videos and other documents or files.

I use this app not only as a backup, but also for the Family Vault.  Amazon Prime subscribers in the US can invite up to 5 family members and friends to access & contribute their entire catalog of pictures and videos with Amazon’s Family Vault.

To do this, you click on your name with the drop down menu and then select the Family Vault. From that menu, you can send invites to your friends/family. Right now, I just have my Mom & Sister contribute their mobile pictures… and it’s so nice to have instant access to them for scrapping! From the Amazon Photos website, you can download any mobile photos directly to your computer.

Remember that issue, from the beginning of this post, about memory/space on our devices? Well, after the 3 apps I just referenced have synced my photos… I am able to DELETE ALL PHOTOS FROM MY PHONE!  Once those photos are safely stored away in the cloud and/or on my EHD… the different apps ensure that I still have access to the photos online if I need to re-download &/or if I’m not at my desktop where they reside on my EHD.

It’s such a time saver to have all this happen automatically in the background! I also have piece of mind that my photos are backed up in multiple locations just in case something happens to my phone. The apps discussed above are just a few of my favorites for accomplishing this… but I imagine there many more out there that do awesome stuff, too! I encourage you to try to get those thousands of pics off your phone & free up some storage!


About the Author  Amie is a craft-loving dental hygienist who lives in Washington state. She loves her husband, her two crazy kids, and her English Bulldog… as well as coffee, baking cupcakes, daffodils, glitter & sprinkles, reading a good book, and lip gloss — not necessarily in that order.