In last month’s “Better in Black and White” tutorial, I gave some tips on how to take better black and white photos. For those who missed it, the tutorial can be found here.
This month, I will focus on converting your coloured photos to black and white. You are probably thinking –“Well isn’t black and white just desaturated colour?” Yes it is, but if you use desaturate, or any of the other one click conversions in your photo editing software, you will get a black and white photo that is usually flat. For the photo to pop, you need to work just a little harder. 😉 A photo edited for colour rarely looks good just desaturated to black and white.
For example, the following photo of my partner was taken at the beach last week. As you can see just desaturating the photo or changing to grayscale has created a flat image. The last image uses one of my favourite conversion methods and the one I will be demonstrating today.

Converting to Black and White using Adjustment Layer and Colour Luminosity
(My screenshots are from Photoshop but most photo editing programs will allow you to convert using this method.)
- Open your colour photo in Photoshop and modify as required so that it is appealing to the eye. (This may require brightness or contrast modifications, etc.)
- Create a new black and white adjustment layer. (Layer/New Adjustment Layer/Black and White)
- Now comes the fun part – changing the luminosity of the original colours. Move the individual colour sliders to the left or right until you get an image that you are happy with. There is no right or wrong, just individual preferences.
In the previous photo, my aim was to blow out the background so that I would have a photo that could be easily blended into a background paper. These are the adjustments that I made:

Let’s look at some more image conversions and the changes made to the colour luminosity.
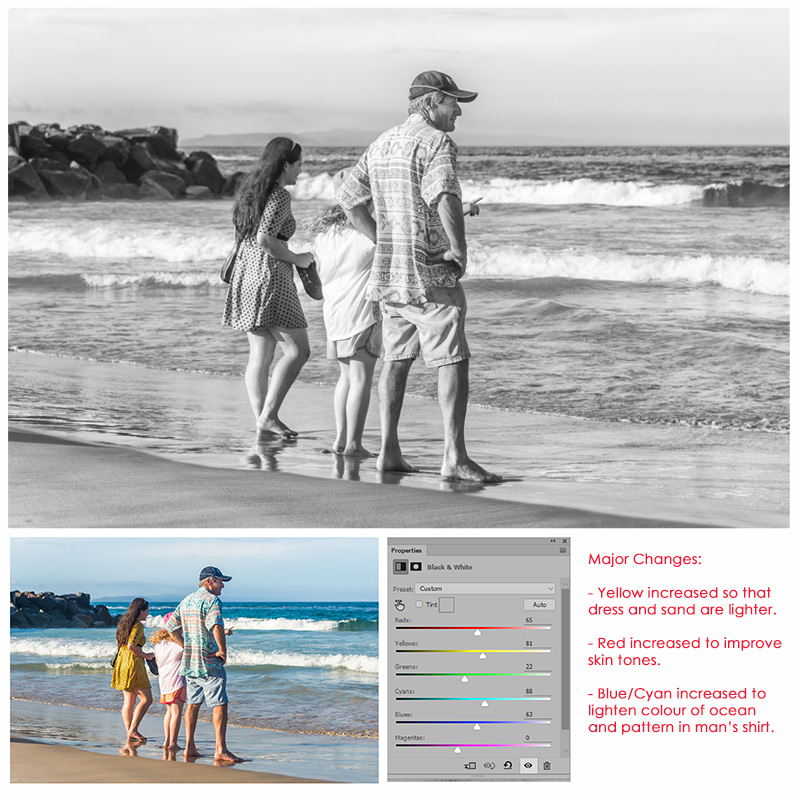
- This family photo was taken at the beach. I like the photo but wanted less contrasting colour.

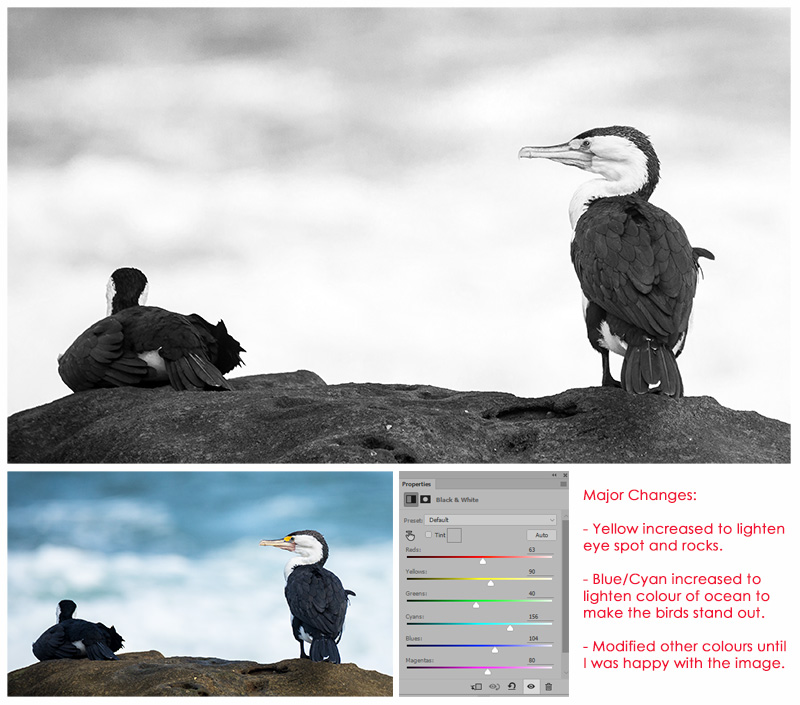
2. I took this photo of Pied Cormorants last week. I love the conversion which shows great detail in the feathers.

3. This photo of my darling Zsazsa did not look good in colour and was saved by the conversion to black and white. Yes sometimes you can save a photo by converting. 🙂

As a final step, I will often alter the brightness and contrast slightly before flattening the image and saving it as a separate file to the original. (You may need that original in the future).
As you can see this is an easy way to have better control when converting images to black and white. Please have fun trying out this technique. I’d love to see what you can do, so definitely feel free to link me up to any of your photos in the comments below.
![]() About the author Carolyn lives with her partner, eldest daughter and 3 rescue dogs on 5 acres of paradise in the hinterland of the Sunshine Coast, Australia. Her camera, along with an assortment of lenses, is never out of sight. When not taking photos, she loves cooking and gardening and of course scrapbooking.
About the author Carolyn lives with her partner, eldest daughter and 3 rescue dogs on 5 acres of paradise in the hinterland of the Sunshine Coast, Australia. Her camera, along with an assortment of lenses, is never out of sight. When not taking photos, she loves cooking and gardening and of course scrapbooking.

Thank you for this tutorial. I will play with some pictures. I find it can really help with older photos that resist color correction. The one of your dog is a dramatic save. And I hadn’t thought of flowing out the sky to help it blend better.
Fantastic Tutorial, lots of great info and very easy to follow. Thanks so much!!
Thank you for this tutorial! I forgot about saving a picture in b & w!